

Chatbot
Chatbots are designed for channels where agents and customers communicate via text or formatted text, examples would be official websites, independent stores, Whatsapp and Amazon E-commerce. Can be used to replace agents by handling common inquiries and providing guidance. They also have the capability to create tickets or transfer conversations to agents based on customer requests. Navigate to AI Center > Bot Platform > New button.
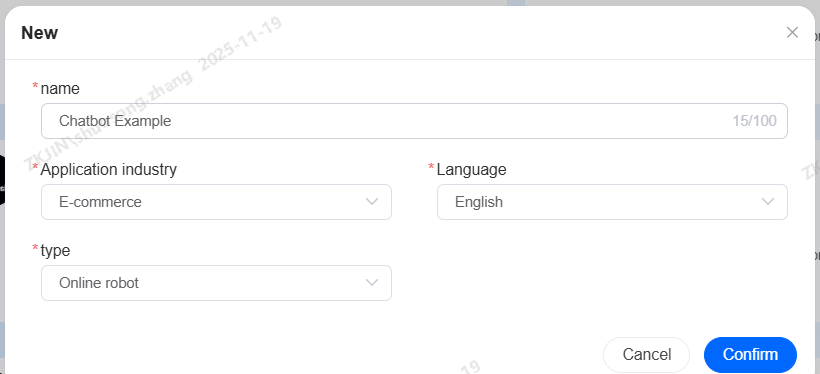
You can create bots for specific industries and languages. To set up a chatbot, follow the illustrated process. Select its primary language, and enable multi-language dialogue capability in the settings if needed.
1.Chatbot (NLP)
After creating a chatbot, if the business scenario is relatively simple which requires only single or multi-turn dialogues, answering questions based on Document Q&A, and recognizing customer intents, NLP-mode can be used without enabling LLM capabilities.
In a chatbot, LLM capabilities are used in two areas:
-
The Agent Node within the task flow
-
Document Q&A in the Knowledge Base
These two functions utilize LLM's conversational and document processing abilities.
1.1 Q&A Knowledge Base
Chatbot must learn from a sufficient set of example dialogues to accurately answer customer questions. This can be done by building and maintaining a Q&A Knowledge Base with relevant Q&As.
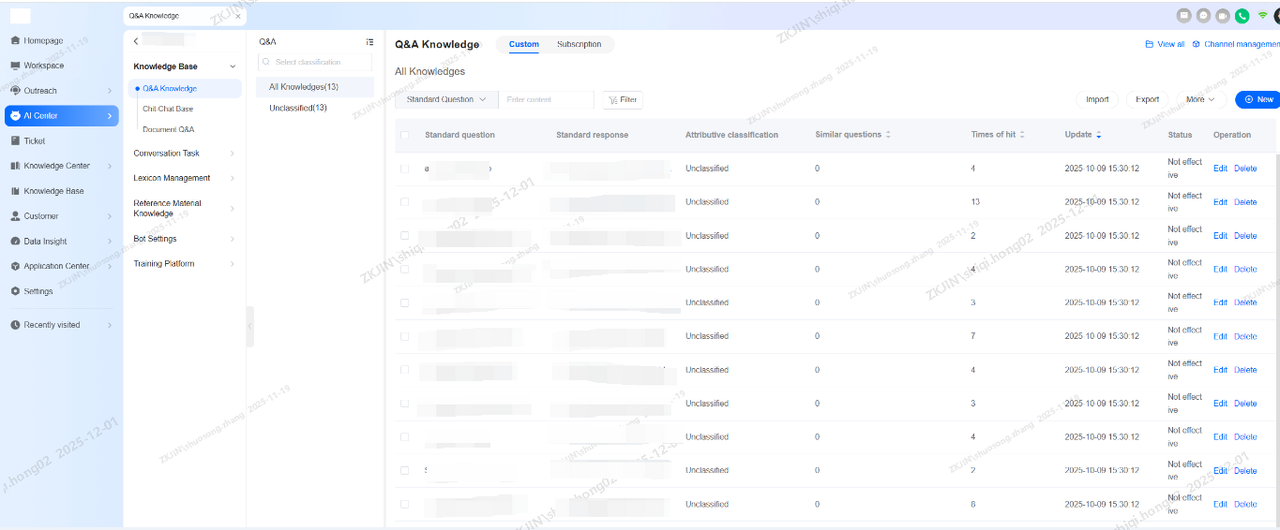
When adding a question, you must define the standard question, provide similar questions, and the reply/answer (which can be text or formatted media like video). The system's built-in AI can automatically generate similar questions for you.
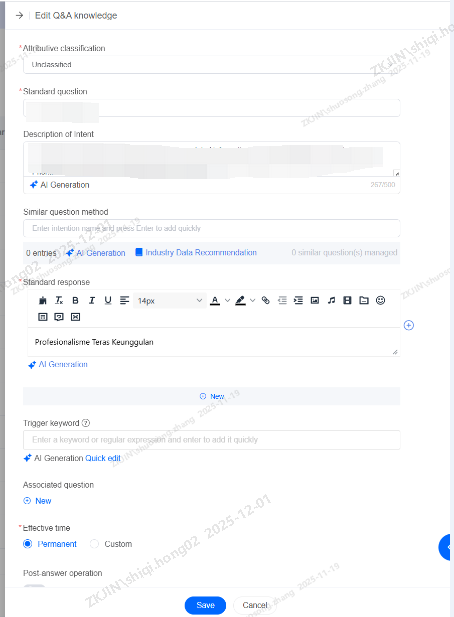
Once a sufficient Q&A Library is created, the chatbot can identify and respond to customer questions. If a query doesn't match any Q&A content, the bot will follow its Guiding Prompt.
1.2 Task Intent
During a conversation, customers may express themselves in diverse ways. To improve the bot's accuracy in identifying customer intent, you must configure Task Intent.
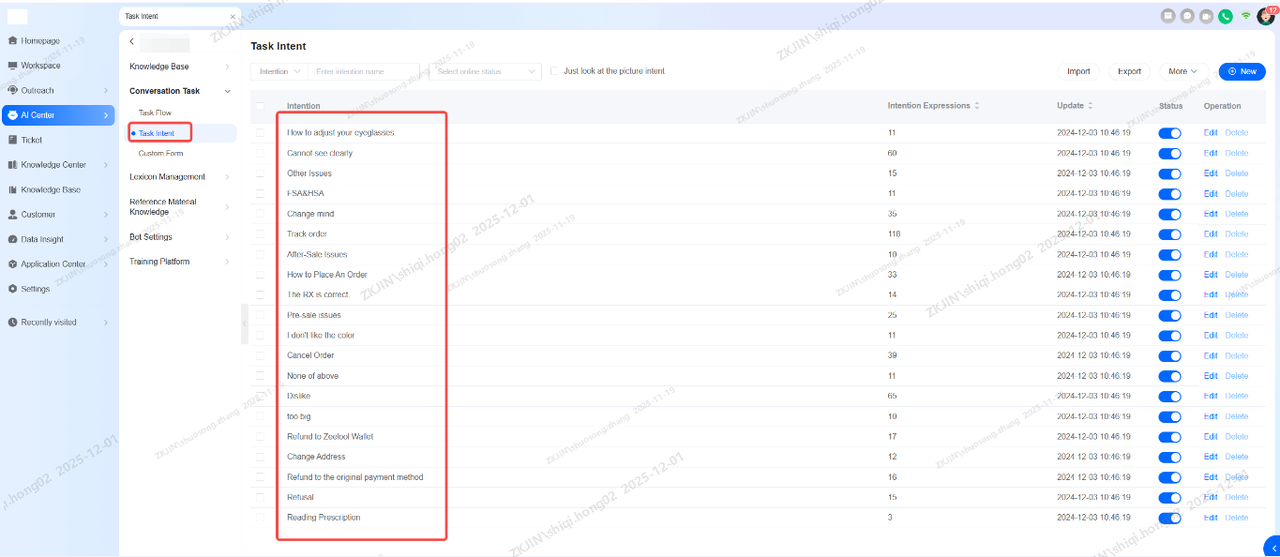
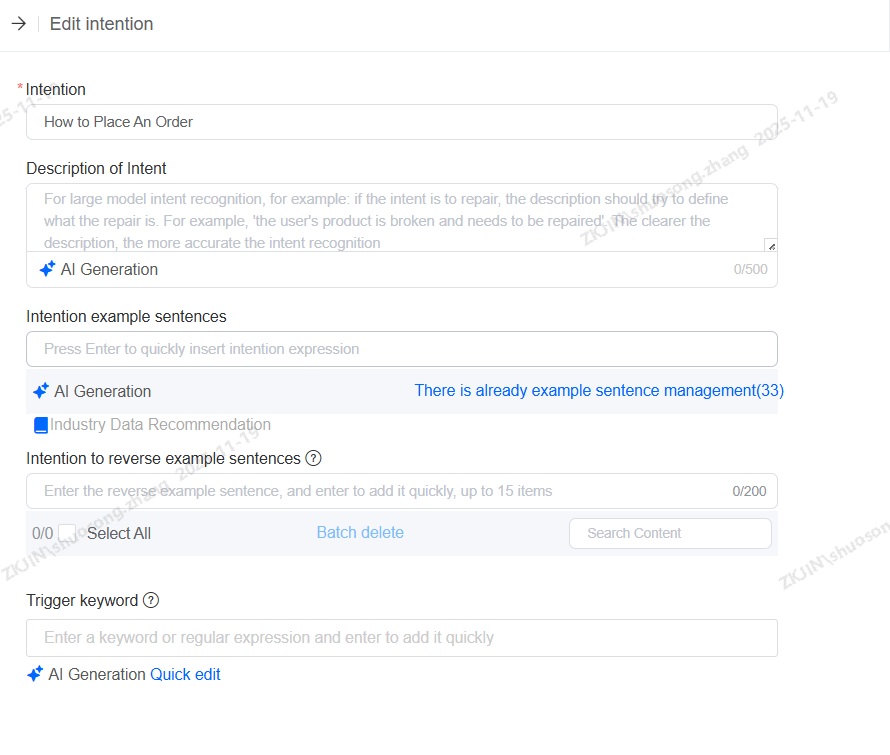
You can also provide sample expressions and trigger keywords for each task intent. This will significantly increase the bots accuracy in identifying customer's intent. The intent management interface also allows you to use built-in AI to automatically generate and expand these expressions.
1.3 Task Flow
When a conversation requires a multi-step process such as after-sales scenario where it must collect order number, product name, purchase date, error code, and issue description to generate a ticket, you need to configure and maintain Task Flow.
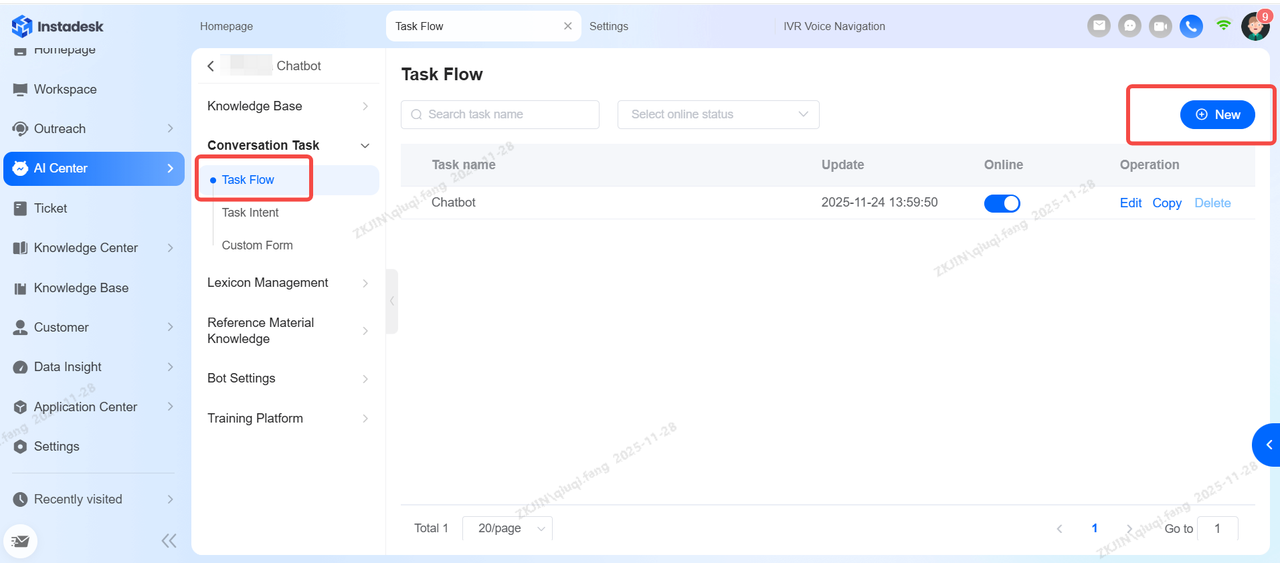
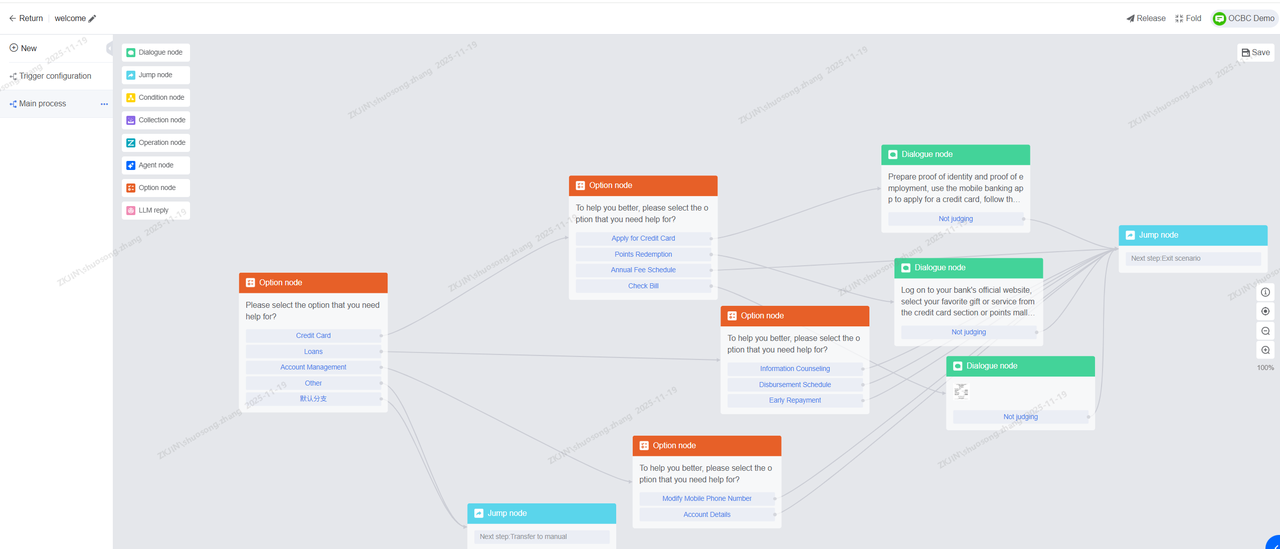
Once you create a task flow, you can configure different nodes in the canvas. Each node has different capabilities, which can be configured according to your needs.
-
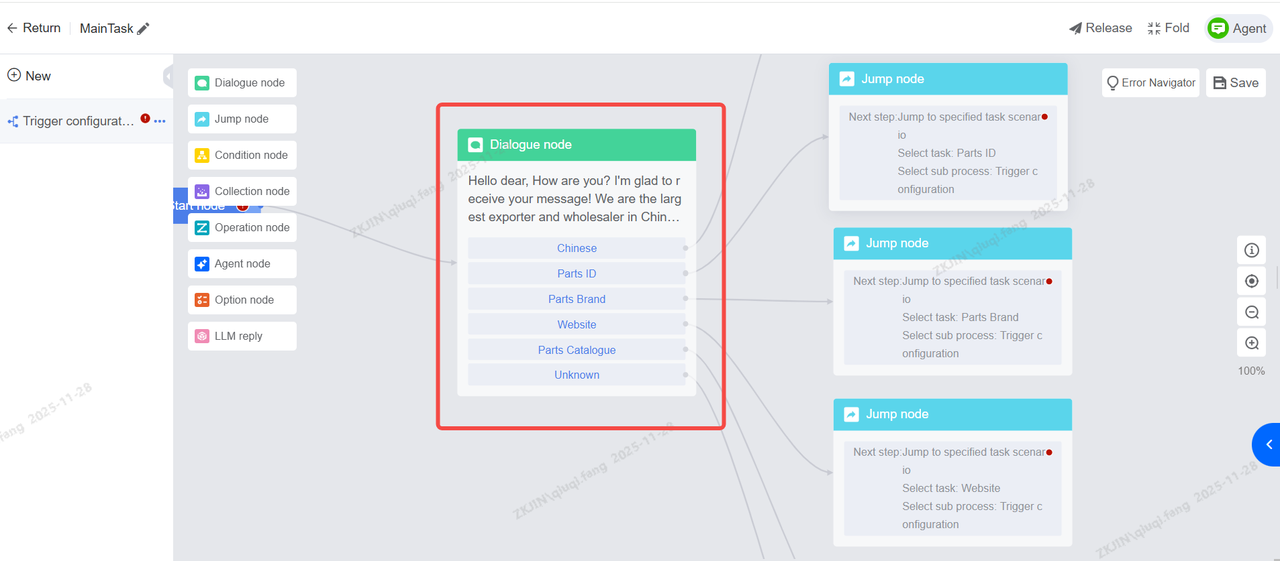
Dialogue Node: Manages text output to the user, aimed at guiding the user to fill in a specific entity or obtain certain key information. Allowing the bot to recognize different intention.
-
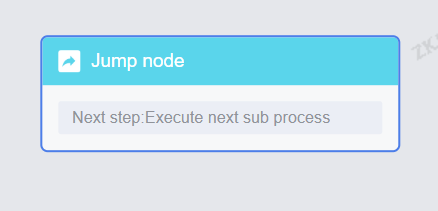
Jump Node: Controls the flow by redirecting the conversation to another specified node, enabling branching paths.
-
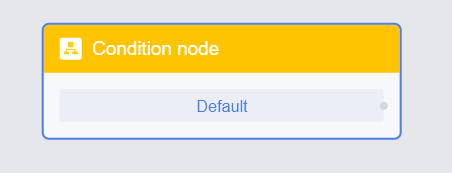
Condition Node: Evaluates specific criteria (e.g., variables, user progress) to determine which path or option becomes available, enabling dynamic content.
-
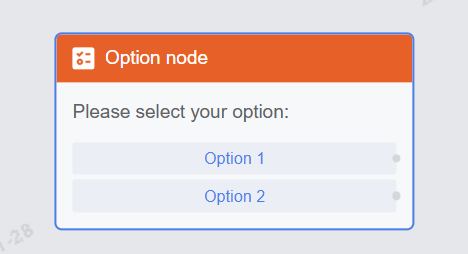
Option Node: Presents the user with multiple choices or responses, allowing them to select and influence the direction of the dialogue.
-
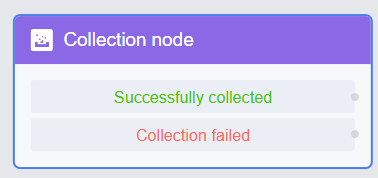
Collection Node: Extract key information from the conversation according to established rules.
-
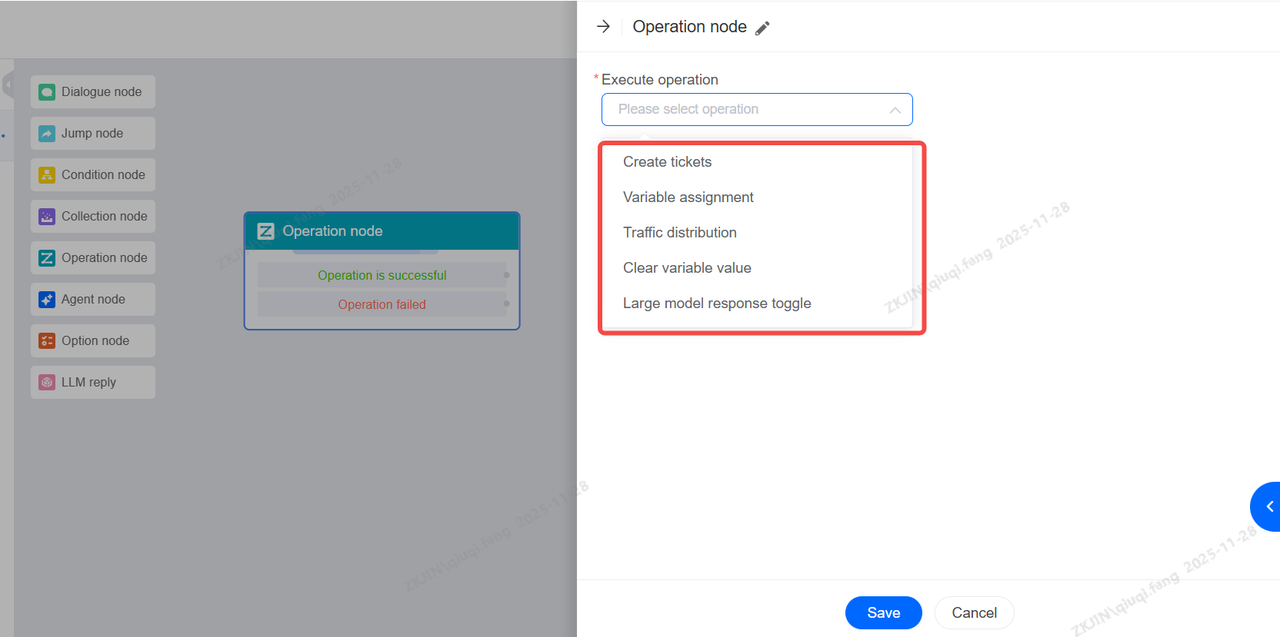
Operation Node: Perform operational actions at certain process nodes, such as creating a ticket, variable assignment, retrieving document answers, allocating traffic without direct user interaction.
1.4 Guiding Prompt
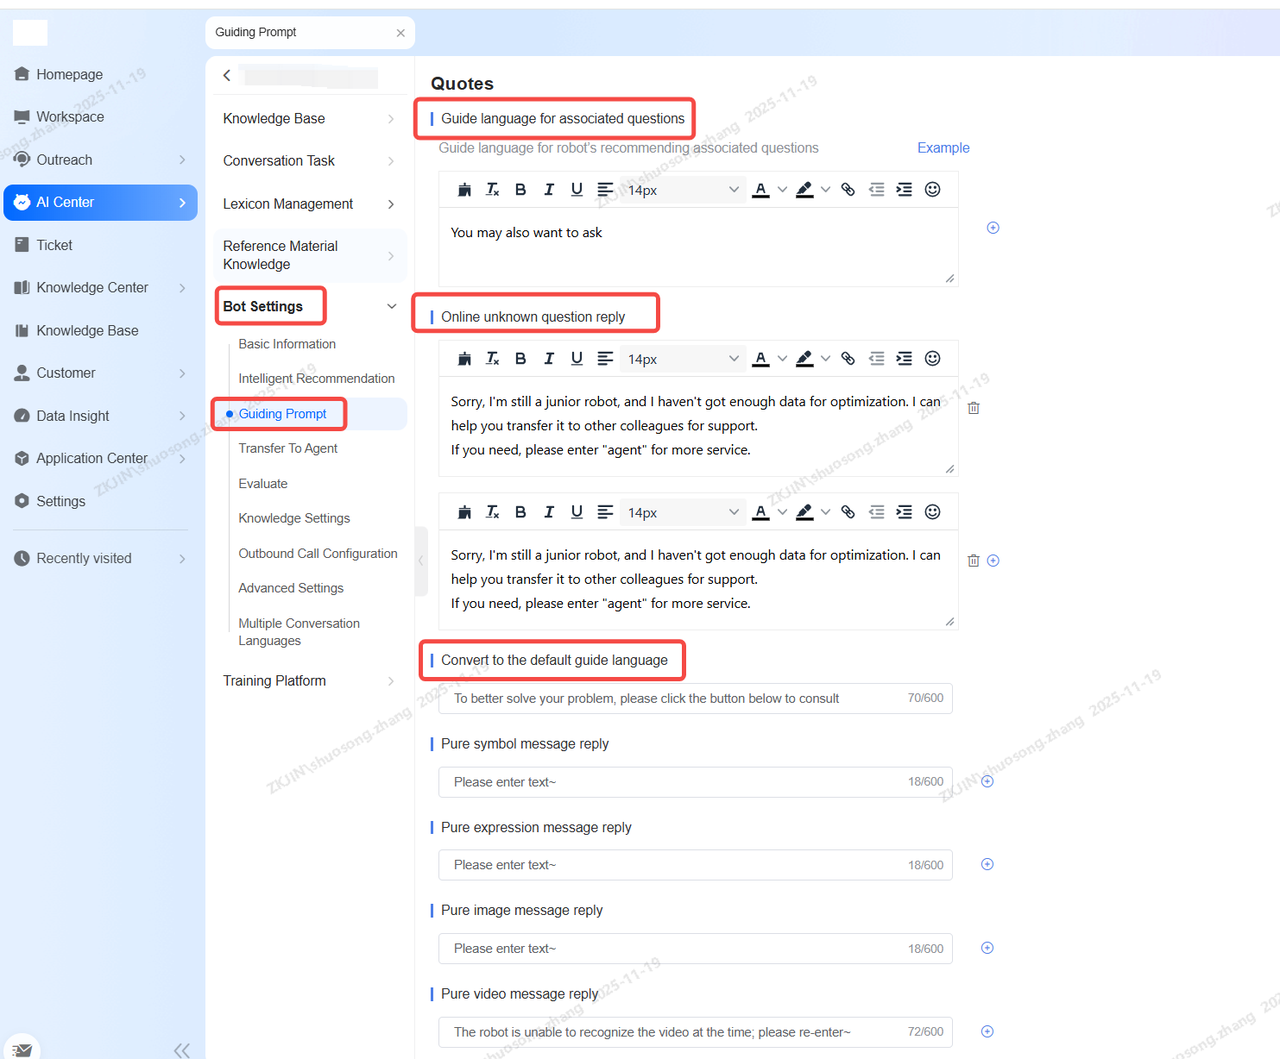
Guiding s are a critical component of the chatbot setup. They serve as a fallback mechanism, allowing you to configure s for recommending related questions, handling unknown inquiries, and transferring to a human agent, among other functions.
1.5 Transfer to Agent
When a chatbot cannot answer a customer's question or the customer is dissatisfied with the interaction, it should ly transfer the chat to agent. The bot includes specific configurations and triggers to allow this transfer, either automatically or via a customer-entered keyword.
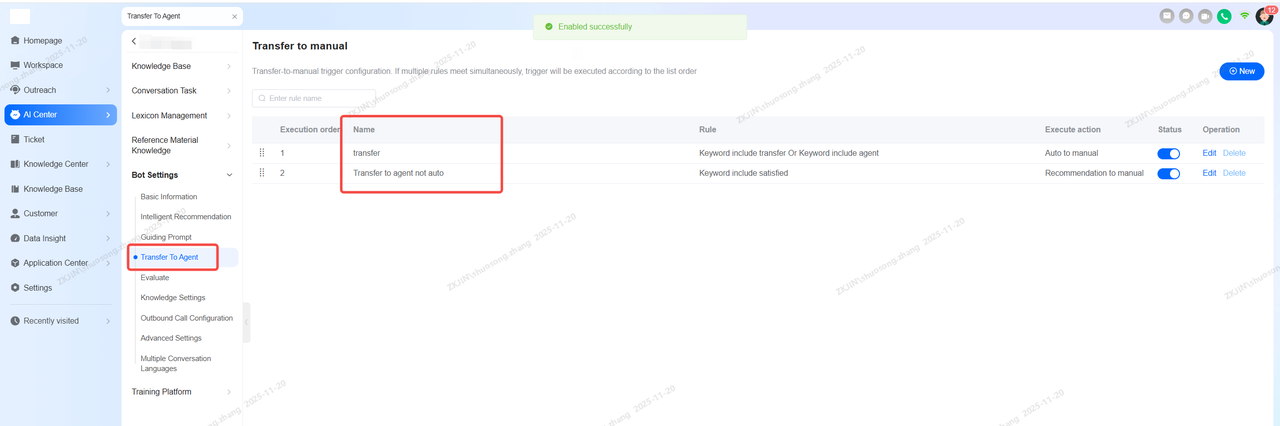
There are two ways to transfer to an agent:
-
Automatic Transfer: The system directly assigns an agent to take over the chat once a trigger condition is met.
-
Recommend Transfer: The system suggests transferring to an agent, allowing the customer to choose whether to proceed.
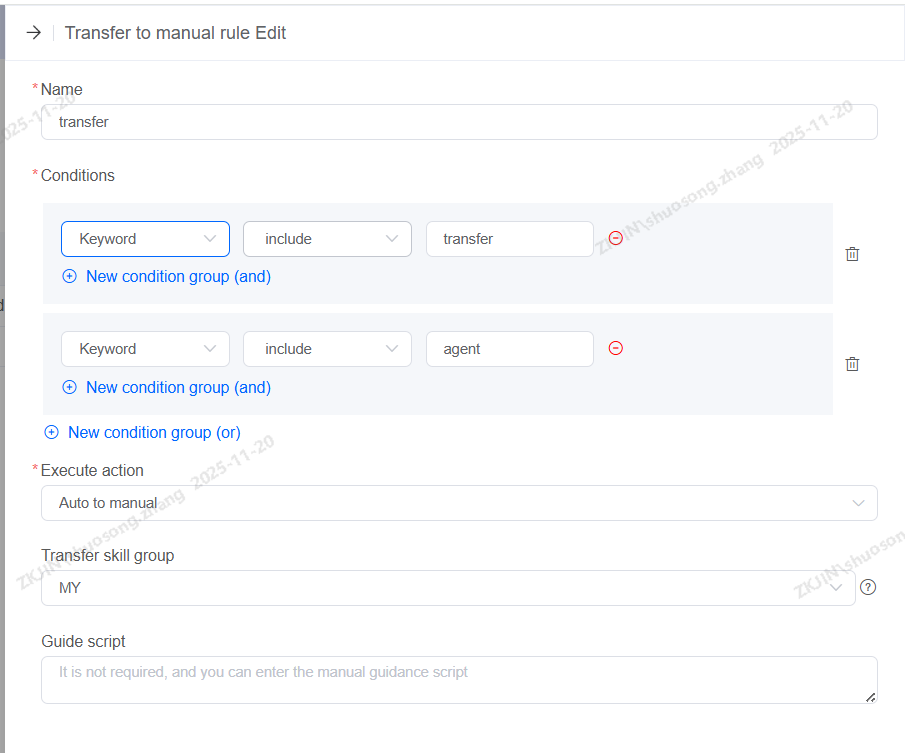
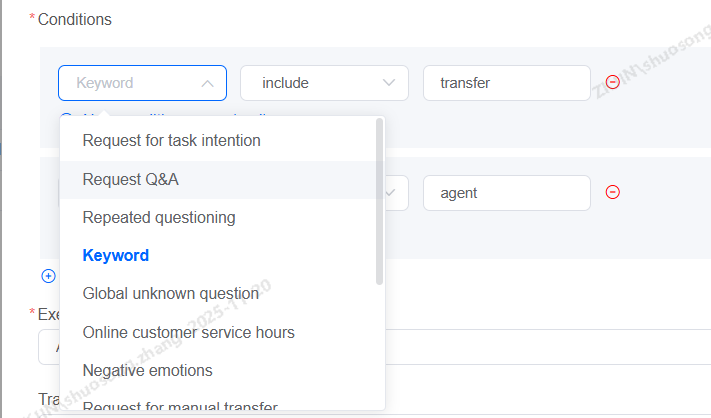
Transfer conditions can be configured based on keywords or specific conditions to initiate the action.
1.6 Intelligent Recommendation
The Intelligent Recommendation module is crucial during initial bot-customer interactions. When properly configured, it helps the bot guide the conversation, suggests FAQs and anticipate potential customer questions. It is particularly effective for customers who need help but are unsure how to phrase their queries.
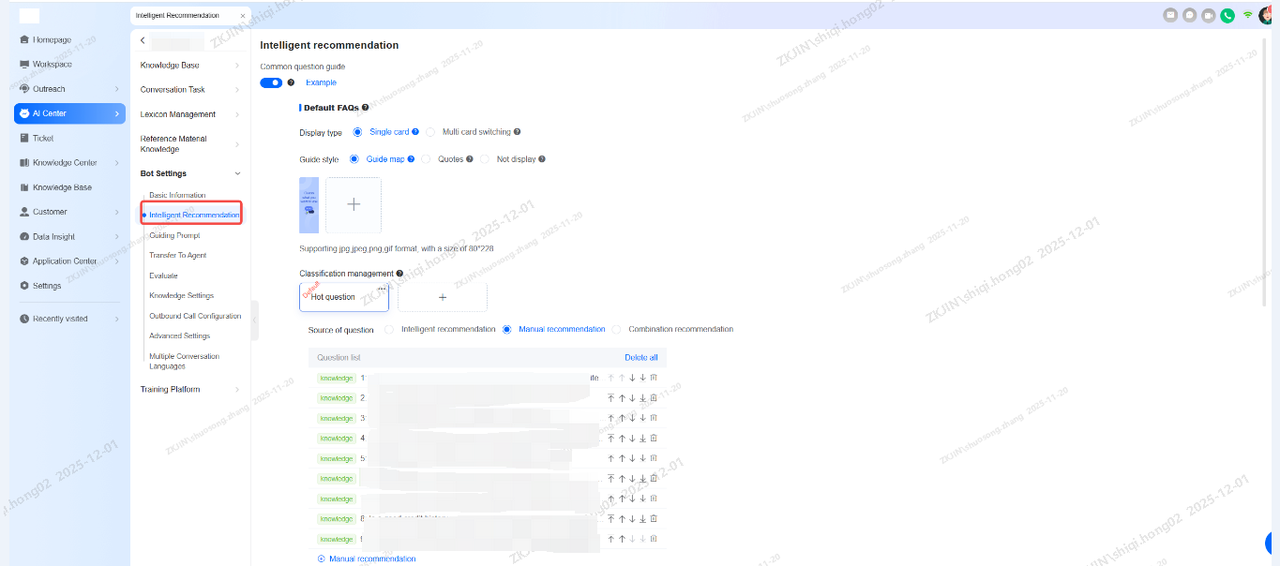
Features available in the Intelligent Recommendation module:
-
FAQ Recommendations: Manually or system-generated FAQs (requires historic data) can be presented as a configurable list within the chat window. The display format and sorting logic are adjustable.
-
Convenient Navigation: Questions are categorized into broad scenarios, allowing users to easily navigate and find content relevant to their specific industry.
-
Quick Process: Pre-configured Task Flows automatically suggest related questions or issues, enabling customers to select their topic or explore other options.
-
Intent Prediction: AI analyzes the chat to predict and suggest the customer's potential intents.
-
Auto-Suggest: As the customer types, the system automatically suggests relevant questions from the FAQ, allowing them to complete their query with a click instead of typing it.
1.7 Chatbot Evaluation
The chatbot can be configured to allow users to like or dislike the robot's answer or automatically send customer a satisfaction survey at the end of a chat. The settings are located in the bot's configuration, as shown in the picture below:
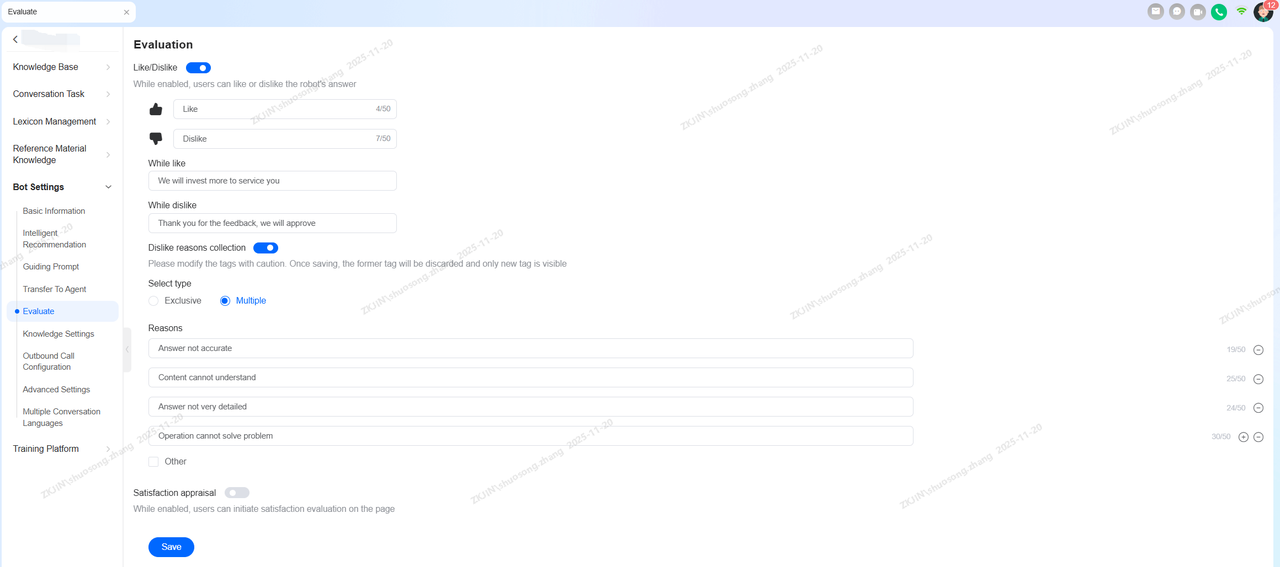
1.8 Multi-language Settings
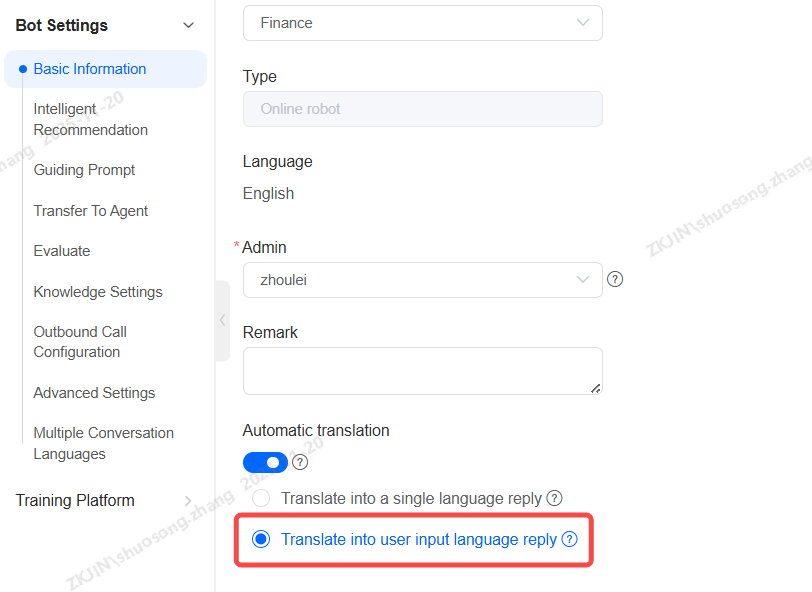
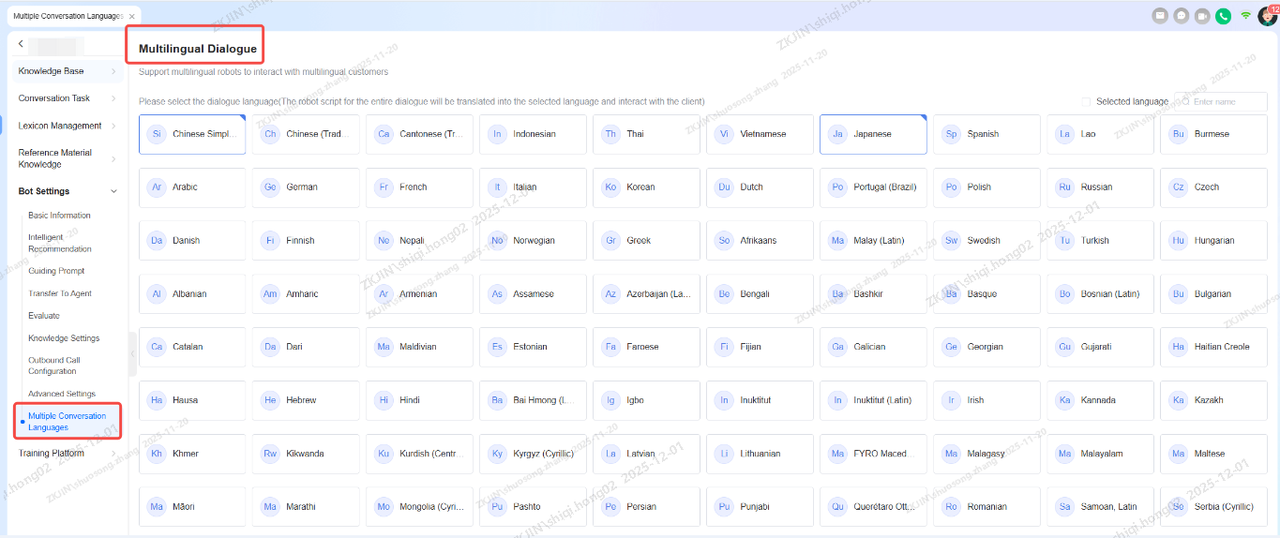
To enable the chatbot's multilingual capability, activate the Multi-Language Dialogue feature and select the languages. This allows the bot to communicate with customers in multiple languages.
2.Chatbot (LLM)
For the LLM-based chatbot, the basic setup follows the same steps as shown in Section 2.1.1 for the NLP chatbot. The LLM bot includes additional modules that leverage its advanced capabilities, such as Document Q&A, LLM reply and Agent Nodes.
2.1 Document Q&A (LLM)
Instadesk's advanced document processing allows businesses to analyze internal knowledge files, automatically generating Q&A pairs for chatbots to use in their customer interactions.
Setup:
-
In the bot's Knowledge Base, enable the Document Q&A feature.
-
Upload the relevant knowledge documents.
-
The system will process the files (retrieval, chunking, categorizing, and Q&A extraction), which usually takes 5-20 minutes, depending on the size of the document.
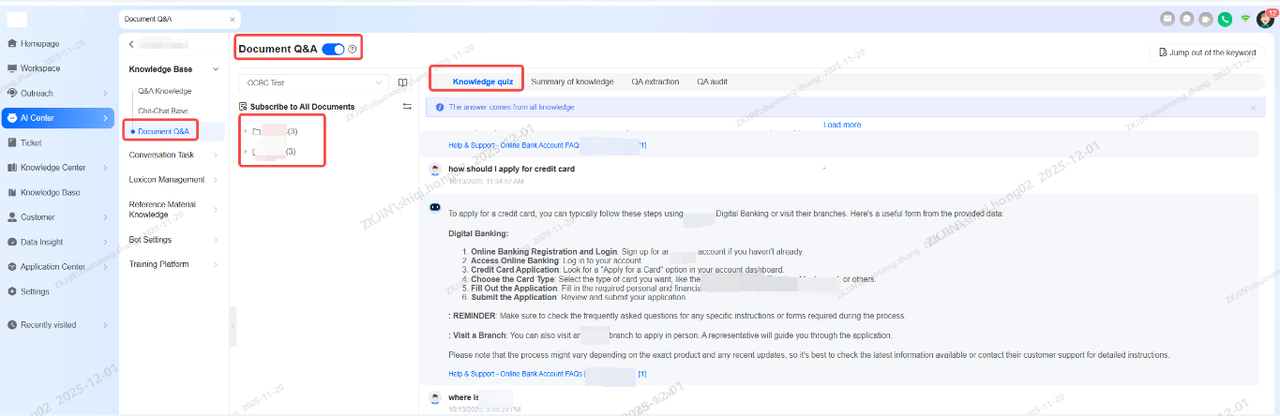
The generated Q&A pair are then available for the bot. Administrators can review and manually adjust both the questions and the source text chunk to ensure answer accuracy. The extracted Q&A pair can also be used to create a knowledge base.
A test chat interface is located in the bottom-right corner, allowing you to verify the bot's response by asking questions based on the document's content.

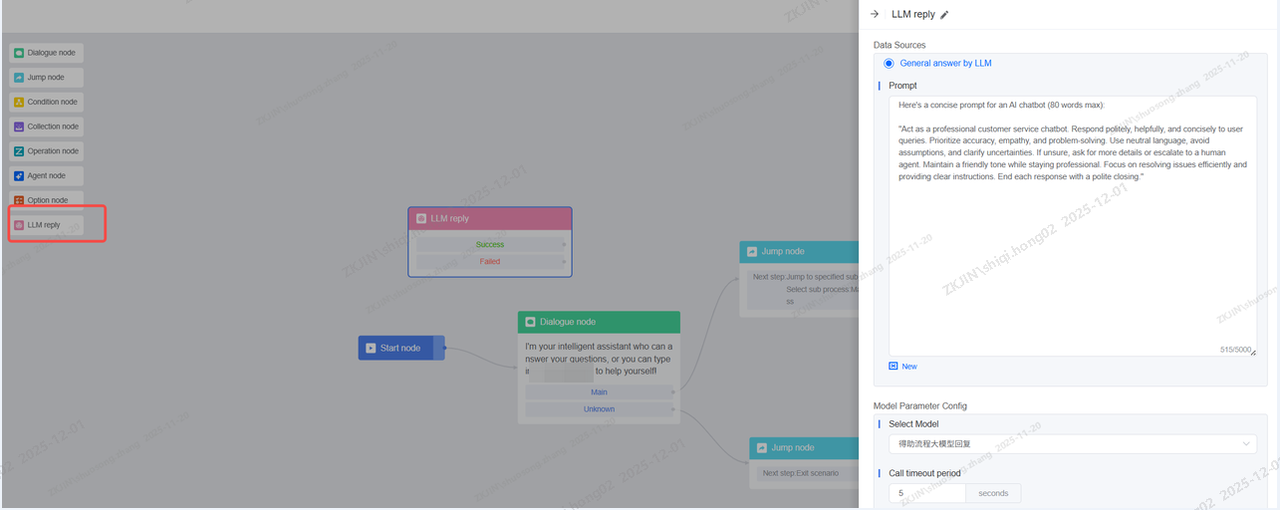
2.2 LLM Reply Node
LLM Reply Node captures customer input from a specific dialogue step and processes it using a Large Language Model based on your . Configure the node with your instructions and integrate it into the conversation flow.
2.3 Agent Node (LLM)
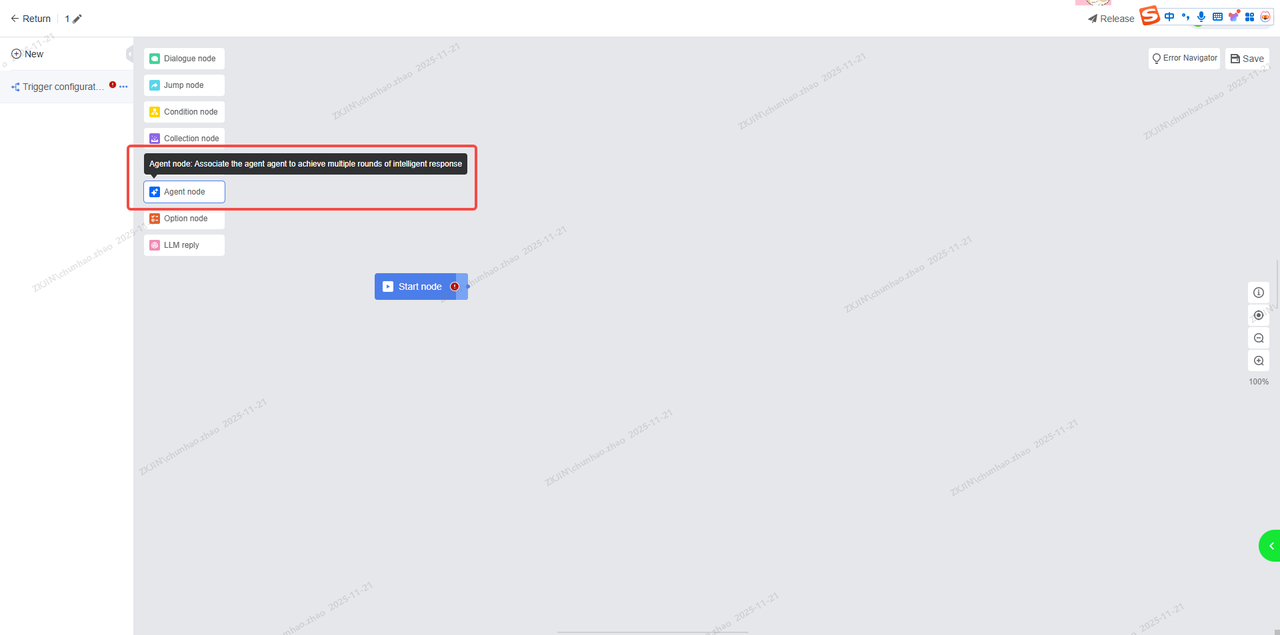
The Agent Node calls upon AI platform (PA) agents. This node can utilize a single agent or multiple agents working together, leveraging large language models to achieve superior intent recognition.
-
Create an Agent Node and click on it.
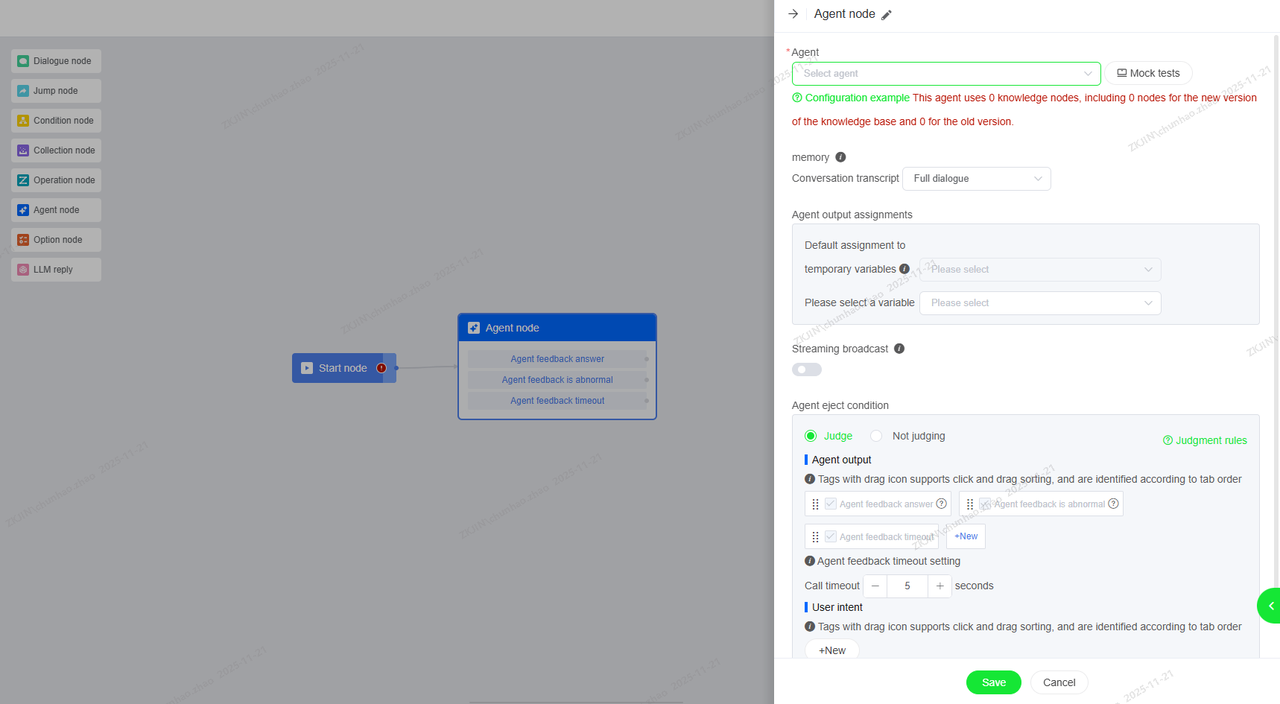
Here, the Agent option requires you to select the specific Agent you need to bind.
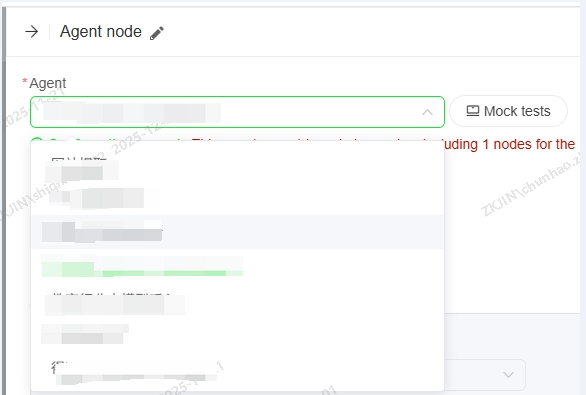
-
Go to the AI Platform to configure and select the related agent. Navigate to AI Center > AI Agent > Go to Configuration, click default for the Project Space.
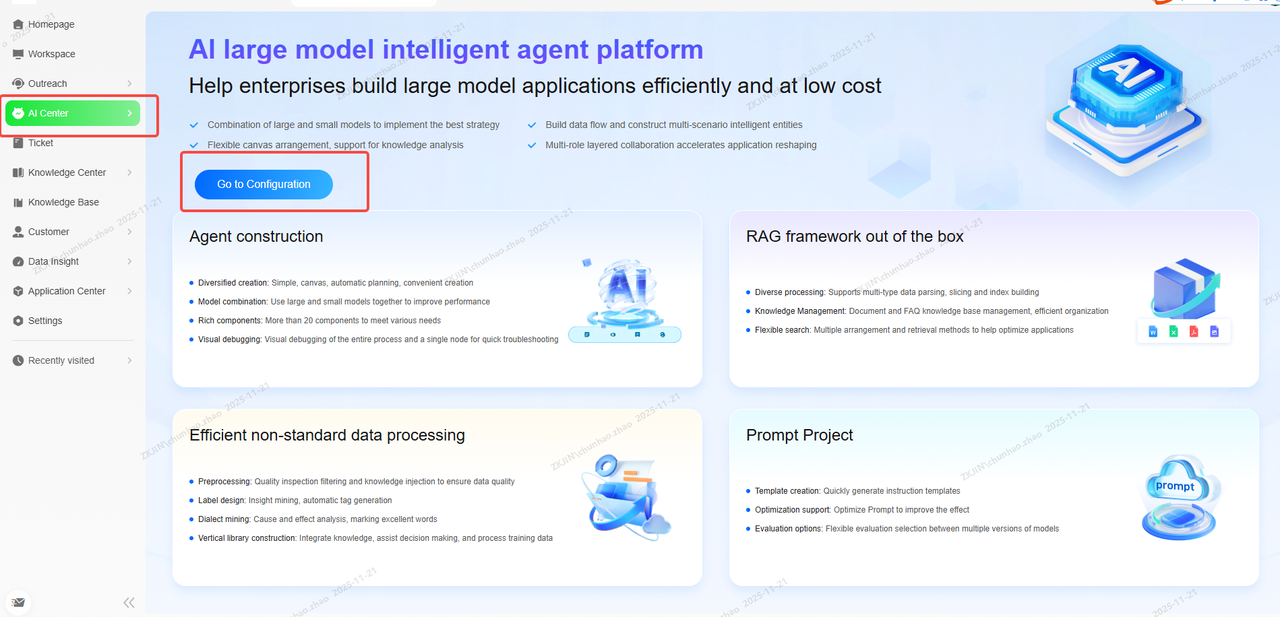
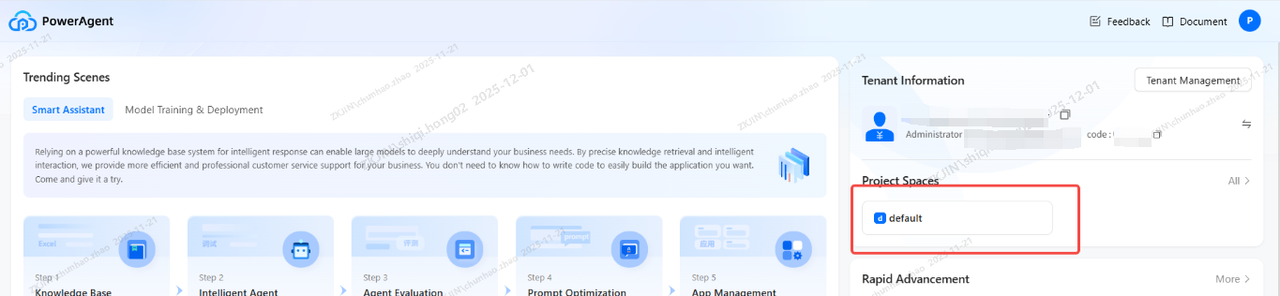
-
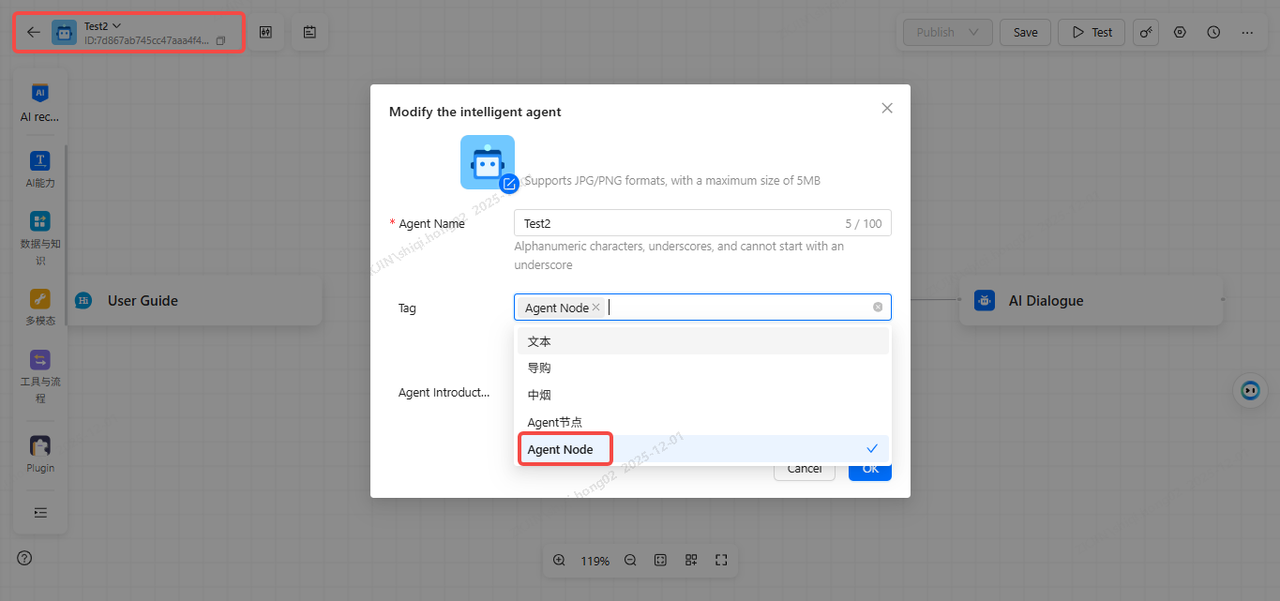
Create and select the agent you want to use.
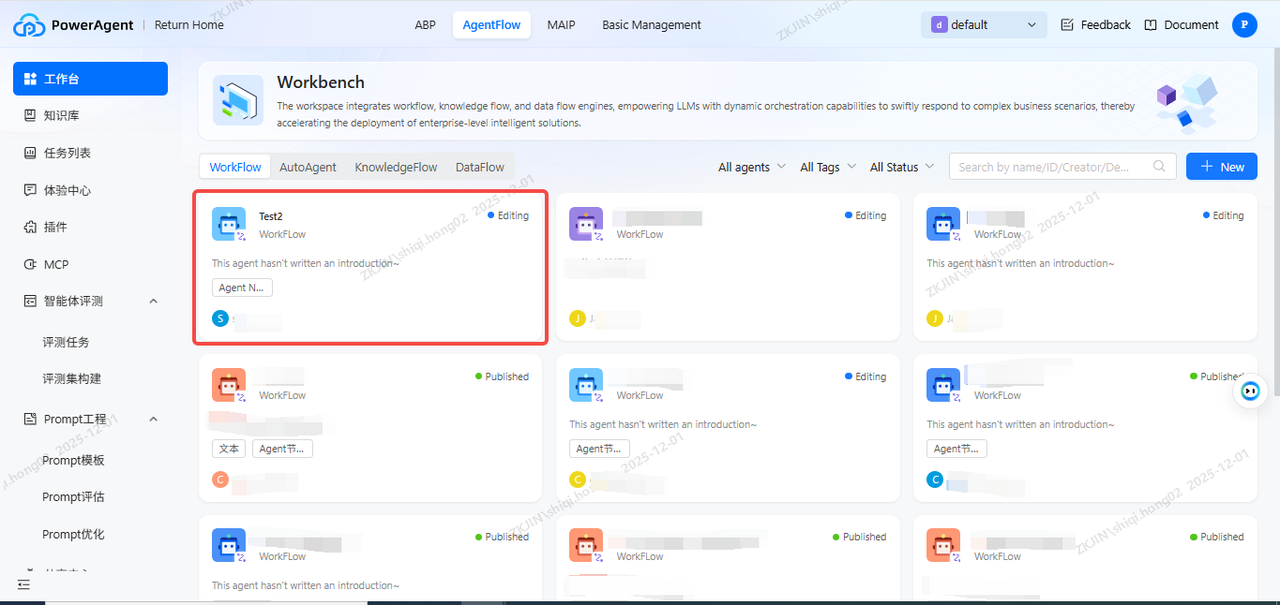
Note: You must add the Agent tag to map the corresponding agent, otherwise it won't show in the Agent Node.
-
Go back to the Agent Node, turn on the Streaming Broadcast.
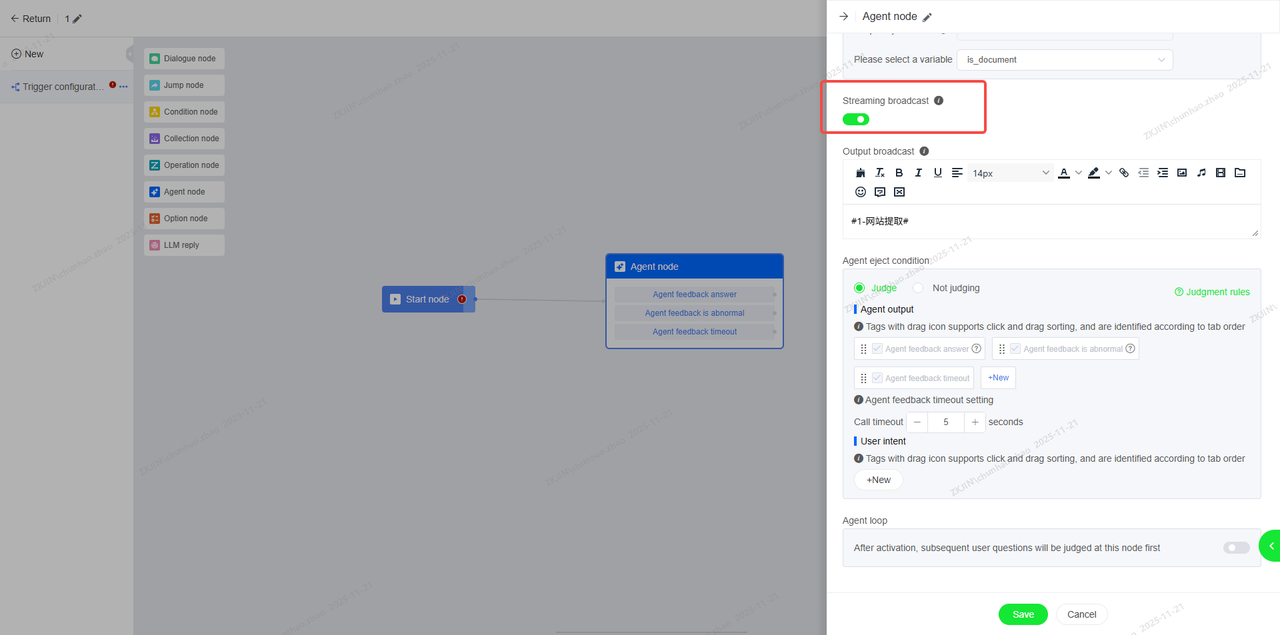
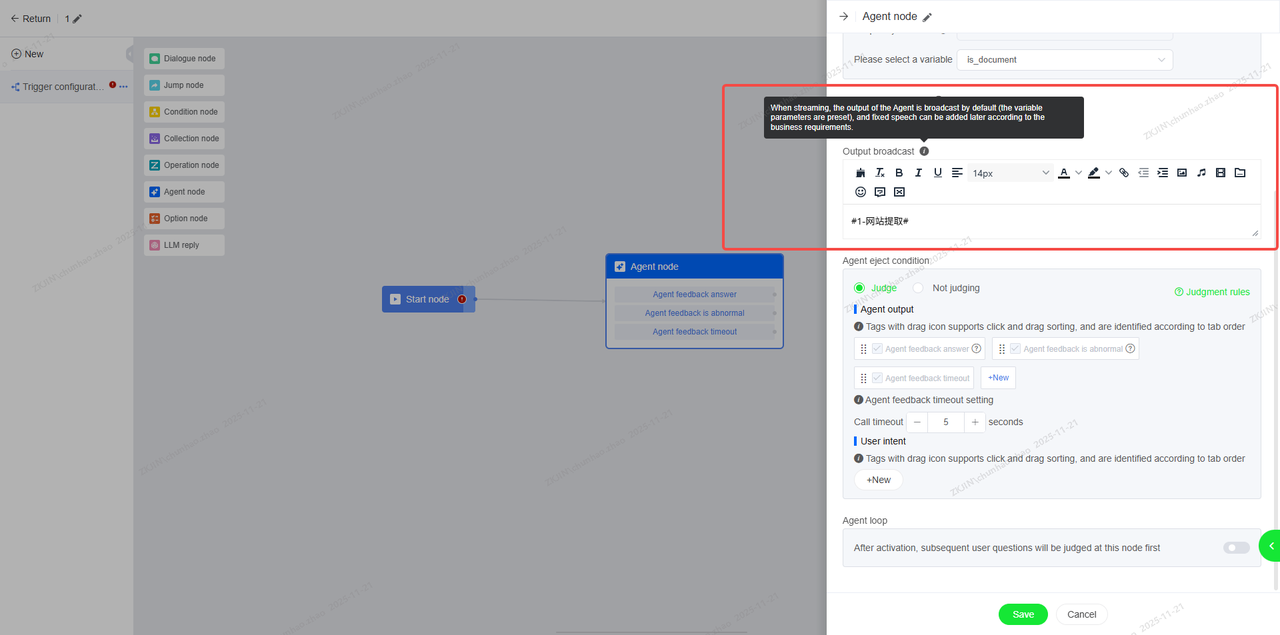
The output of the Agent is broadcast by default (the variable parameters are preset), and fixed speech can be added later according to the business requirements.
-
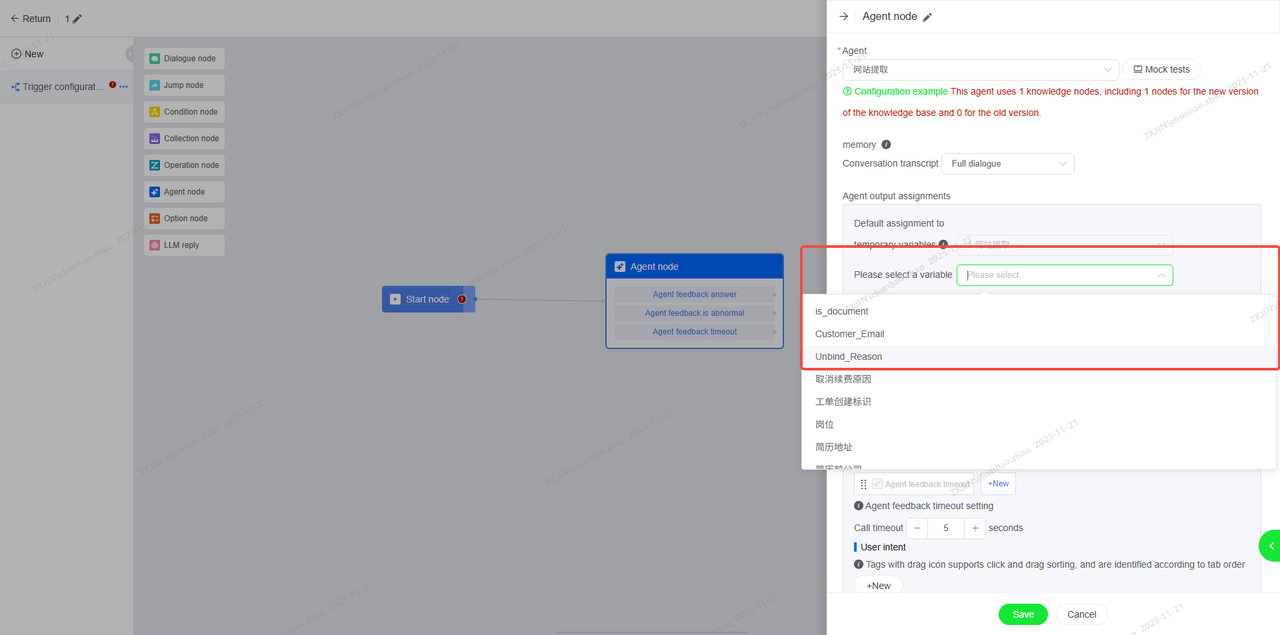
If needed, you can create a new variable to assign the agent's response for the following flow.
Note:
-
If you need to stream the output, make sure the PA platform stream output is on.
-
When the streaming broadcast is turned on, the judgment will be output after the speech broadcast is completed.
-
Please note that if the Agent broadcasts hang-up and transfers to manual speech, it is best not to configure the speech in the corresponding jump node to avoid repeated broadcasting.
-
Chatbot In Multi-Channels(Social Media & E-Commerce)
Chatbots can be deployed across major global channels, including social media platforms like Whatsapp, Facebook Messenger, and Instagram, as well as e-commerce channels such as Amazon (EU) and eBay.
To enable this, bind these channels in the system's Channel Management module, configure the assignment rules, and link them to a chatbot. This allows the AI agent to provide 24/7 automated customer service.
3.1 Whatsapp
3.1.1 Accounts Required for WhatsApp Registration
Before using the WhatsApp service, ensure your company has an official WABA account registered with WhatsApp. Prepare the following account sbased on this hierarchy:
|
Account Name
|
Instructions
|
Priority
|
|---|---|---|
|
Meta Business Account
|
The Meta Business Account is the central platform for managing all Meta business assets, including WhatsApp, Instagram, and Facebook.
|
High
|
|
Facebook Personal Account (Operated by Zhongkejin)
|
To perform embedded registration on behalf of the client, the client must grant administrator privileges of their Meta Business Account to the Facebook personal account operated by Zhongke Jin. Alternatively, the client may provide their Facebook account credentials to manage the Meta Business Account.
|
High
|
|
WABA
|
The WhatsApp Business Account can only be registered through the embedded process provided by our partner Infobip. It is used to manage the WhatsApp Platform and integrate with the Instadesk online customer service system.
|
High
|
|
Sender
|
The Sender (message-sending identity) can only be registered through the embedded process provided by our partner Infobip, applied for within the same workflow as the WABA. It is used for sending WhatsApp messages and integrating with the Instadesk online customer service system.
|
High
|
|
Infobip Official Account (Zhongke Jin)
|
Supplier account used to access the WhatsApp API through an authorized supplier (for use by Zhongkejin personnel only.)
|
High
|
|
Infobip Account Balance (Zhongke Jin)
|
|
High
|
|
Meta Business Account verification
|
|
High
|
|
WABA Green Badge Verification
|
|
Low
|
3.1.2 Integration Process Instructions
-
Create Facebook Business Manager account (Meta Business Account)
Note: The network used for operations must support access to external websites.
|
Application Steps Description
|
Required Documents
|
Priority
|
|---|---|---|
|
Facebook account
|
High
|
|
Facebook Registration: Last name, First name, Phone number/email, password, date of birth, gender
|
High
|
|
|
High
|
-
Create WABA and Sender
-
WABA: WhatsApp Business Account
-
Sender: The sending account under WABA. One sender is bound to one phone number, and one WABA can have multiple Senders bound to it.
-
Application method: Applied with the assistance of ZKJ operations staff.
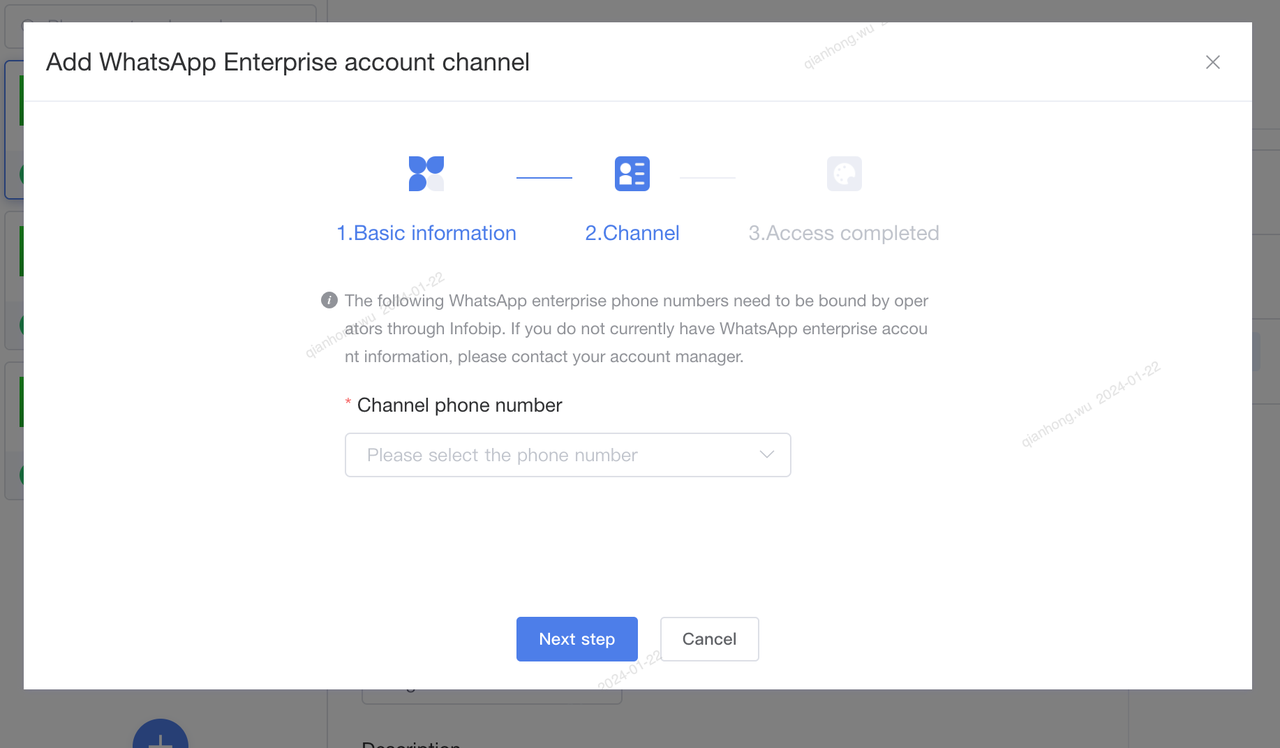
After the operation staff completes the application, you need to bind the channel with the sender. Navigates to Configuration Management > Channel Management, configures the WhatsApp channel, and selects the Sender information that needs to be bound for the customer.
-
Meta Business Account Verification (Highly Recommended)
Verification is not mandatory. The differences between a verified and unverified account are as follows:
|
Account Type
|
Approved Sender with Limited Access
|
Approved Sender
|
|---|---|---|
|
Customizable
|
Business verification not completed
|
Business verification completed
|
|
Message Volume
|
A maximum of 50 template messages can be sent to end users within a 24-hour period
|
The number of template messages you can send to end users depends on your messaging tier.
|
|
Number of Senders (Phone Numbers)
|
Limited
Maximum of 2 unverified WhatsApp senders can be registered
|
Unlimited
More than 2 senders can be registered
|
|
Reply to Incoming Messages
|
Unlimited
|
Unlimited
|
-
Business Verification Methods & Required Documents
|
Application Steps
|
Required Documents
|
|
Priority
|
|---|---|---|---|
|
Verification Entry
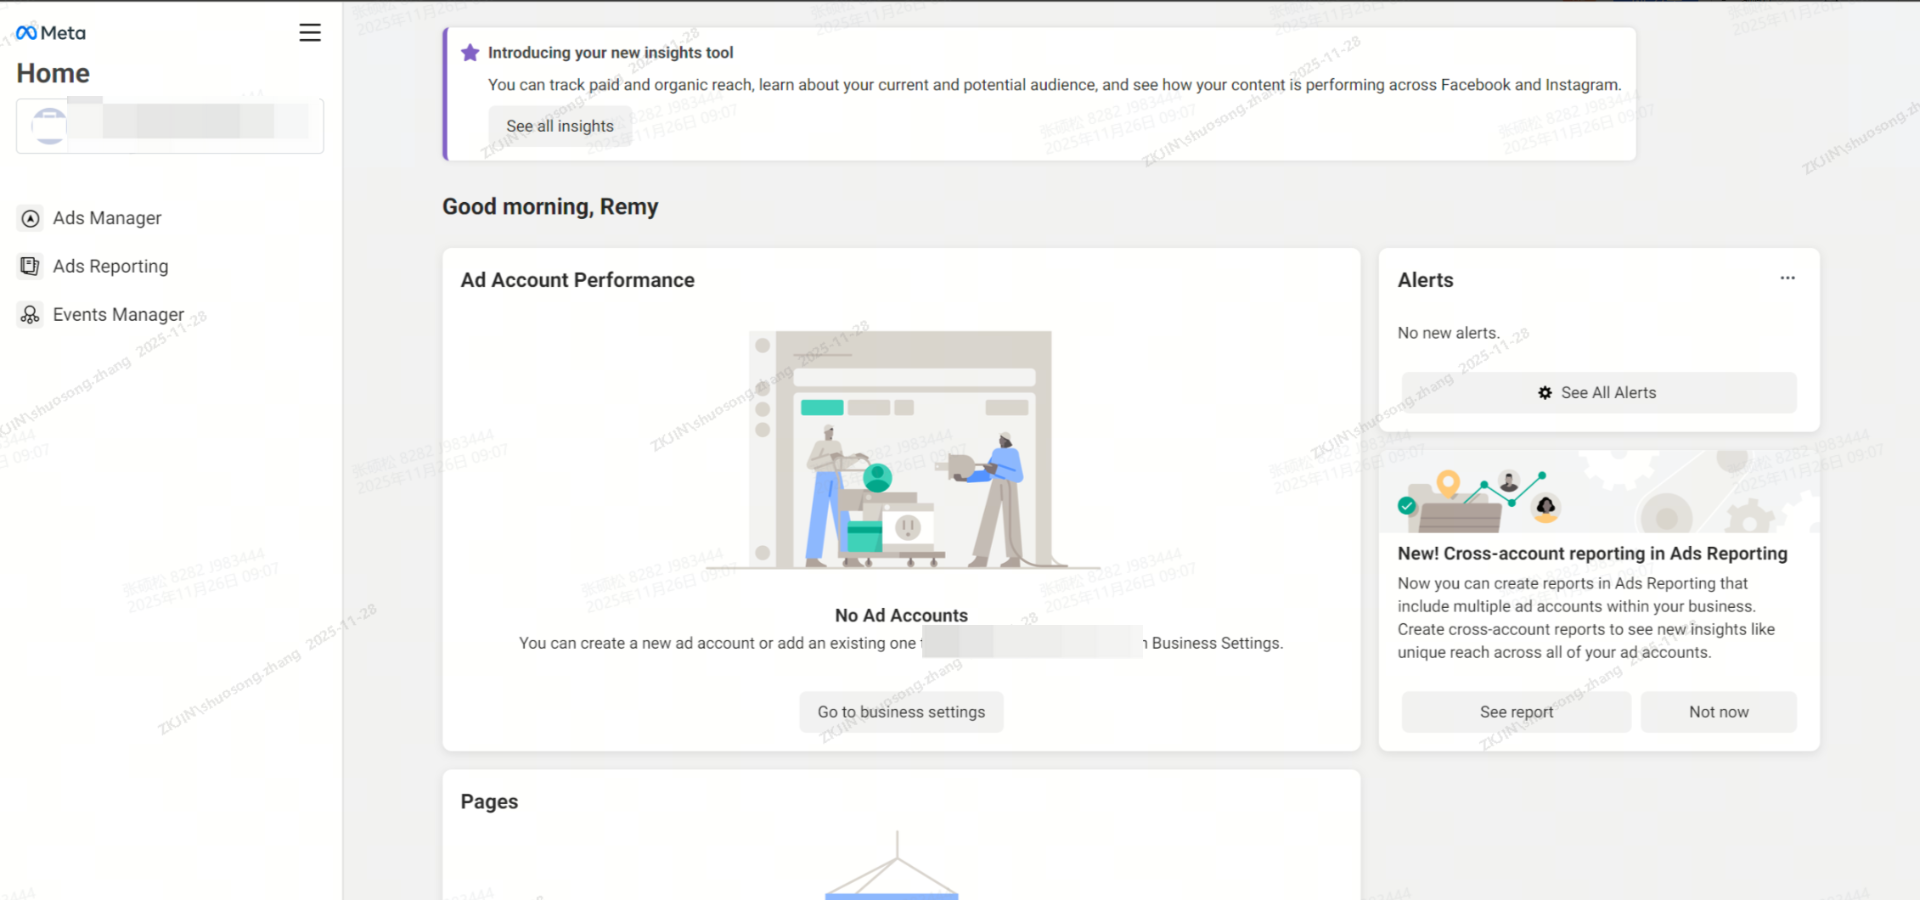
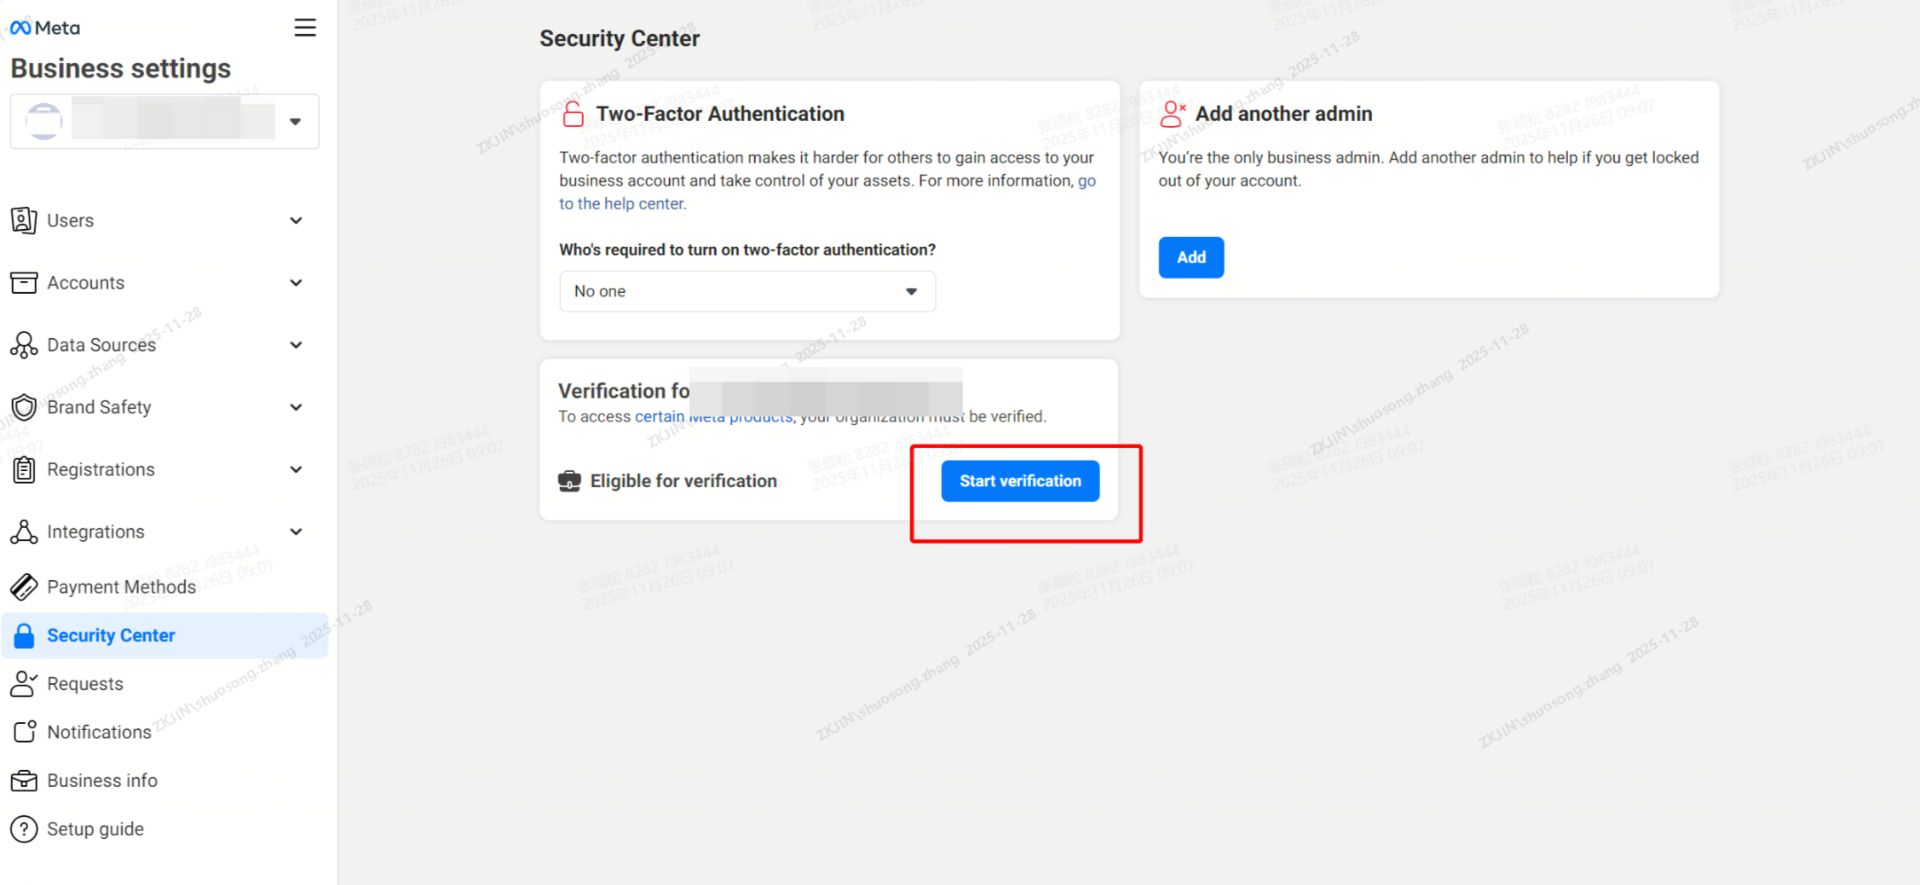
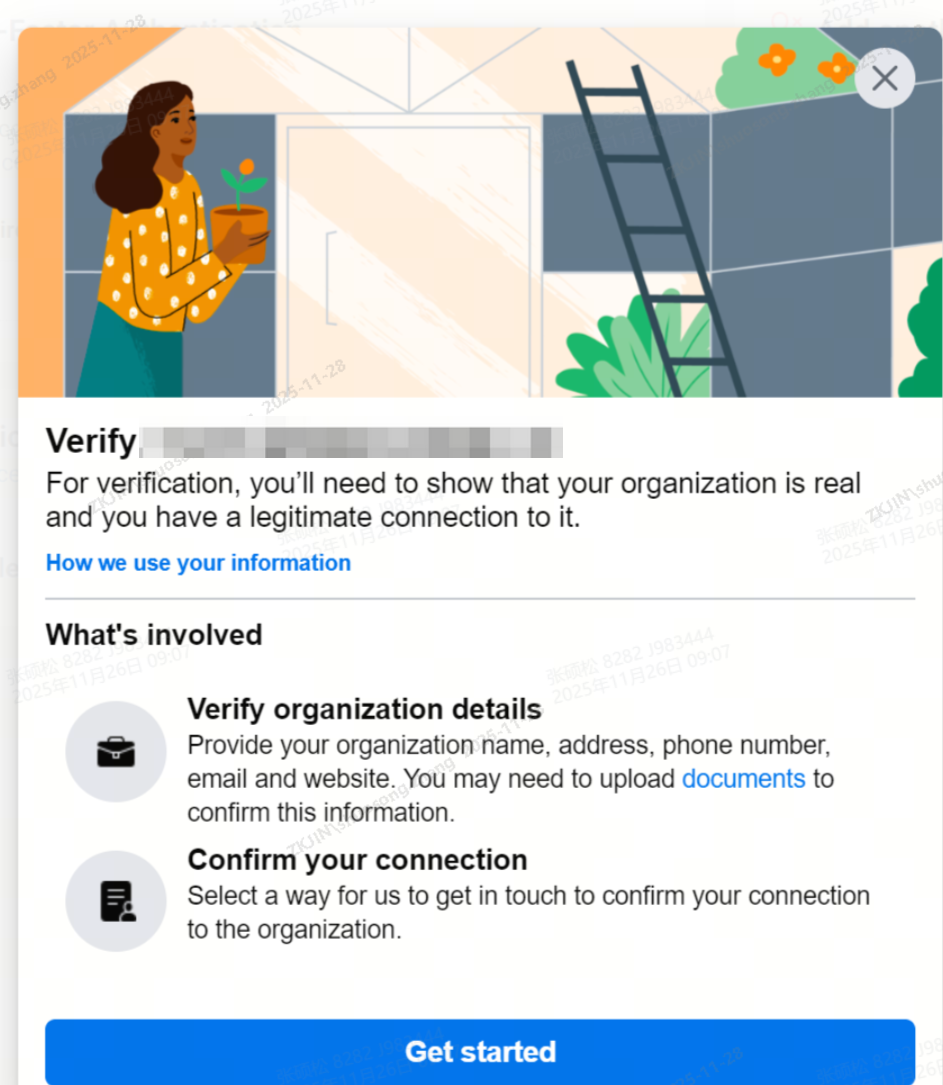
Login using your Facebook account, then click the gear icon in the lower left corner to begin the Business Settings
|
Open website: https://business.facebook.com/
|
 |
|
|
|
 |
|
|
|
 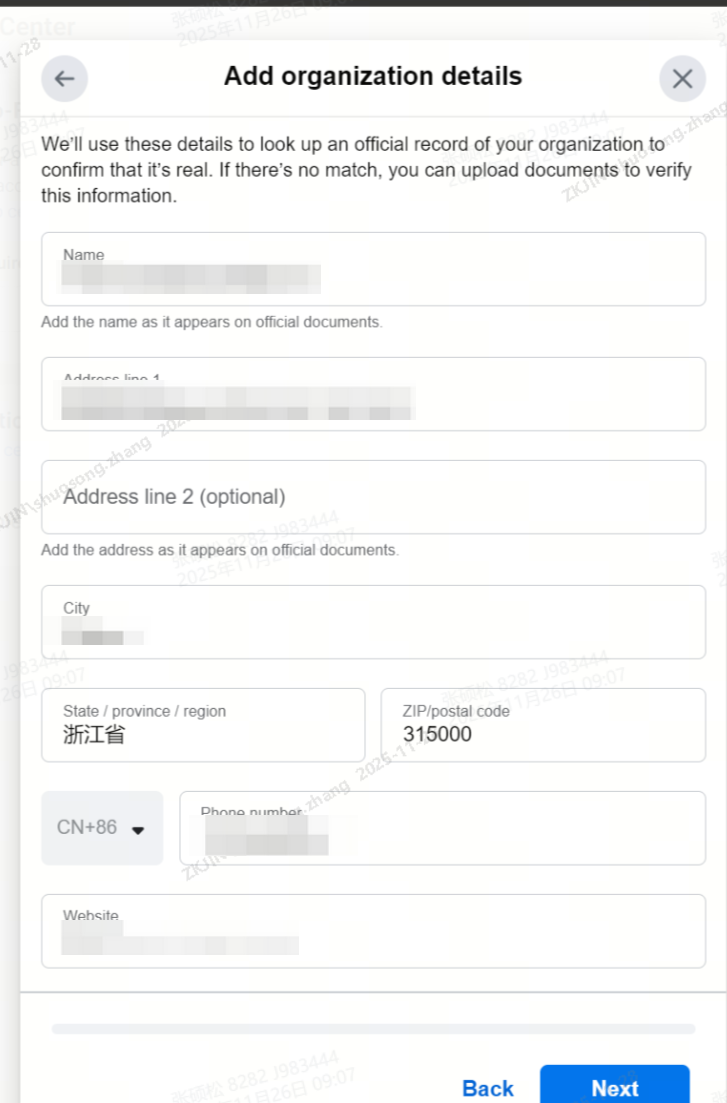 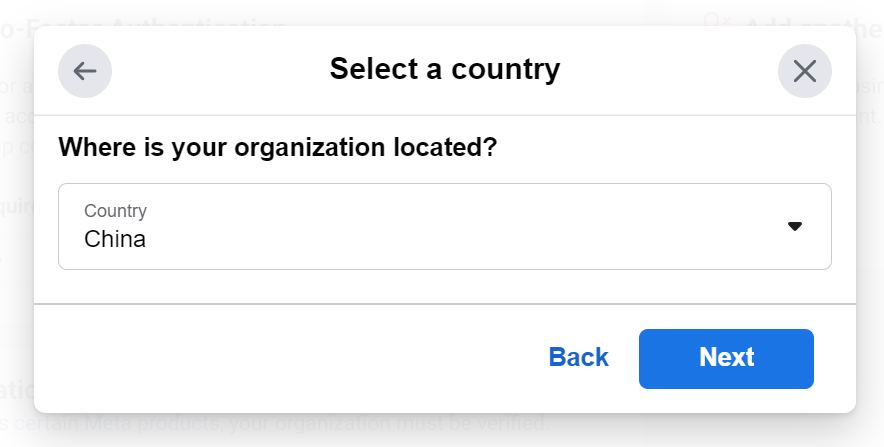 |
|
|
Select verification method
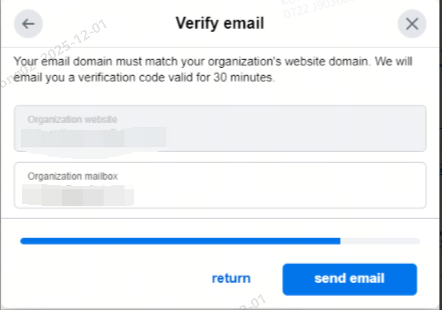
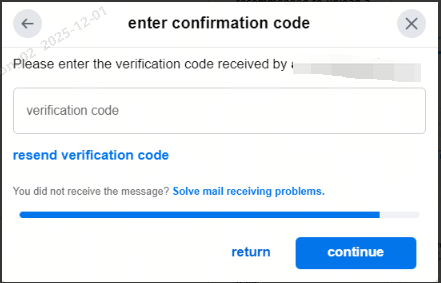
4 methods are supported: email, phone, SMS, and domain verification. The official recommendation is to use email verification
|
|
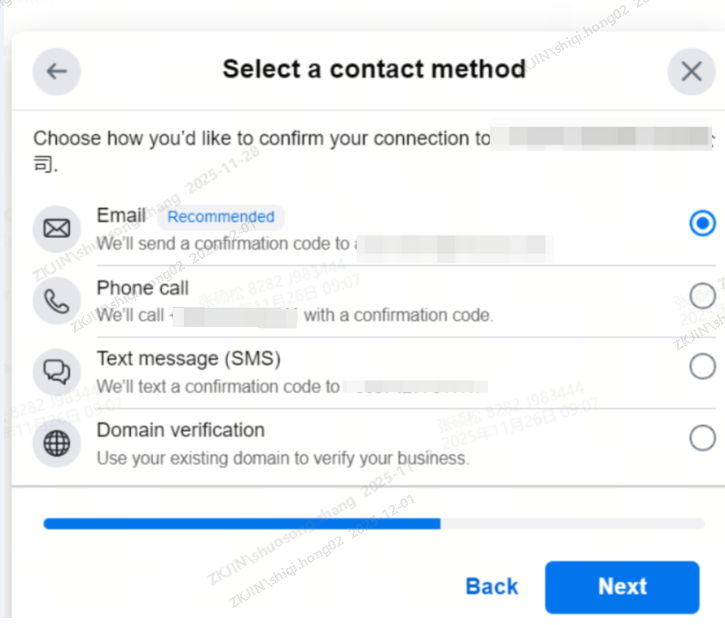 |
|
|
Upload Supporting Documents:
Note: If a appears during the submission process requiring identity verification for the Facebook account, please follow the platform's instructions. You can proceed with business verification after the Facebook account verification is passed.
|
|
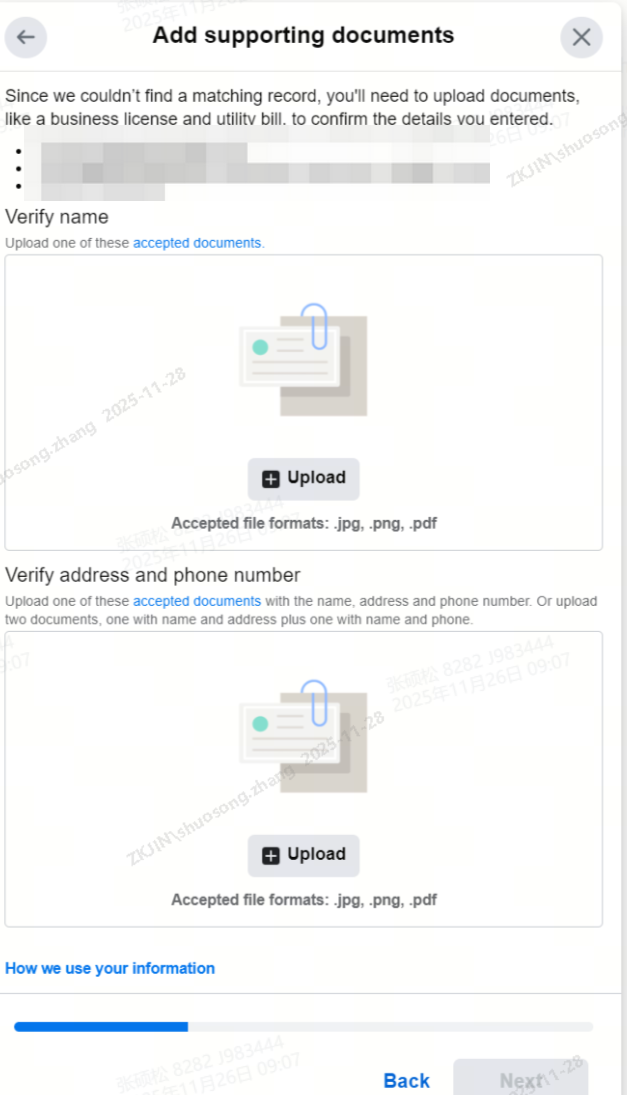 |
|
|
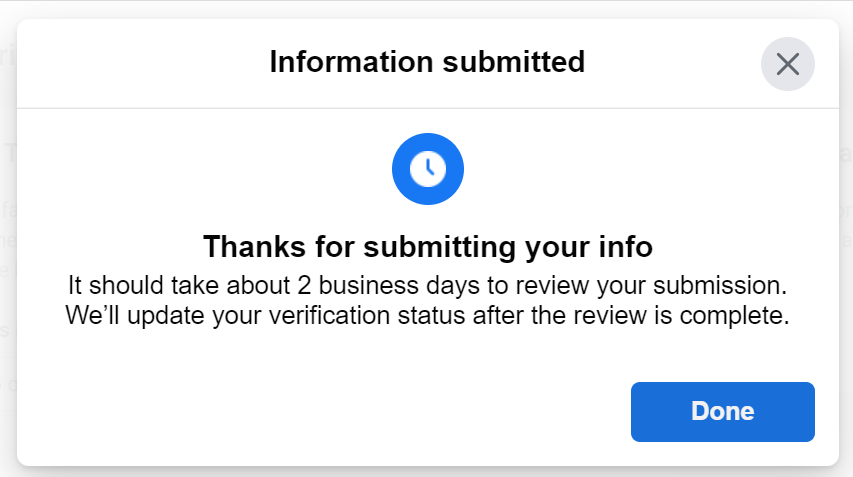
Obtain and submit the verification code
|
|
   |
|
|
View result
|
|
 |
|
-
WABA Account Verified Badge Verification (Not Mandatory)
-
Contact the BSP to request access, this step ZKJ operation staff will help you with that if needed.
-
Appendix: Document Checklist
The specific documents required, in addition to those for Business Verification and Verified Badge Verification, are as follows:
| Information | Description |
| Sender Phone Number | A phone number used to identify a WhatsApp Business API (WABA) account. The phone number (sender) must meet the following WhatsApp requirements: Must be in E.164 international format (country code + subscriber number, including area code, without the '+' symbol) and must be internationally reachable. Must remain active during verification to receive SMS or voice calls for 2FA and number ownership. Limitations: Short codes are not allowed. Toll-free numbers in international format are acceptable if they can bypass IVR during verification (if applicable). The number must not have been previously used with the WhatsApp Business API. If the number is already registered on Android, iPhone, or any business app, the associated account must be deleted before it can be registered as a business account. |
| Facebook Account | The Facebook account (Facebook Business Page) associated with the WABA sender. Meta reviews the Facebook account submitted for WABA registration. Common factors Meta considers include: Credibility of the Facebook account: Do the profile picture, cover photo, 'About' section, and general posts align with the business? Influence of the Facebook account: Does it have sufficient followers, user engagement, and general activity? Verified Facebook Business Pages (with a blue checkmark) have the highest success rate for WABA sender approval. |
| Facebook Business Manager ID or Meta Business ID | The Business ID corresponding to your Meta Business Account. Steps to find your Business ID: 1. Go to Business Settings. 2. Click Business Info. 3. Under Business Manager Info, you will see your ID number. |
| Admin Access to Facebook Account | The submitted Facebook account must have admin-level access. Alternatively, a Facebook Business Page can be created during the embedded registration process. |
| Business Name | The legal company name as shown on official documents. |
| Business Phone Number | The company's official phone number. This can be the same as the sender number. |
| Business Email Address | The email address of the company representative registering the WABA. |
| Business Website | The company's official website. The website must demonstrate a connection to your business, Facebook account, and the WABA registration information submitted to Meta. Important: When submitting a website for WABA registration, it is best to include the http:// or https:// protocol. If submitted without a protocol, it will default to https:// (HTTP Secure). E.g., www.infobip.com becomes https://www.infobip.com. If your website uses http:// (HTTP only), you must include the protocol. E.g., http://www.infobip.com, to prevent URL conversion. Later, in your WhatsApp sender profile, you can display up to two (2) websites. |
| Street Address | The company's street address as shown in business documents. |
| City | The city where the business is located, as shown in business documents. |
| State/Region/Province | The state, region, or province (as applicable) where the company is located, consistent with business documents. |
| Country | The country where the company is located, as shown in the business documents. Note: The WhatsApp Business Platform must not be used to send or receive any messages to or from the following countries: Crimea, Cuba, Iran, North Korea, and Syria. |
| Display Name | The name that will be displayed on the WhatsApp sender profile. The display name must not violate WhatsApp Business and Commerce Policies. It must also follow these guidelines: - Must accurately represent your business. - Must align with external branding. - Must have a clear connection to your business. - Must use correct formatting. |
| Business Category | The category selected from the options during WABA registration. |
| Description | The description that will be displayed in your WhatsApp sender profile. It can contain up to 256 characters. |
| About | The 'About' information that will be displayed in your WhatsApp sender profile. It can contain up to 130 characters. |
| Logo | The acceptable logo image size must be 300px by 300px. |
An example of how to fill in the information is as follows:
| Information | Example |
| Sender Phone Number | 44786006**** |
| Facebook Account | https://www.facebook.com/infobip/ |
| Facebook Business Manager ID or Meta Business ID | 12345678901**** |
| Admin Access to Facebook Account | Ensure you have administrator-level access to the submitted Facebook Account |
| Business Name | xxx PTE. LTD |
| Business Phone Number | +44 7860 06**** |
| Business Email Address | support@xxx.com |
| Business Website | https://www.xxx.com/ |
| Street Address | Room xx, xxx Street, District xxx, xxxx |
| City | Cyberjaya |
| State/Region/Province | Selangor |
| Country | Malaysia |
| Display Name | xxxxx |
| Business Category | xxxxx |
| Description | xxx's services include omnichannel communication, contact centers, chatbots, customer engagement, and customer data platforms. |
| About | Shaping the future of customer experience through contextual communication. |
| Logo |
3.1.3 Product Capability
-
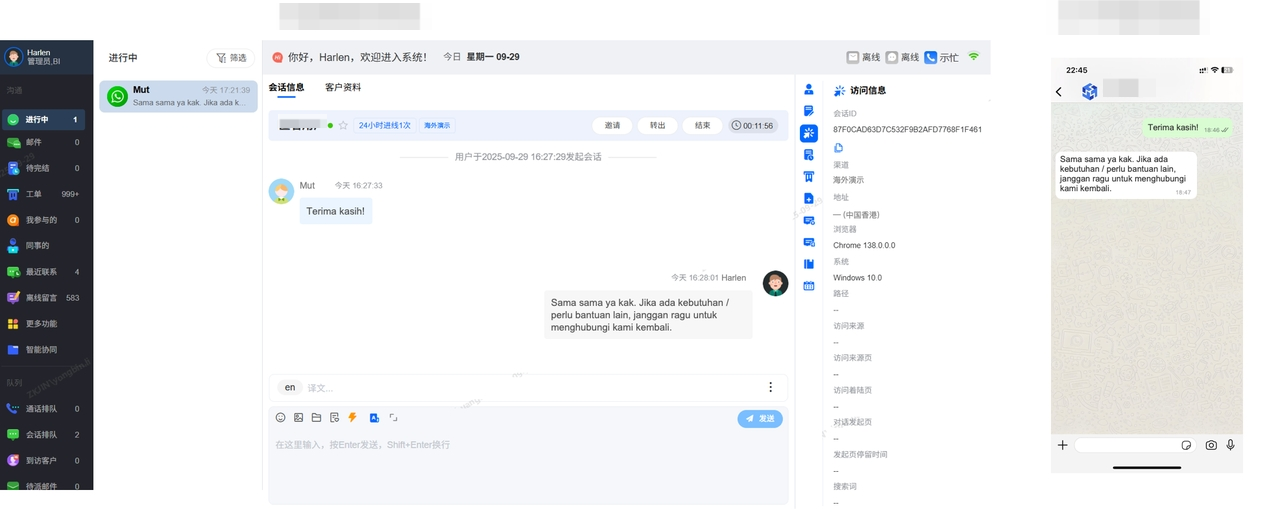
Online Customer Service
Enables real-time communication with WhatsApp customers, quickly converting inquiries.
-
Instant Alerts: Customer messages trigger immediate notifications.
-
Intelligent Routing: Automatically assigns conversations to available agents.
-
Immediate Response: Seamless connection for rapid engagement.
-
Multi-Format Support: Reply with text, images, rich media, videos, and more.
-
Supported Message Types:Message TypeReceive SupportSending SupportTextSupportedSupportedImageSupported(jpg、png、jpeg)Supported(jpg、png、jpeg)DocumentSupported(xlsx、xls、world、txt、ppt)Supported(xlsx、xls、world、txt、ppt)Formatted Media & TextSupportedNot SupportedLocationSupportedNot SupportedVideoSupportedSupportedAudioSupportedNot SupportedContactsSupportedNot SupportedEmojisSupportedSupportedCustomized EmojisSupportedSupportedInteractive ListSupportedNot SupportedReplySupportedNot SupportedRead/UnreadSupported
-
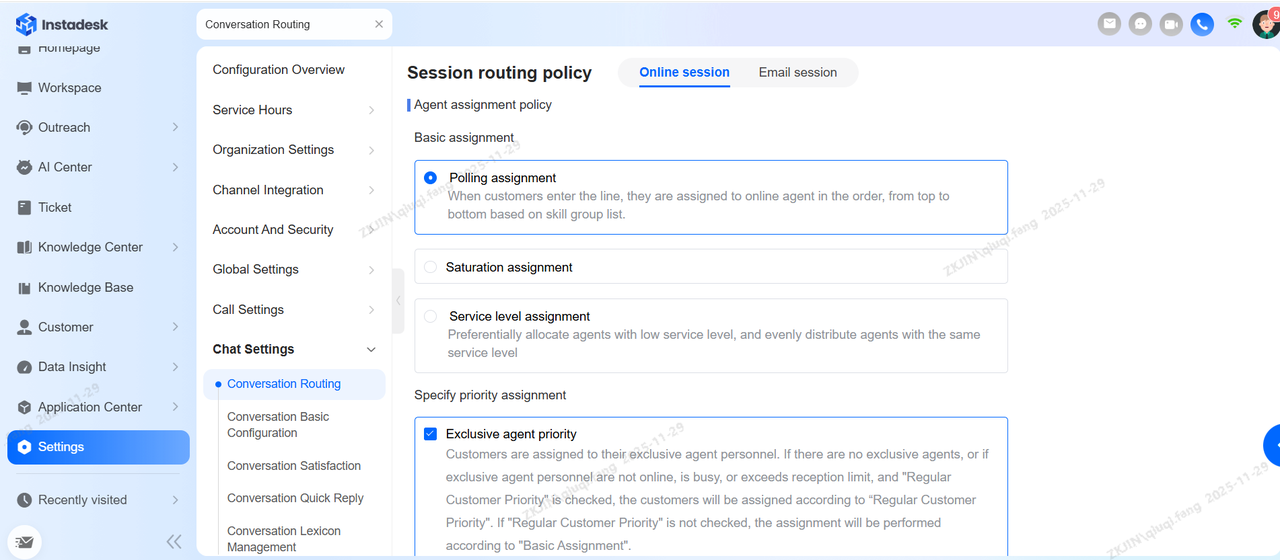
Chat Assignment Capability
When a WhatsApp customer enters the system, how are they assigned to an agent? How is workload balanced among agents? - Instadesk provides automated distribution with multiple assignment strategies to balance efficiency and quality, improving customer satisfaction.
-
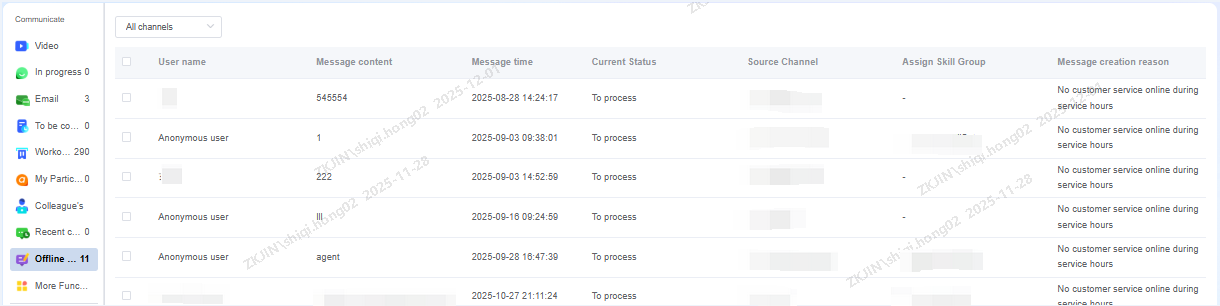
Offline Messages
This feature supports WhatsApp channel customers when the routing strategy is set to Agents Only and no agents are online. It provides a message queuing function to ensure:
-
Timely reach of customer messages.
-
Immediate visibility of WhatsApp customer messages for agents as soon as they come online.
-
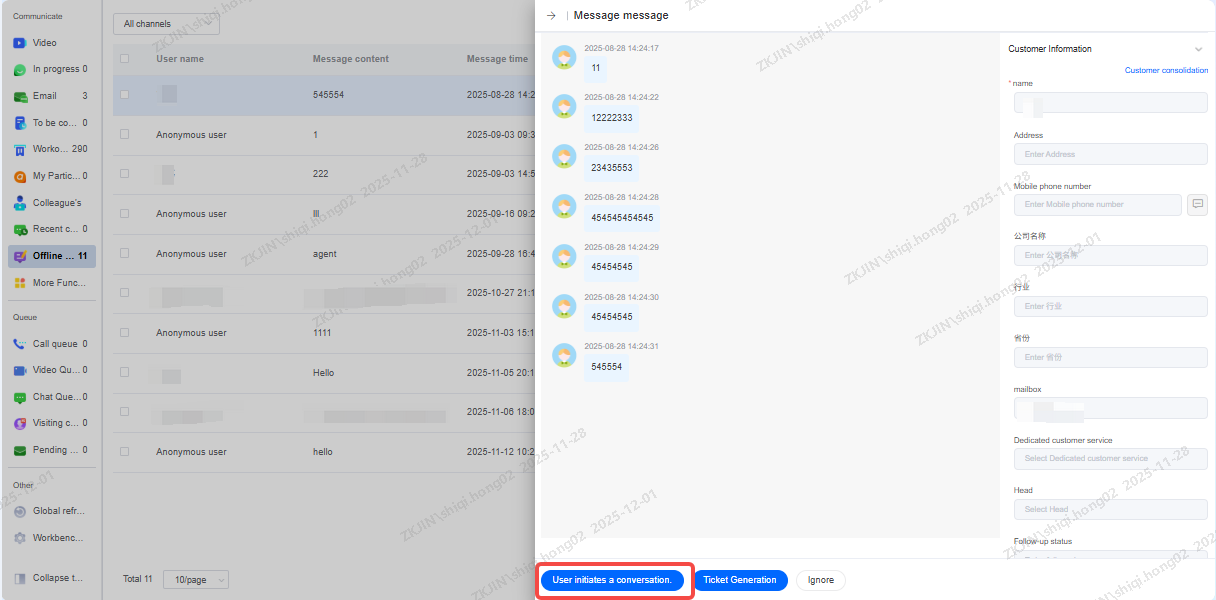
Message to Live Chat
Once an agent comes online, they can instantly convert offline messages from WhatsApp customers into active chats, allowing them to proactively start chats and provide timely response to customer inquiries
-
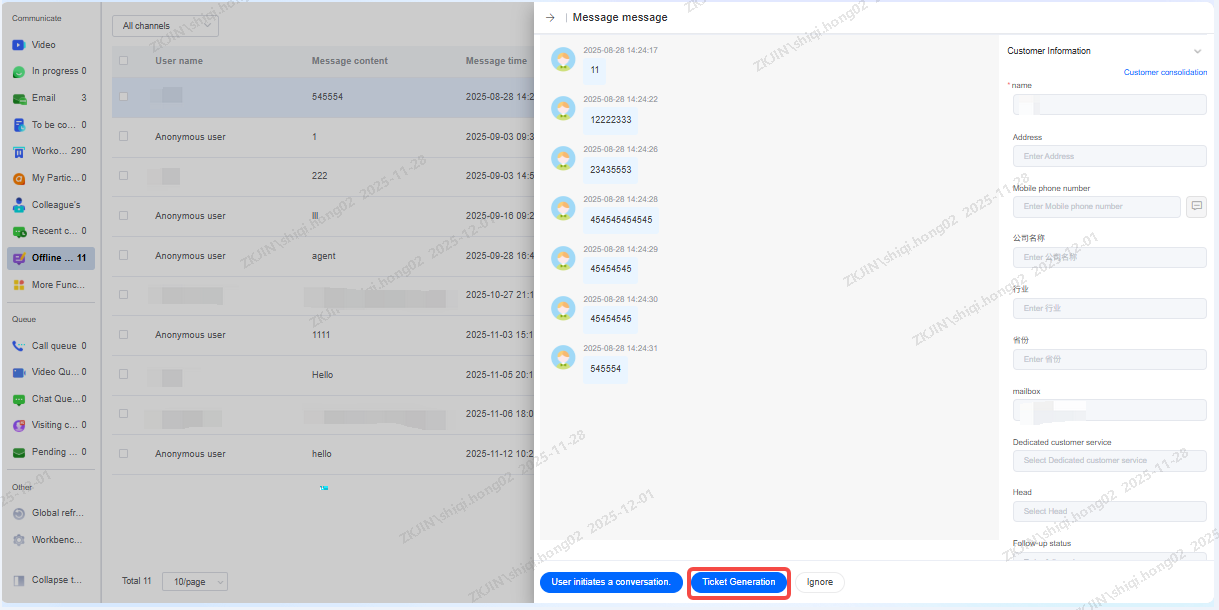
Message to Ticket
Agents can convert WhatsApp customer messages into support tickets, with each ticket type following its designated workflow for processing
-
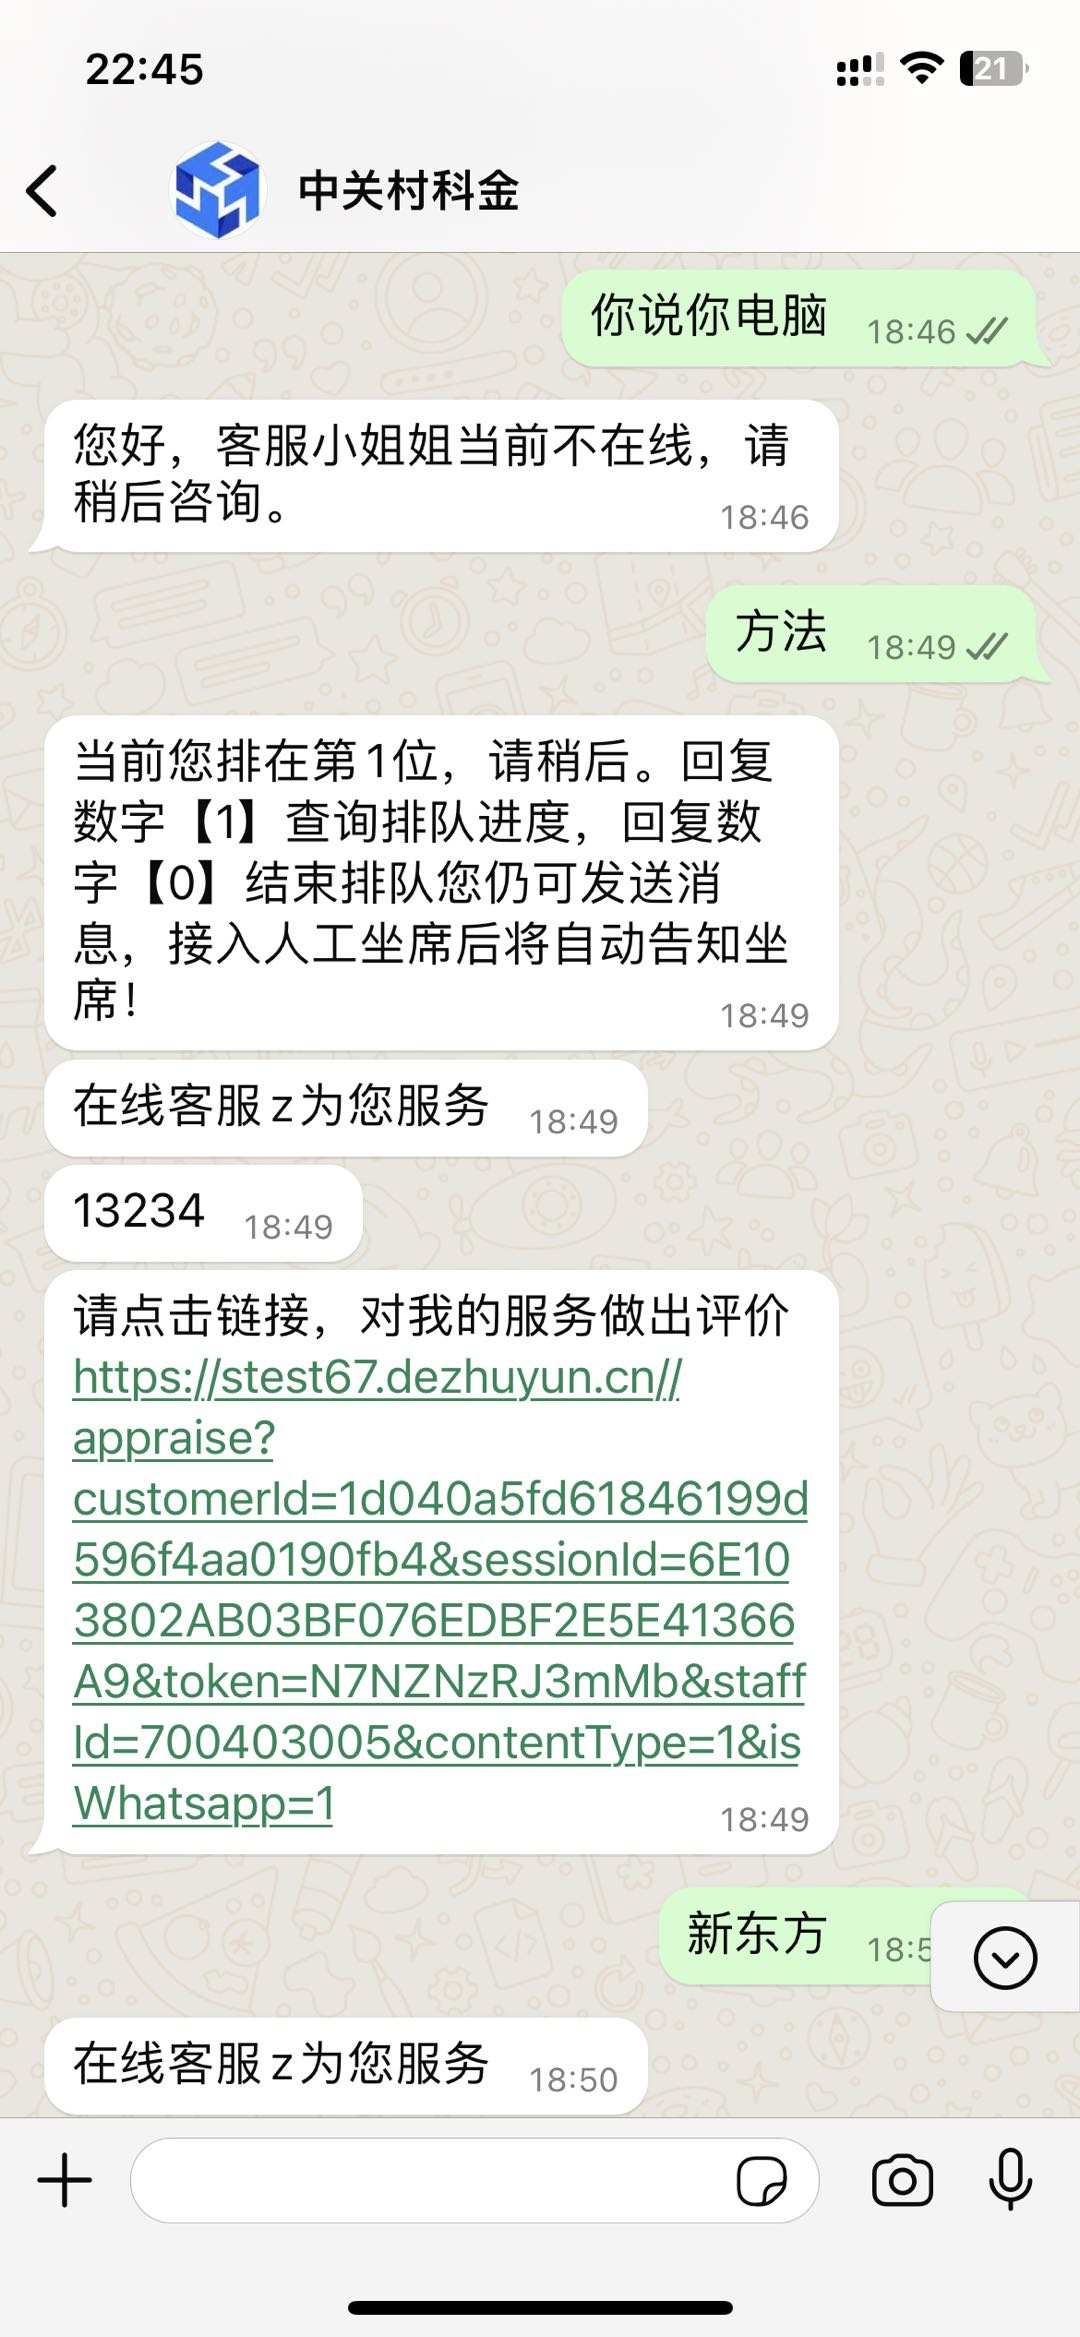
Online Queue
When an agent is busy, incoming WhatsApp chats enter a queue based on predefined rules. Once the agent becomes available, customer with the longest queue time will be connected first. Customers can also check their real-time queue position
-
AI Knowledge Base
The powerful knowledge base stores common FAQs, allowing one-click quick replies from the right-side panel to make communication more efficient.
-
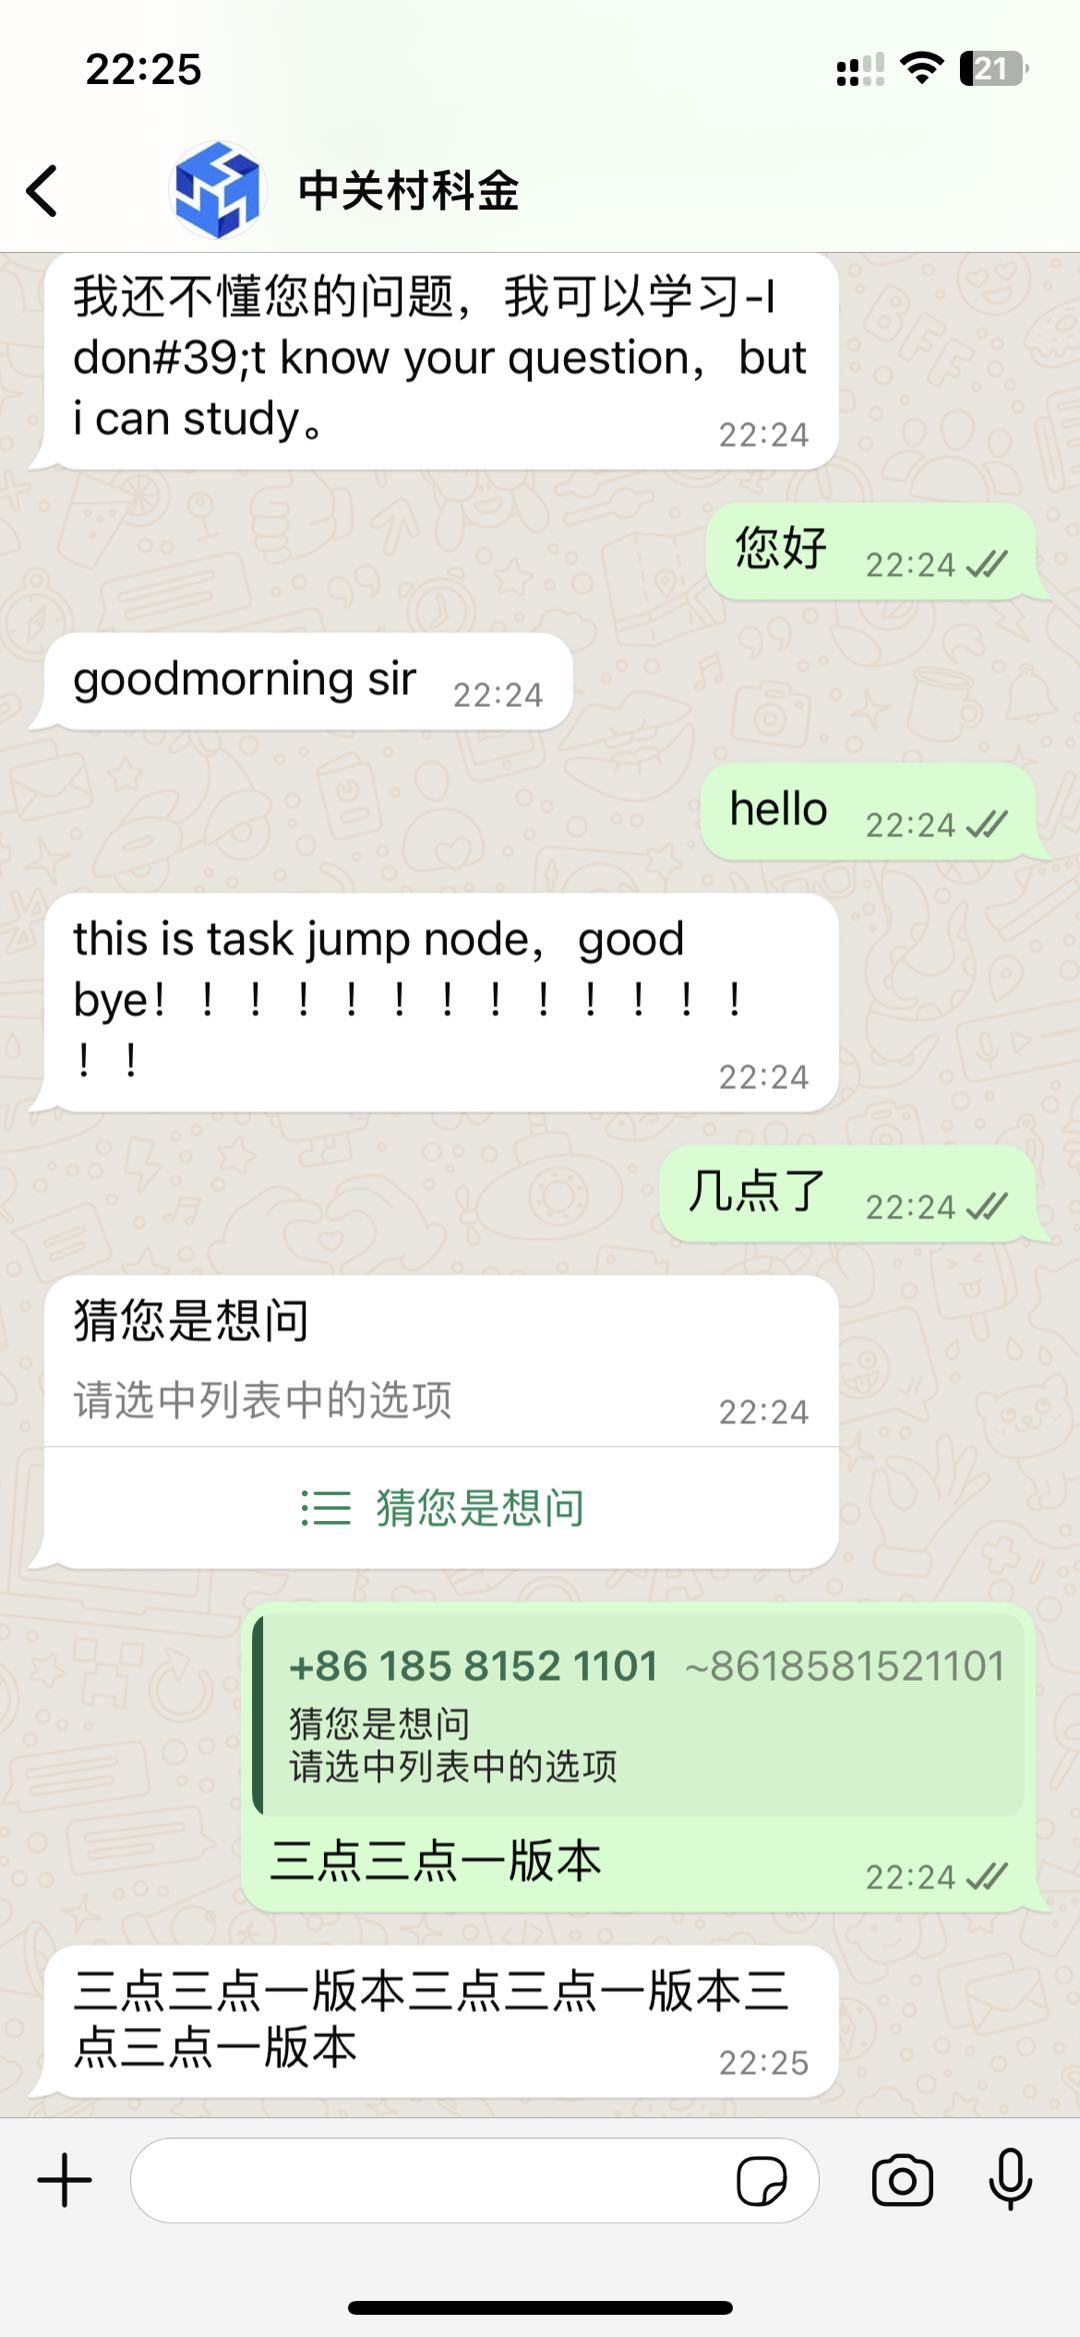
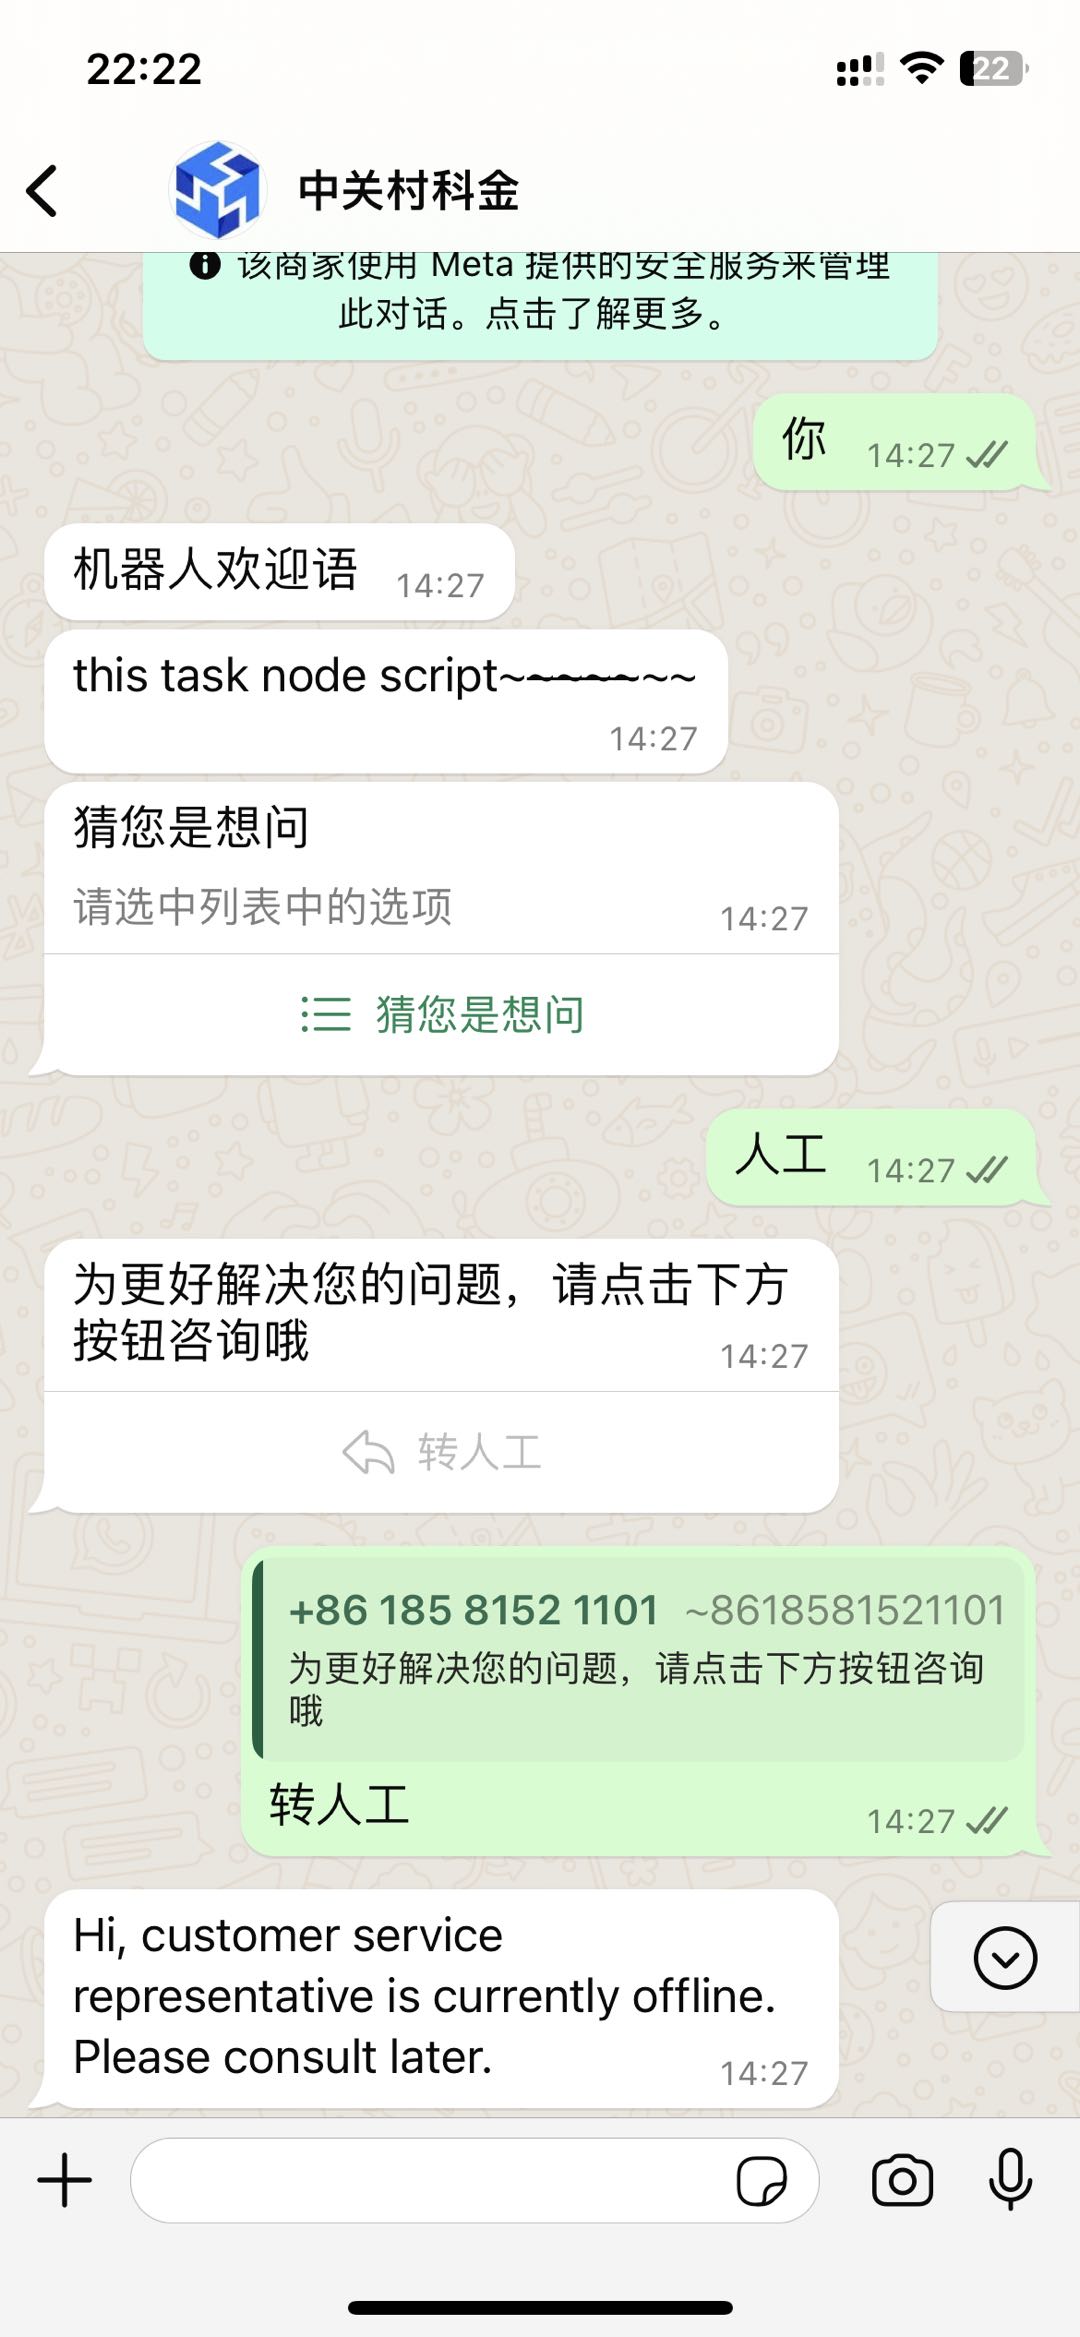
Chatbot
A WhatsApp optimized chatbot that efficiently resolves user queries through natural, human-like conversations, enhancing user experience while helping businesses reduce costs and improve efficiency.
-
Sending Template Messages
Supports proactively sending template messages to end customers via the outreach strategy engine.
Template types: Transactional, Marketing, Authentication
Sending restrictions: Content must be approved by Meta before delivery.
-
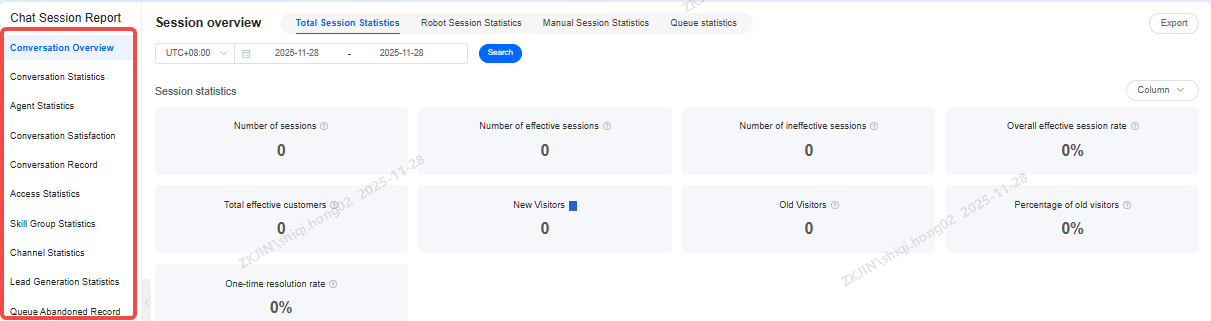
Analytics Report
Comprehensive reporting tracks every interaction, while agent status and connection duration monitoring help track working hours.
3.2 Ebay
Instadesk enables businesses to integrate eBay's native channel messages and order information as online chats, providing faster and more efficient customer support.
This feature allows real-time communication with customers to answer inquiries, provide product/service details, and handle complaints or feedback. It also supports managing multiple eBay stores within a single interface, improving agent efficiency and centralizing customer message management across all stores.
3.2.1 Pre-Operations
Instadesk offers multiple features to help businesses manage their eBay stores. Before getting started, users must complete 2 prerequisite steps.
3.2.2 Integration Process
The first prerequisite is the Integration Process, which involves authorizing your store.
-
Login to both your Instadesk account and eBay store, ensuring both are opened in the same browser.
-
Then complete the following steps:
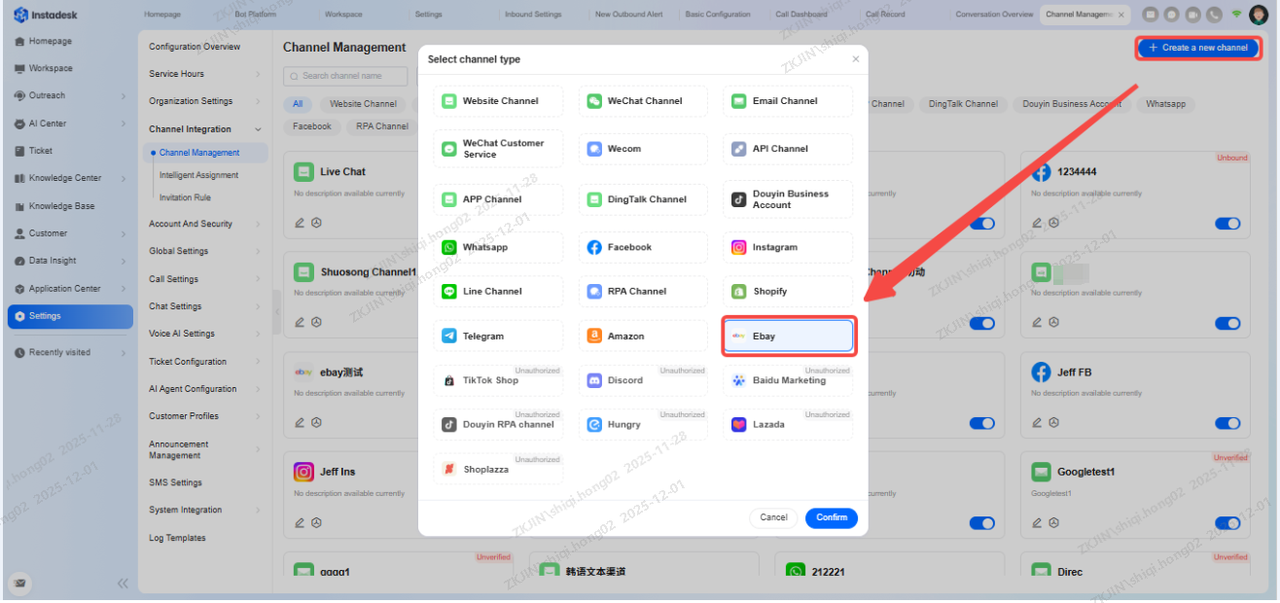
Navigation: Configuration Management > Channel Integration > Channel Management > New Channel, select eBay.
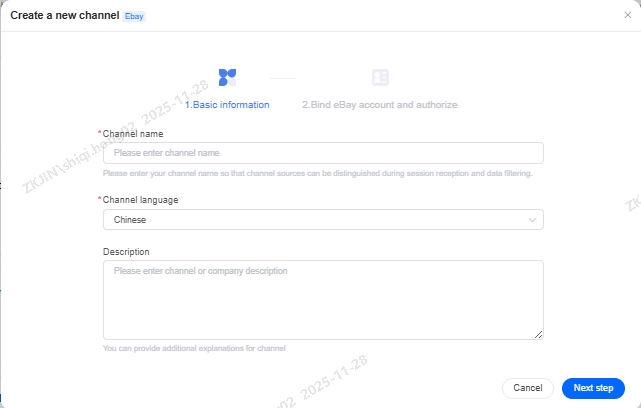
Enter the Channel Name and Channel Language
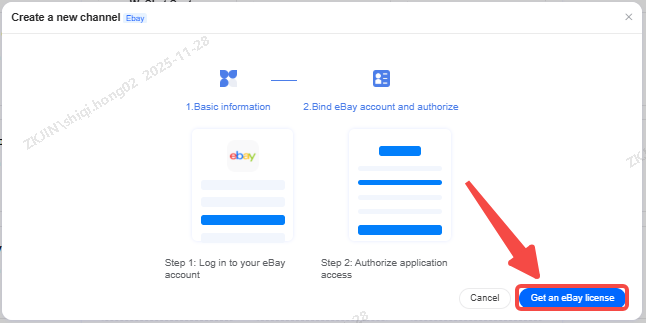
Ensure your eBay account is logged in, then click Authorize eBay Access
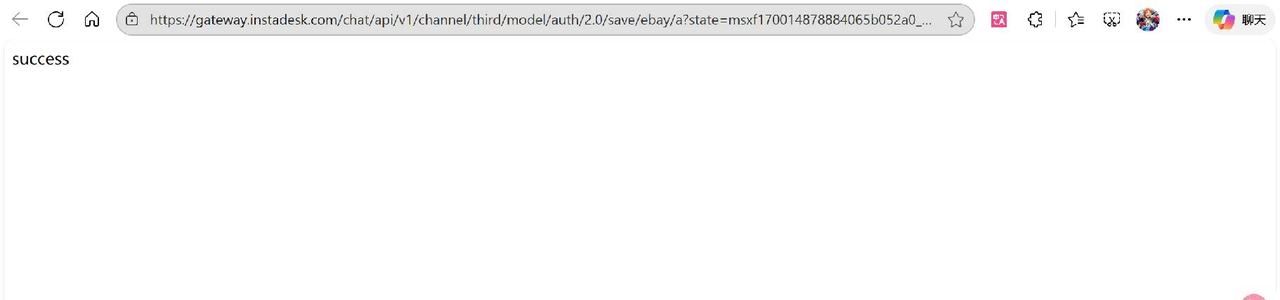
If the following page appears in the new pop-up window, the binding was successful
If the page does not appear, return to Channel Management, click the previously created eBay channel, and re-authorize it.
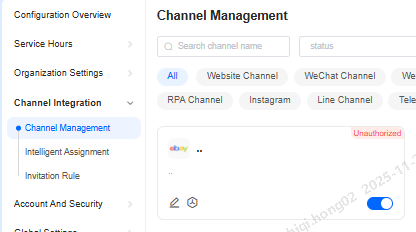
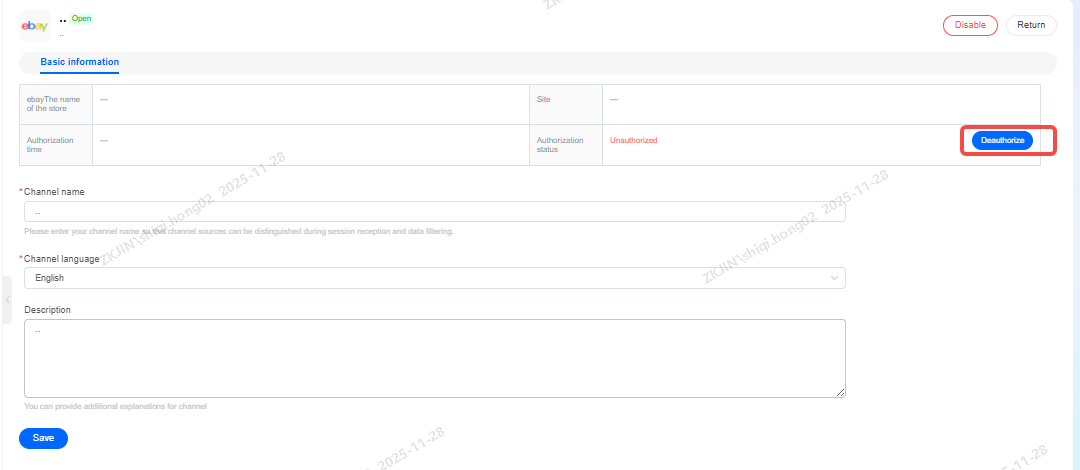
The Integration Process is now complete. Your eBay store and Instadesk account are successfully linked and in an Authorized status.
3.2.3 Additional Information
A single store can only be bound to one channel. If you attempt to authorize an already-linked store for a new channel, the new authorization will fail.
To unbind a store from a channel:
-
Click the Disable button in the lower-right corner of the channel card.
-
Then, click the Delete button in the lower-left corner to complete the unbinding process.
Configuring Intelligent Chat Assignment
To enable multiple agents to handle customer messages and ensure inquiries from different stores are automatically routed to the correct teams, you must complete the second prerequisite: configuring intelligent conversation assignment.
Example:
The merchant's Store 1 is authorized and bound to eBay Channel 1. All messages from this store should be handled by Agent A.
The merchant's Store 2 is authorized and bound to eBay Channel 2. All messages from this store should be handled by Agent B.
Setup Steps:
Navigate to: Configuration Management > Organization Settings > Skill Group Management.
Create Skill Groups:
Create eBay Skill Group 1 and add Agent A to it.
Create eBay Skill Group 2 and add Agent B to it.
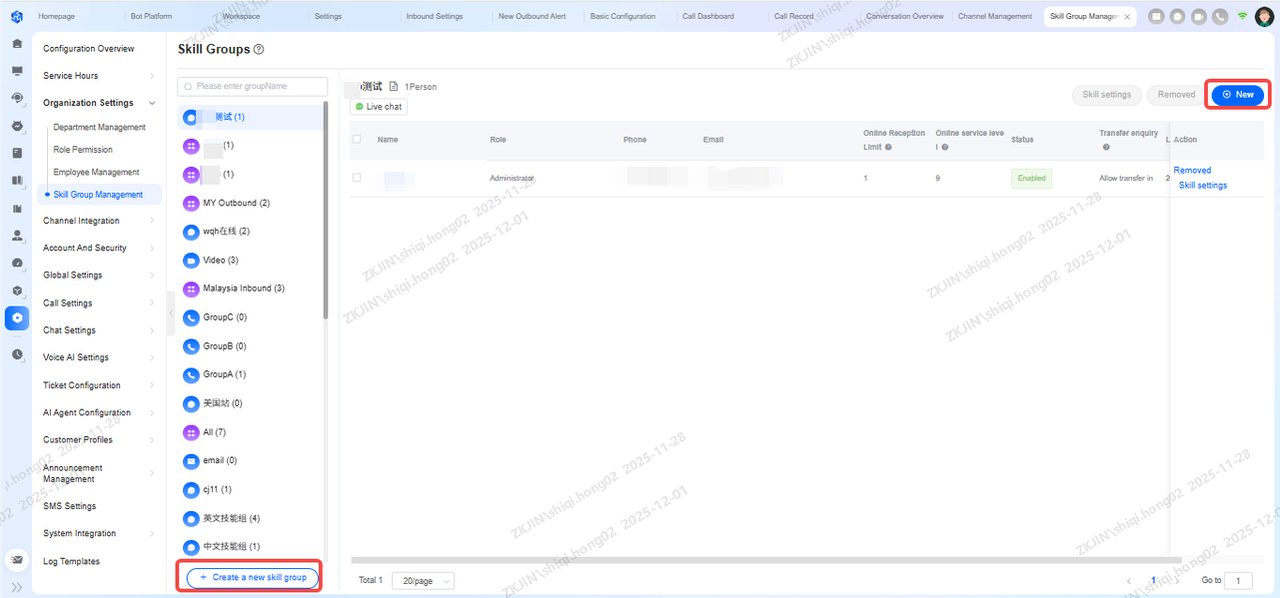
Configure Intelligent Assignment:
Go to: Configuration Management > Channel Integration > Intelligent Assignment.
Create a new assignment:
-
Name: ebay assignment 1
-
Type: Online Routing
-
Channel: Ebay Channel / ebay channel 1
-
Agent Group: ebay skill group 1
Create another assignment:
-
Name: ebay assignment 2
-
Type: Online Routing
-
Channel: Ebay Channel / ebay channel 2
-
Agent Group: ebay skill group 2
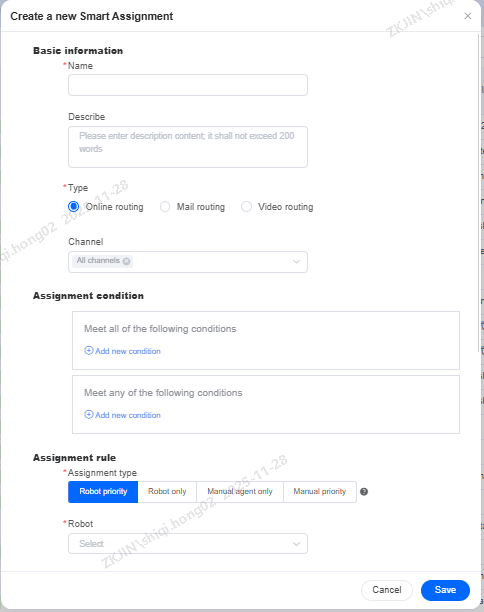
After configuring, when the customer starts a conversation, Instadesk will automatically route the chat to the designated agent based on the intelligent assignment rules.
3.2.4 Product Capabilities
After completing the two prerequisite steps, businesses can use the platform to communicate with customers. This document outlines four key functional modules.
Conversation Assignment
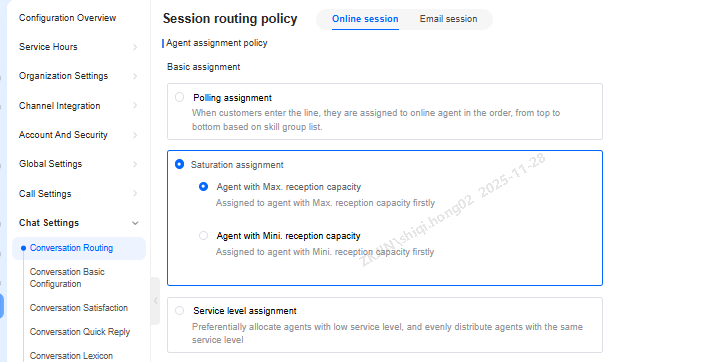
In addition to intelligent assignment, the platform supports various routing strategies:
-
Agent Assignment Policy
-
Priority Assignment
-
Queue Priority Policy.
Businesses can combine these strategies to distribute workload efficiently, balance productivity with service quality, and enhance customer satisfaction.
Configuration Path: Configuration Management > Conversation Settings > Conversation Routing
3.2.5 Online Customer Service
When using the platform, click Workspace on the homepage to access features like customer chats and queue management.
The top-right corner of the page displays the status of 5 functions. The third one is the Chat status, which by default is set offline. Agents can switch this to another status.
Agents typically encounter 3 main scenarios when using the platform:
-
Offline Messages: When the intelligent assignment rules is set to Agents only or Agents first, and all agents are offline, incoming customer messages are automatically routed to the Offline Messages section in the Workspace. This ensures messages are captured and agents can view them when they go online.
-
Active Chat: When an agent is online, all real-time messages from a single customer are combined into 1 chat and displayed in the In Progress section of the Workspace.
-
Multiple Active Chats: When an online agent receives messages from multiple customers simultaneously, they can use the Online Queue feature to manage and prioritize these conversations efficiently.
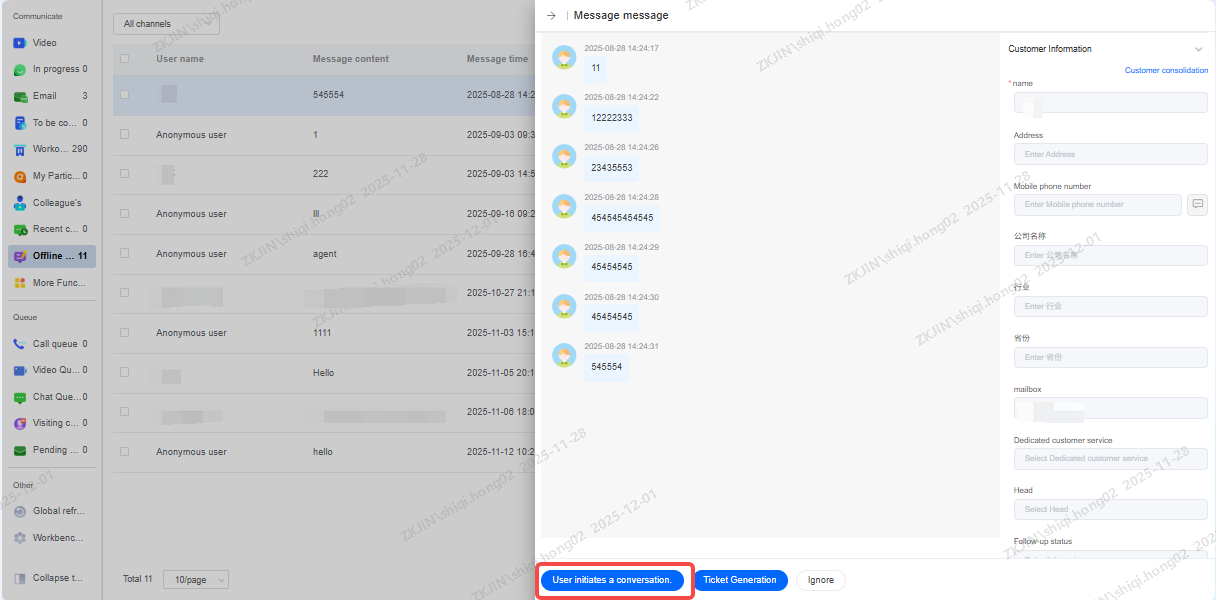
Convert Message to Live Chat
Once online, an agent can click on a customer's offline message to instantly convert it to live chat (Scenario 2), allowing them to proactively start a conversation and provide a timely response.
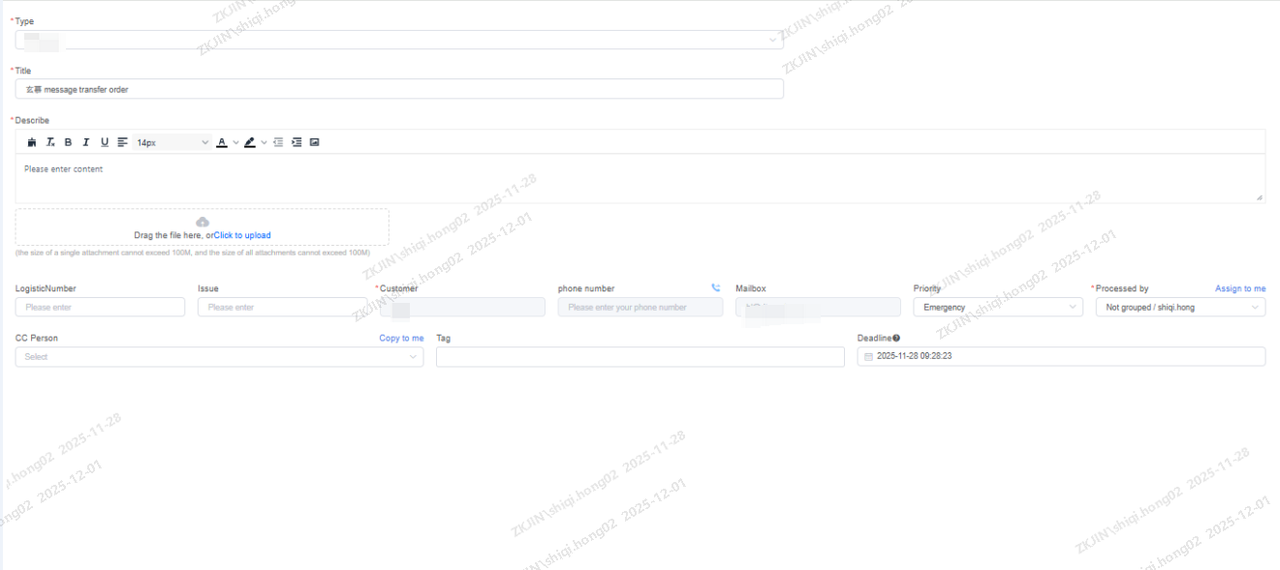
Convert Message to Ticket
Agents can create a ticket directly from a customer's offline message, routing it through different workflows based on the ticket type.
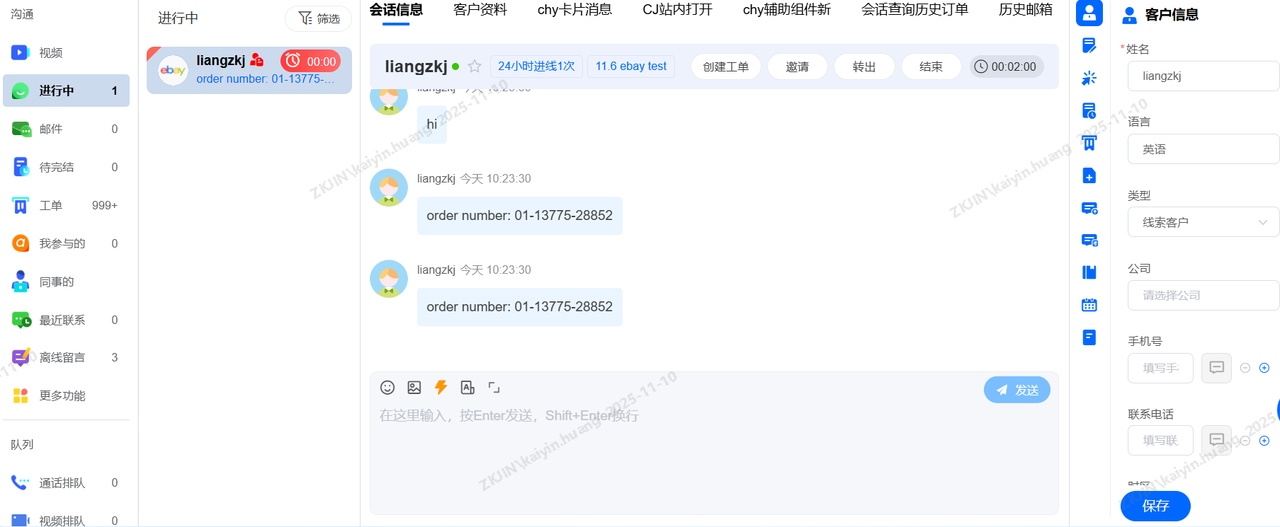
Scenario 2: Start Chat
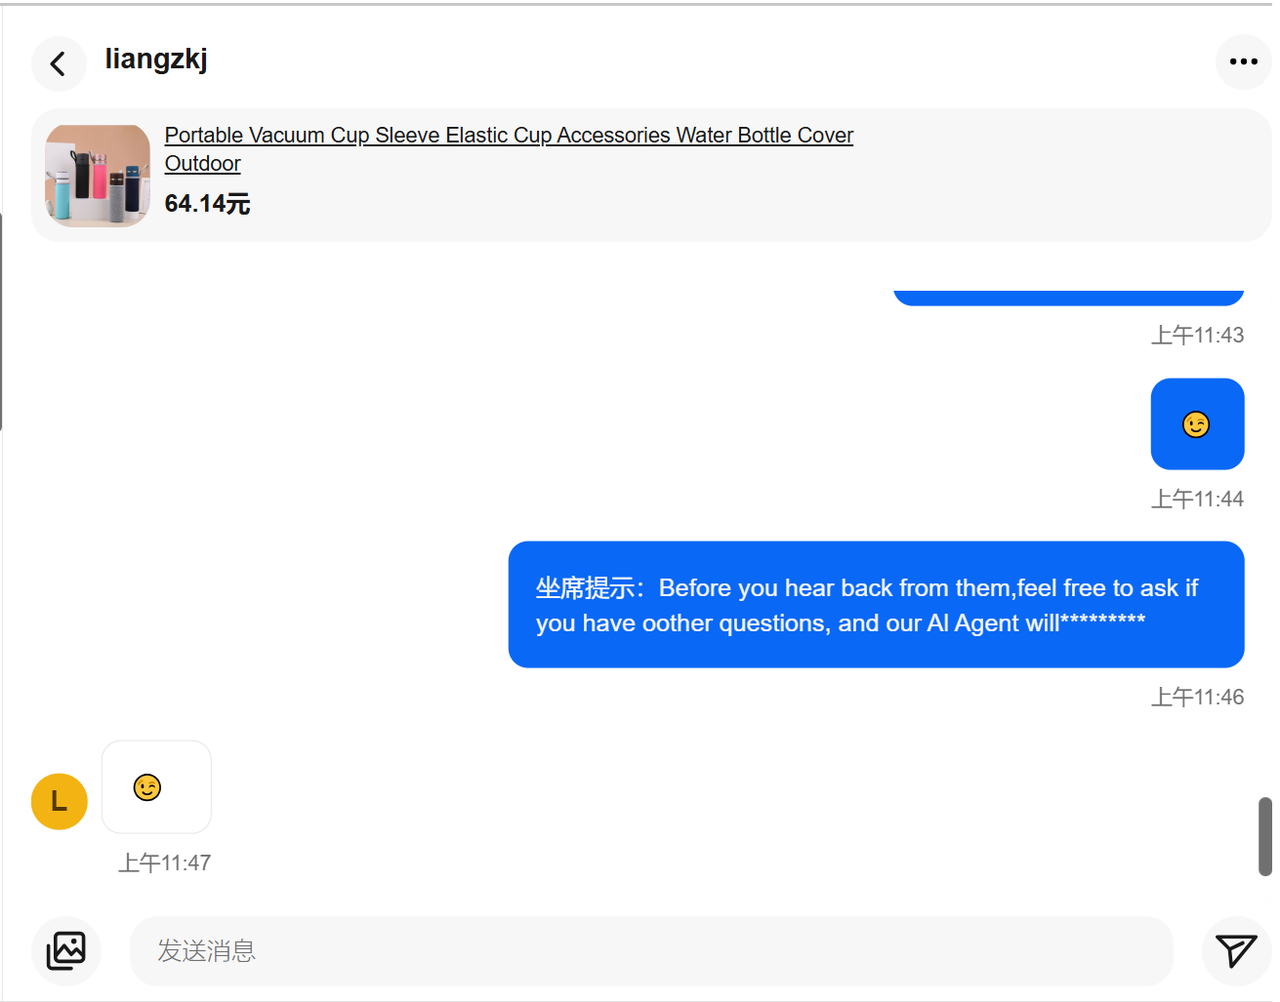
When an agent's status is set to Online, incoming customer chats are automatically routed to the Workspace > In Progress section. This enables instant communication with eBay customers, as chats are intelligently assigned to available agents for immediate, zero-second response. The platform supports replying with text, images and emojis.
-
Supported Message Types
|
Message Type
|
Instadesk supports both receiving and sending messages
|
|
Text
|
Supported
|
|
Pictures
|
Supported (jpg, png, jpeg)
|
|
Emojis
|
Supported
|
Agents can send text, images, and emojis through the platform. These messages are simultaneously displayed in the backend of the linked eBay store.
-
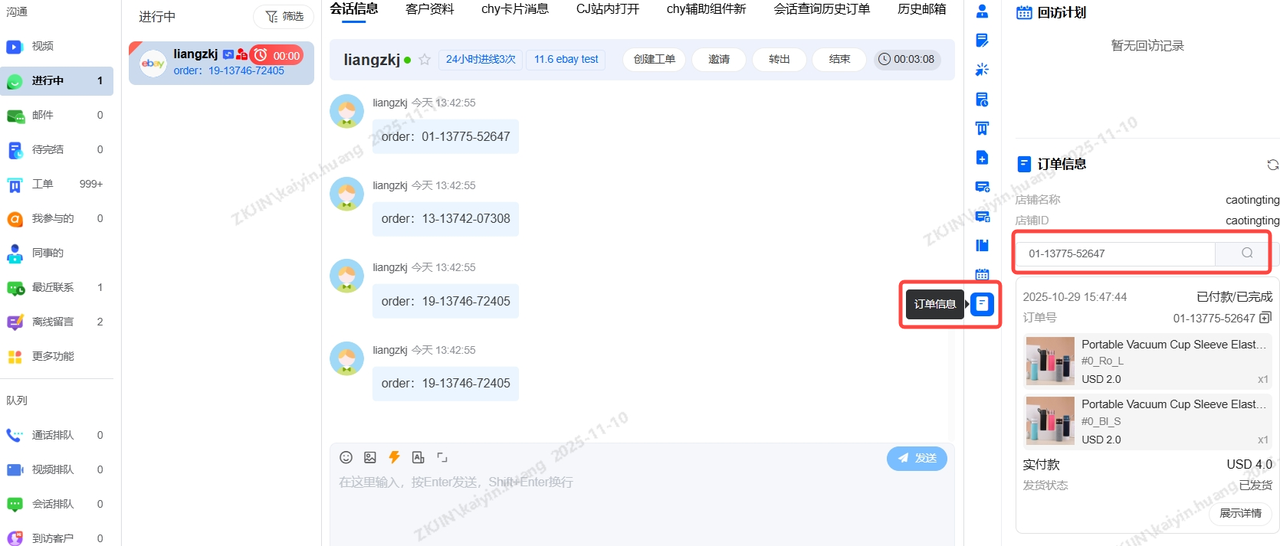
Request Order Information
When a customer has multiple orders, the agent can enter the Order ID in the right hand Order Information panel to look up the details for each specific order.
-
Multi-language Translation
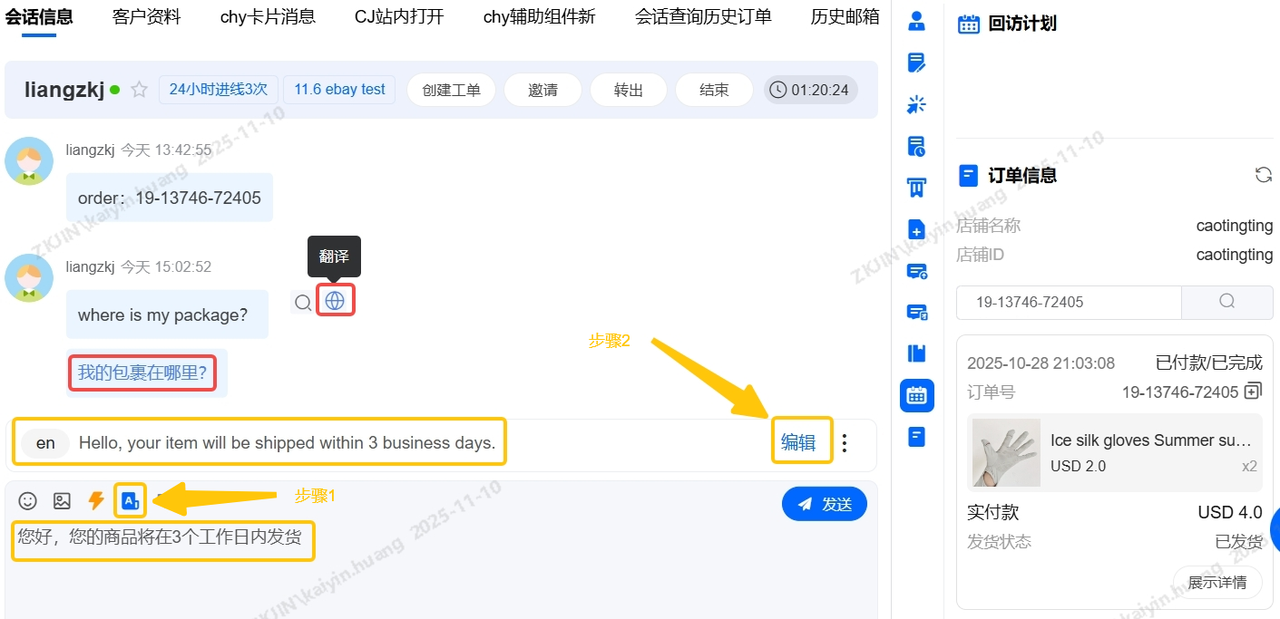
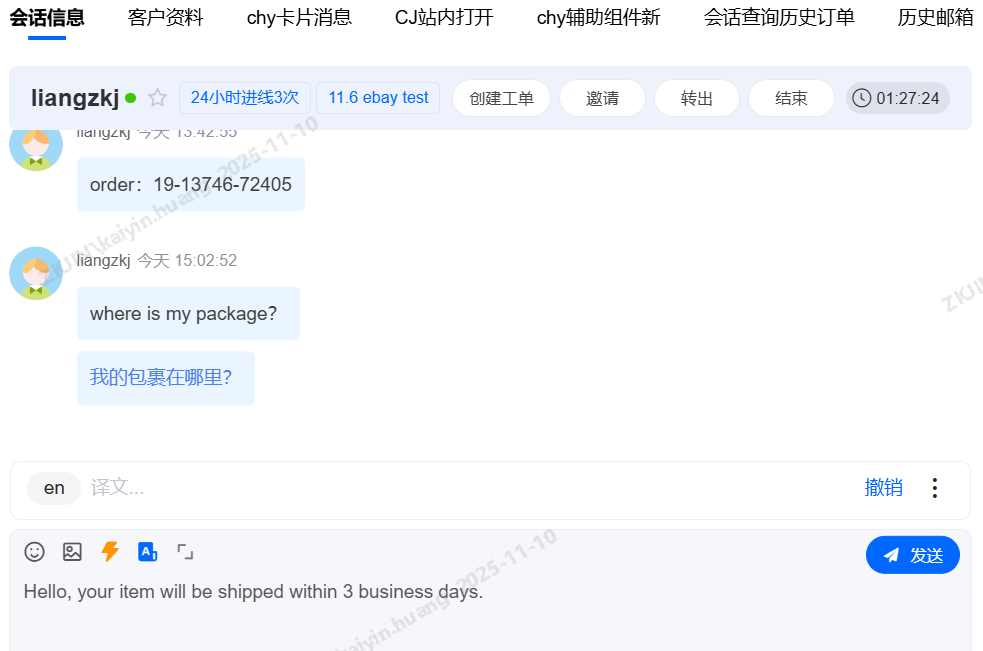
The platform supports translation for both customer and agent messages.
When communicating with non-Chinese speaking customers, agent can:
-
Click the Translate button in the dialog box. The entered text is automatically translated into the selected language.
-
Click Edit to automatically populate the translated text into the input field for sending.
-
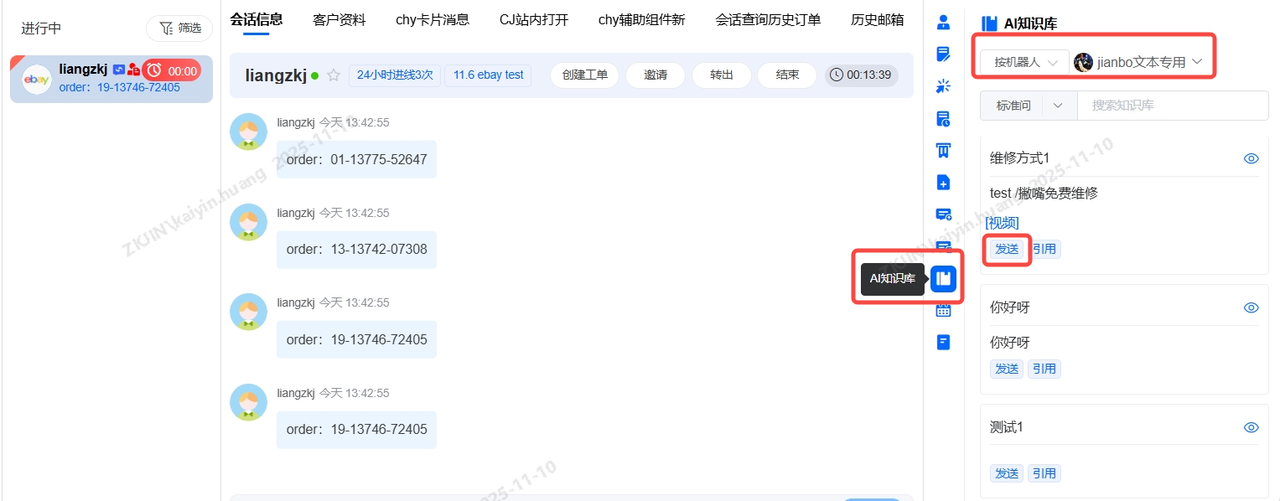
AI Knowledge Base
During a conversation, agents can use a powerful knowledge base (pre-loaded with FAQs, standard replies, and visual aids) via AI Knowledge Base in the right-hand panel. This allows them to quickly send multiple pre-set responses, making communication more efficient
Scenario 3: Online Queue
When an agent is engaged in an existing chat, new eBay chats enter a queue based on predefined rules. Customers can check their real-time queue position. Once the current chat ends, the agent is connected to the customer who has been waiting the longest.
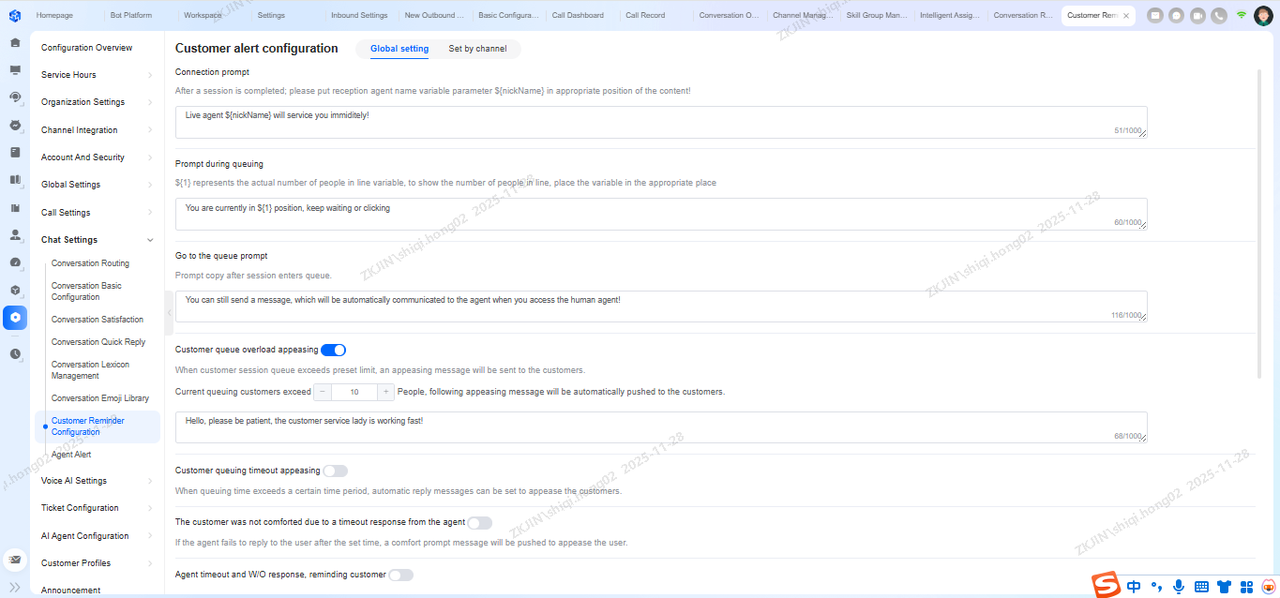
Businesses can pre-configure various automated messages for different queuing scenarios. These messages are automatically sent to customers when specific conditions are met.
Configuration Path: Configuration Management > Conversation Settings > Customer Notification Settings
Configurable Messages & Notifications
-
Connection Message
-
Queue Position & Entry Notification
-
Queue Overflow & Timeout Reassurance
-
Queue End Notification
-
Agent Response Timeout Reassurance
-
Customer Response Timeout Reminder
-
No Agents Online Auto-Reply
-
Off-Hours Auto-Reply
-
Blacklist Reply
Reporting & Analytics
Comprehensive reporting tracks every interaction for data-driven decisions. Monitor agent status and connection times for attendance tracking.
Go to: Data Operations > Conversation Reports > Conversation Overview
Conversation Overview: Get a clear view of total conversations, bot/agent distribution, and real-time queue monitoring to optimize response efficiency.
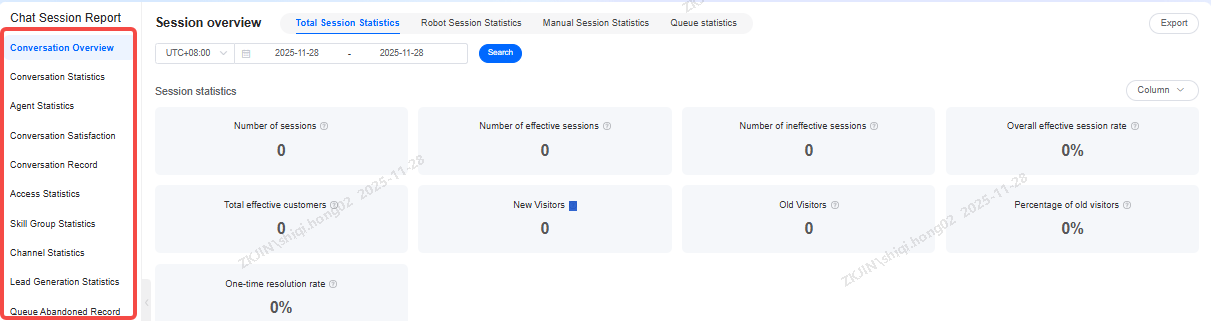
Conversation Statistics: Analyze data by day or hour to pinpoint peak periods and optimize resource allocation.
Agent Statistics: Evaluate agent performance, break times, and email handling metrics to enhance team management.
Satisfaction Rate: Track satisfaction scores for both human and bot services to continuously improve user experience.
Session Records: Maintain complete logs of agent, bot, and email interactions for review and training.
Visit Analytics: Gain insights into customer sources, search terms, and page paths to understand user behavior and support marketing decisions.
3.3 Facebook Messenger
-
The customer creates a Facebook account and s successful login.
-
Confirm Facebook authorization.
-
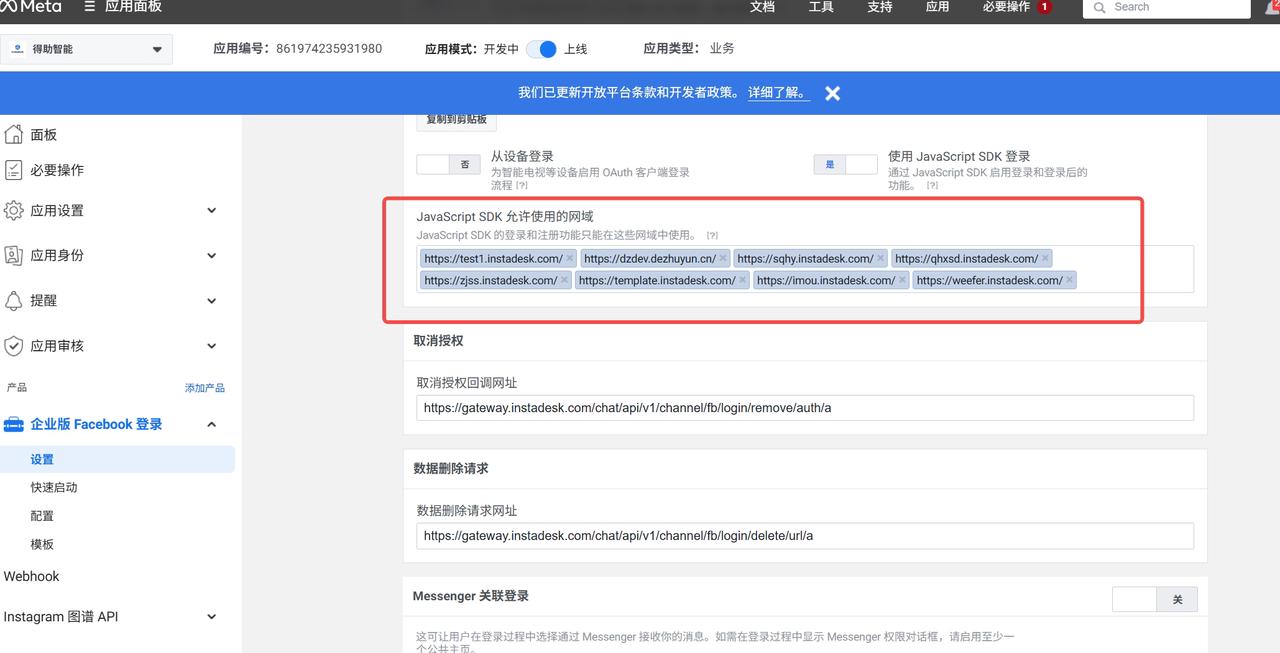
Contact the Product Manager (@黄思睿 ) to add the customer domain (domain.instadesk.com) to ZKJ’s Facebook Developer Console.
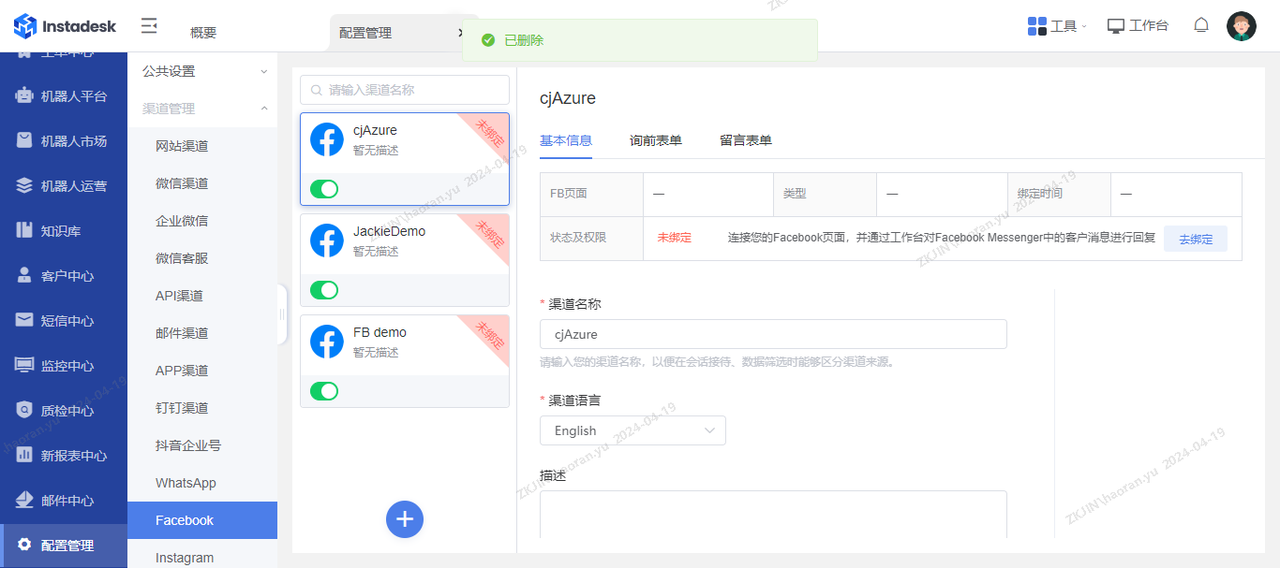
-
The customer logs into tenant account, Navigate to Configuration Management → Channel Management → Facebook → click "➕" to add channel.
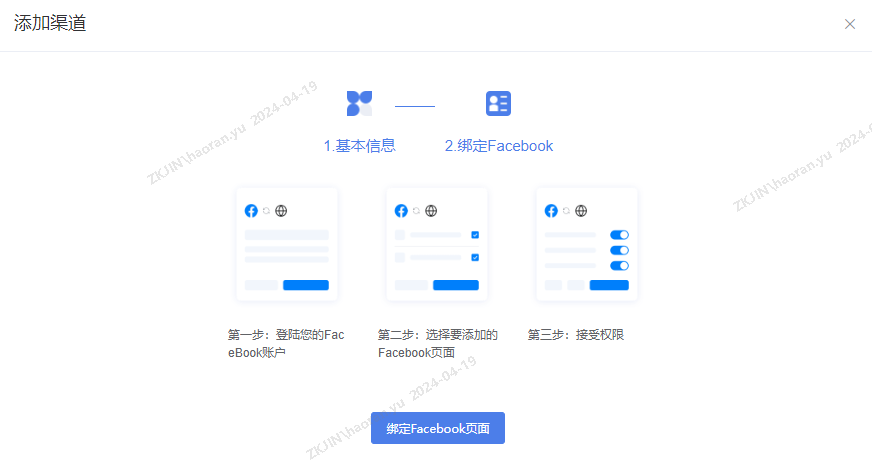
-
Enter channel name, language, and remarks → Next → “Bind Facebook Page”.
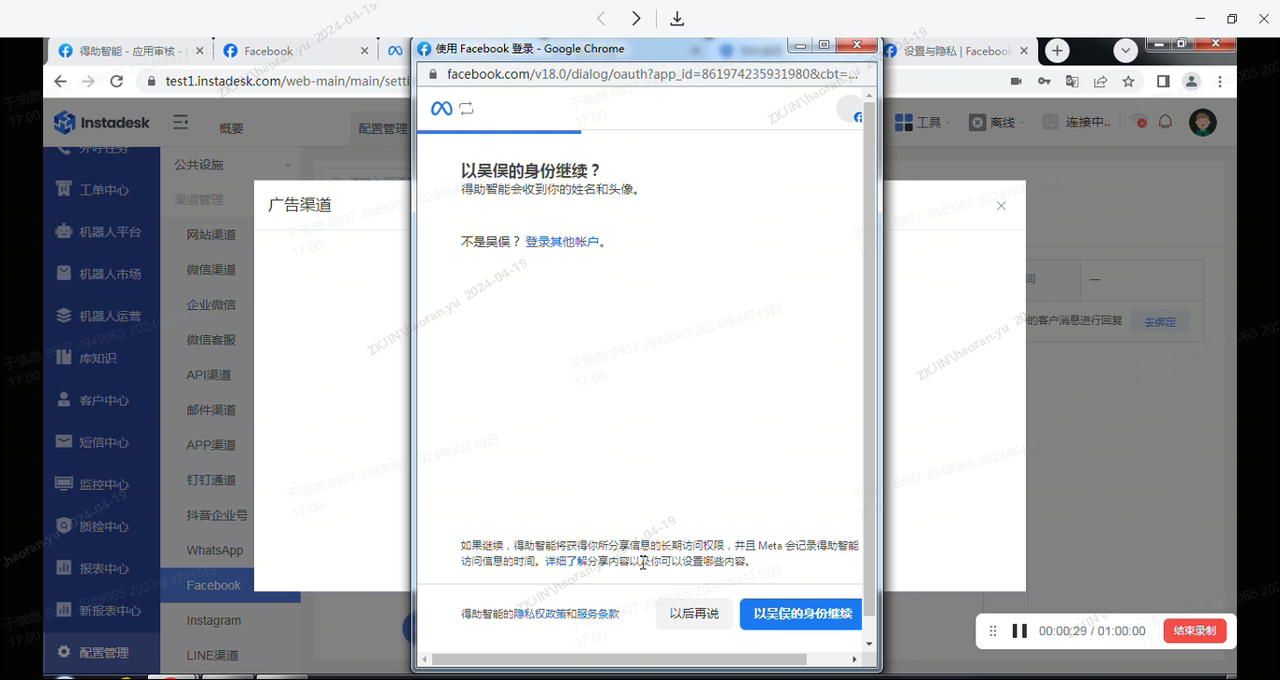
-
In the pop-up, log in to Facebook and select the Facebook Page to bind (create one if none exists) → authorization.
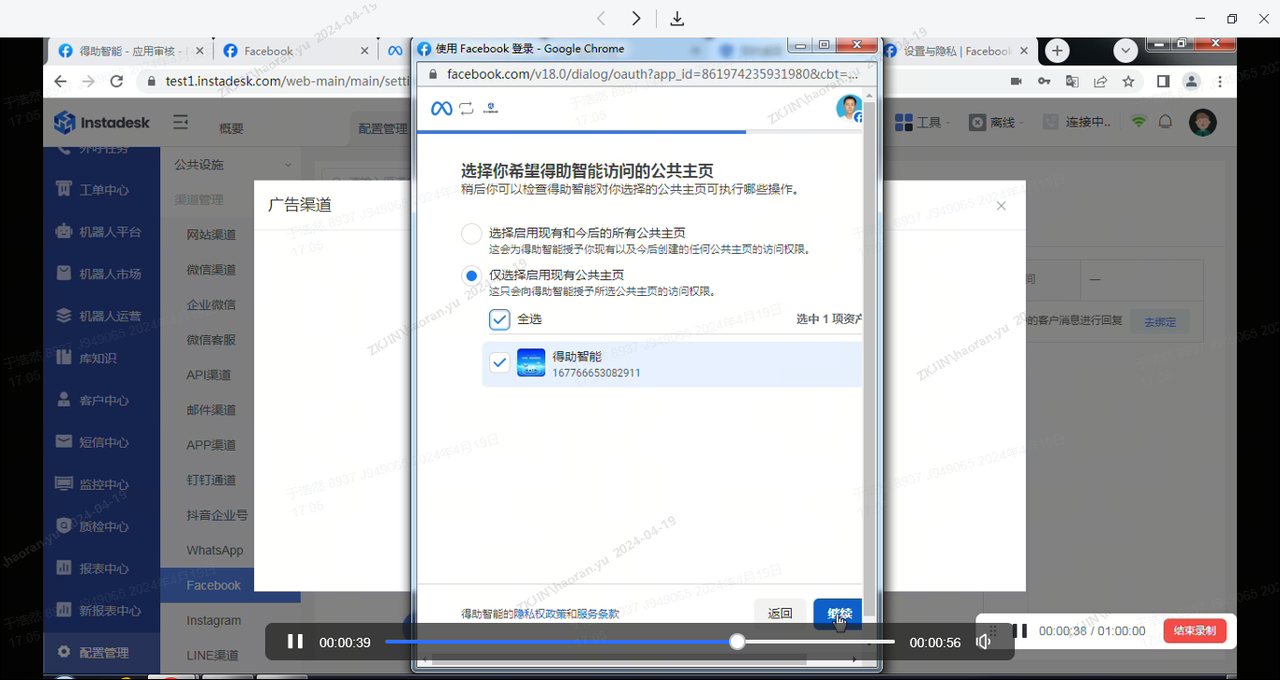
This completes the Facebook channel binding process
Troubleshooting Tips
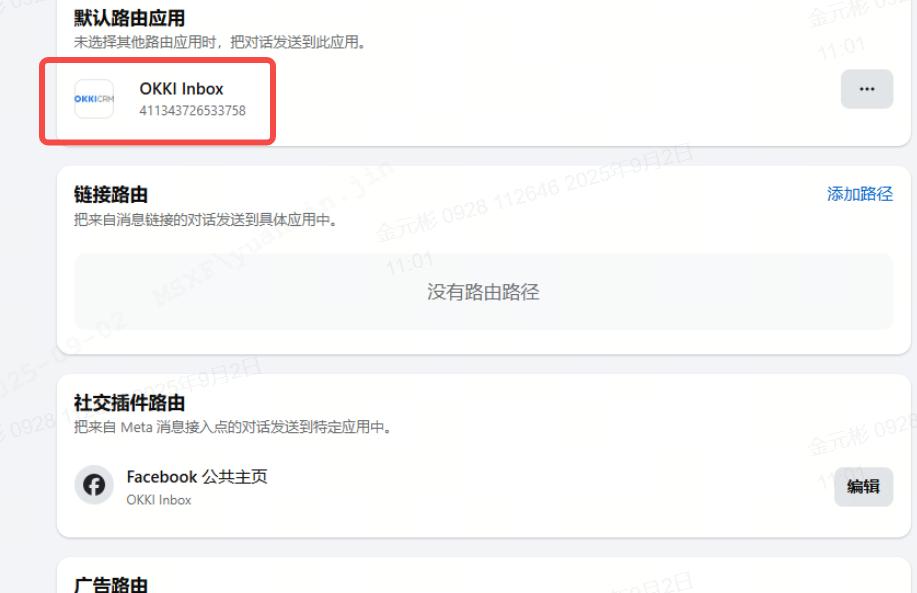
If the customer’s Facebook account has third-party apps bound, set Instadesk as the default routing app. Otherwise, the system cannot retrieve Facebook messages.
3.4 Instagram
-
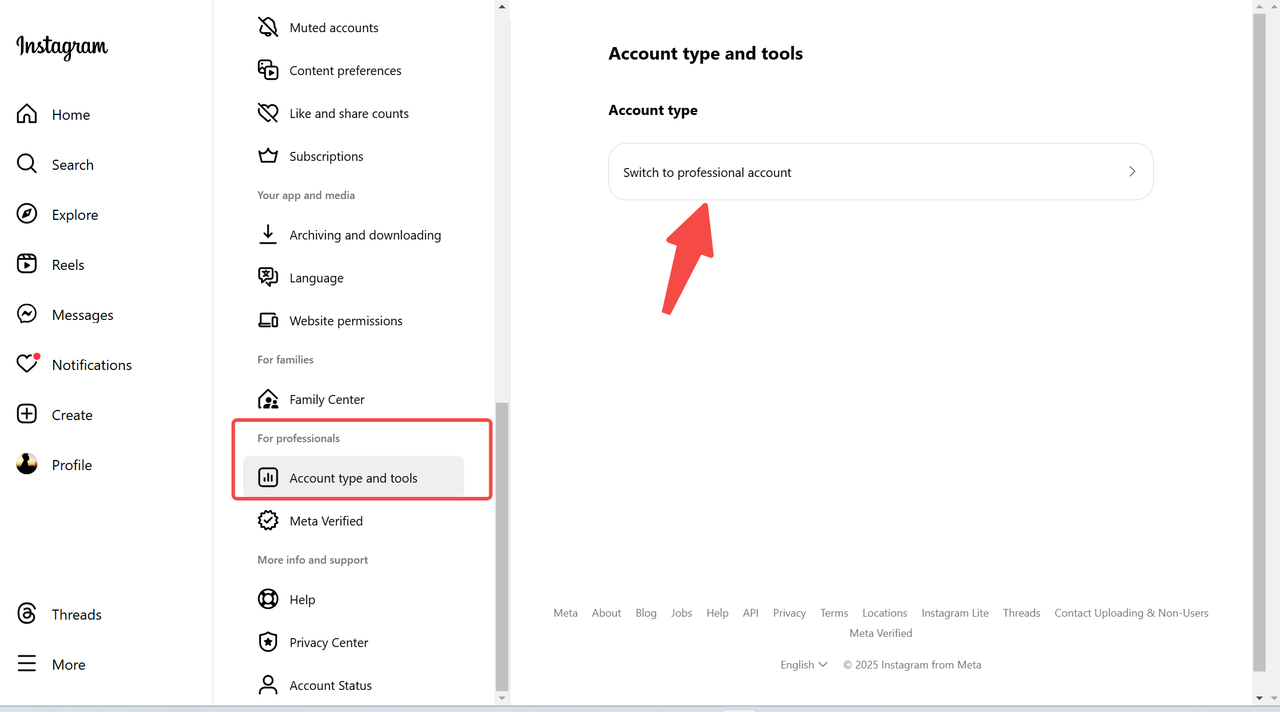
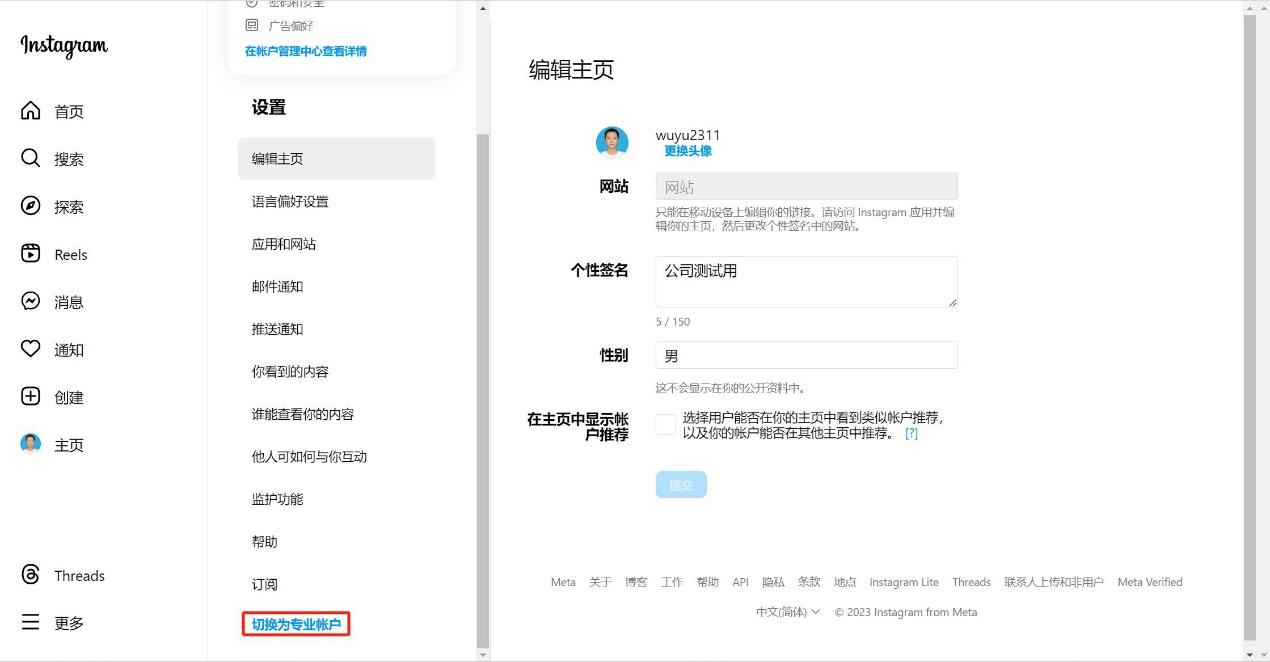
Customer creates an Instagram account and switches to a Professional Account.
-
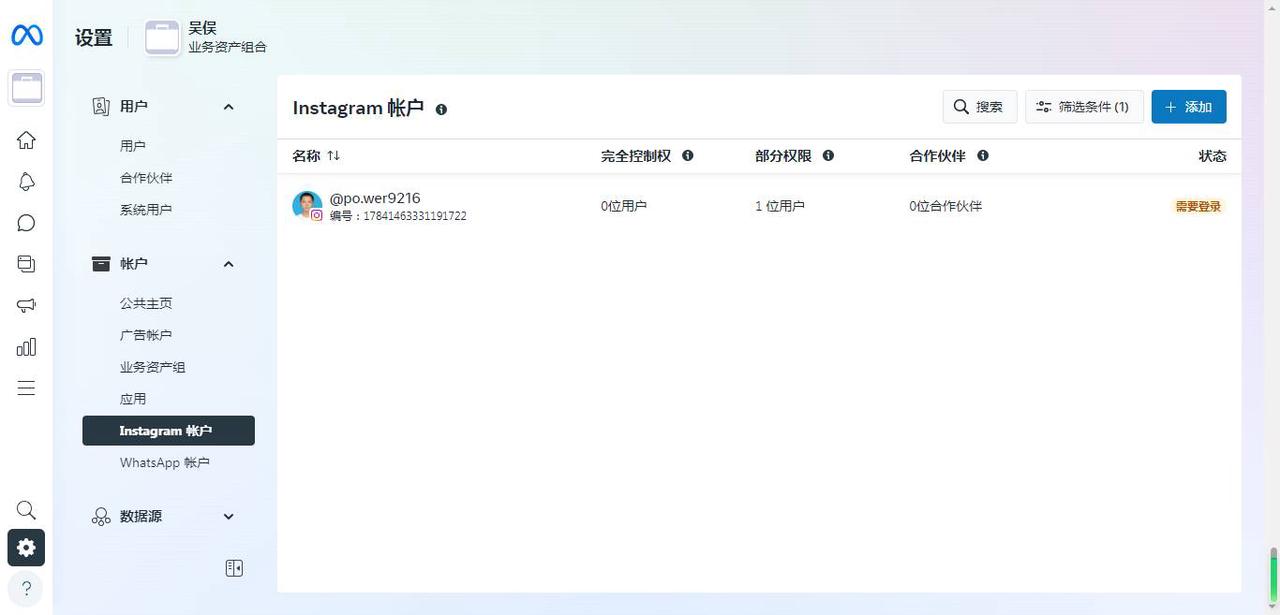
Log in to Facebook, on the Facebook Page, link the Instagram account. Navigate to Facebook Page → Settings → Linked Accounts → Instagram.
-
The customer logs into tenant account, Navigate to Configuration Management → Channel Management → Instagram → click "➕" to add channel.
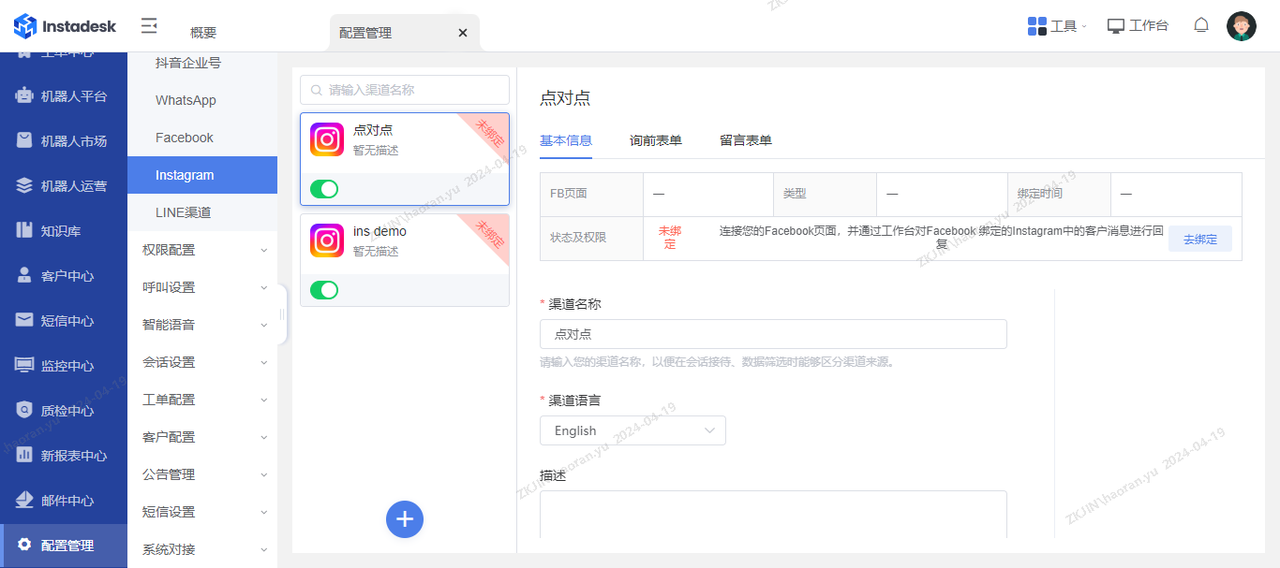
-
Enter channel name, language, remarks → Next → “Bind Facebook Page”.
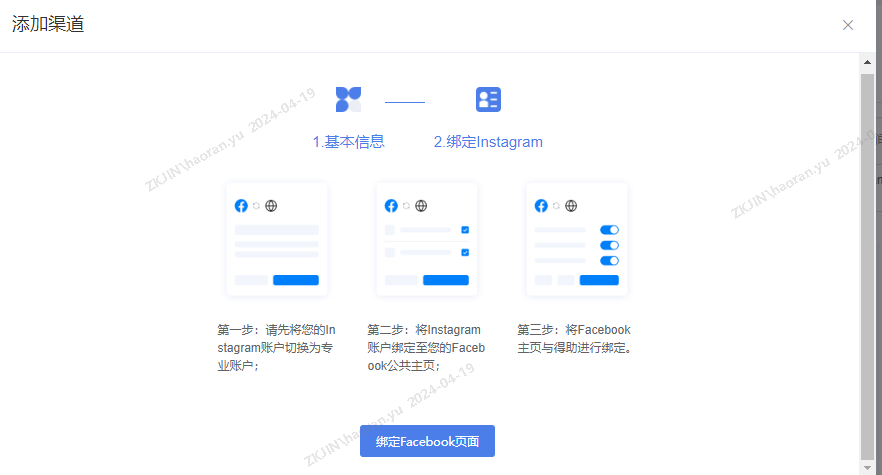
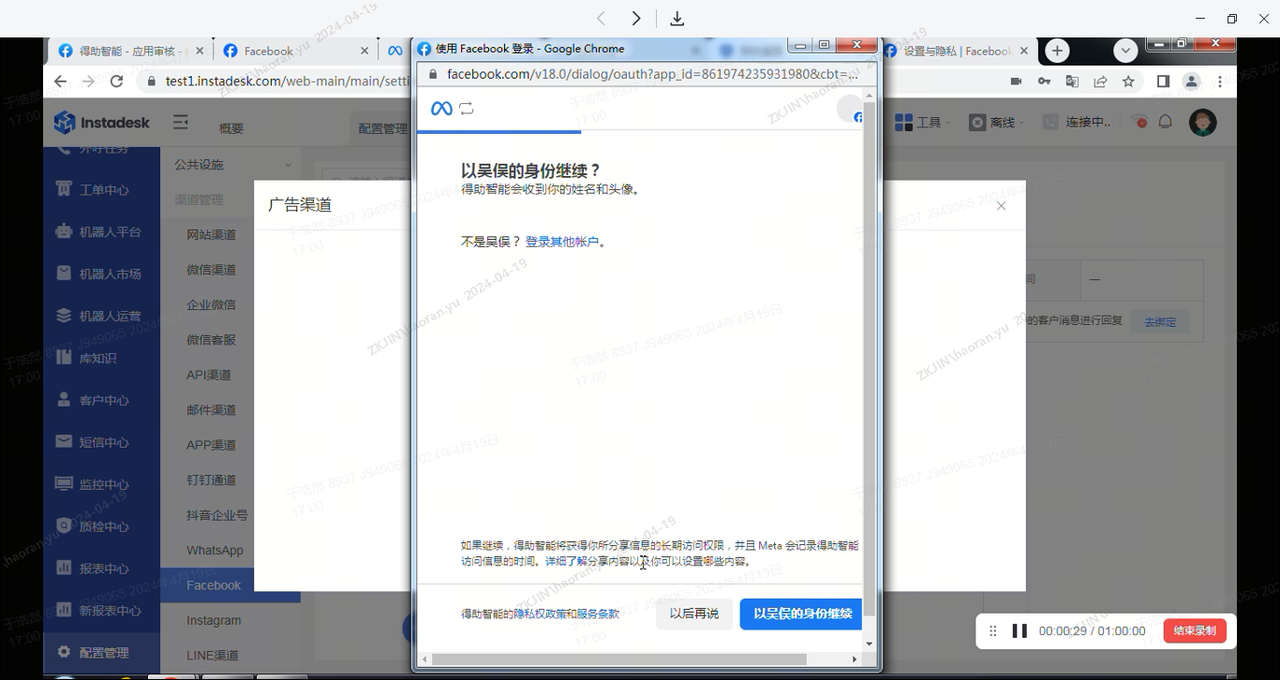
-
After Facebook login, select the Facebook Page to be bound (if no Page has been created, please create one), and the authorization.
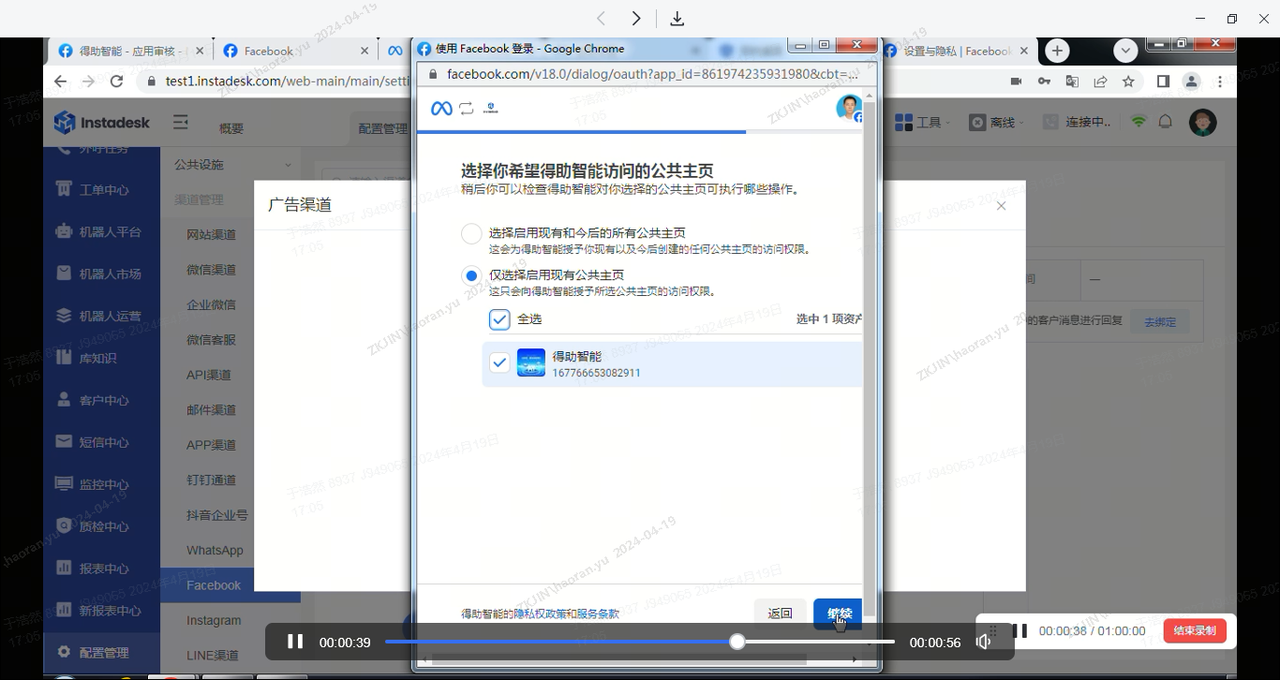
This completes the Instagram channel binding process.
3.5 Line
-
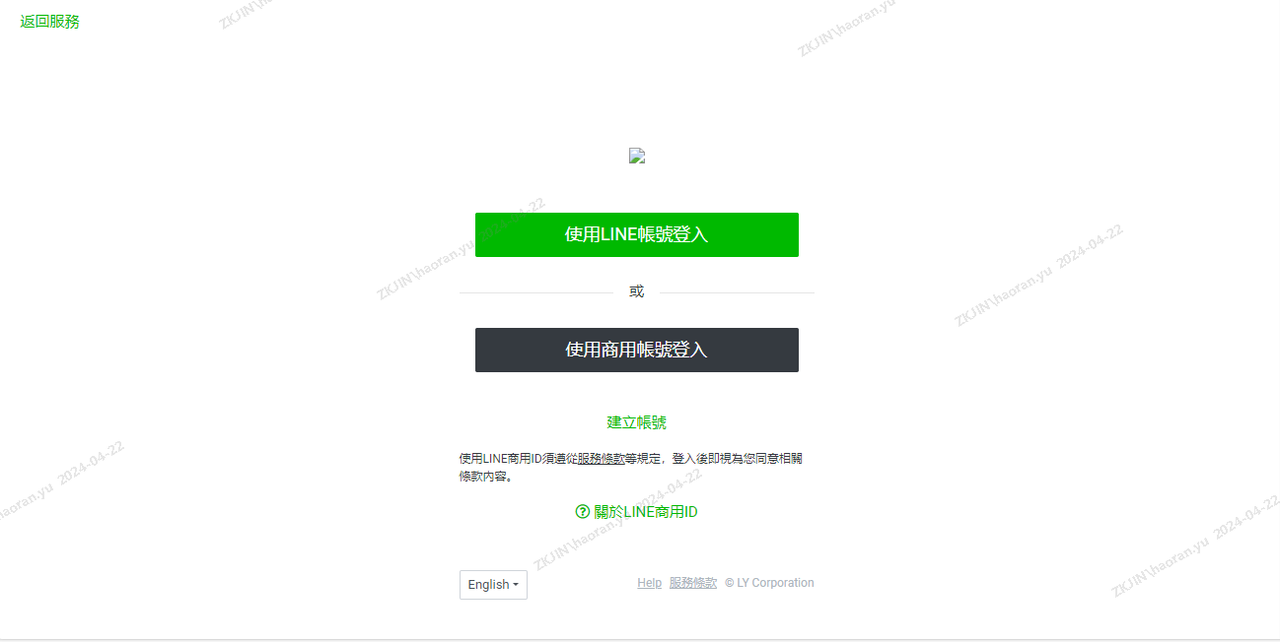
Customer registers a personal or official Line account, creates a Developer Account (login via LINE Business ID).
-
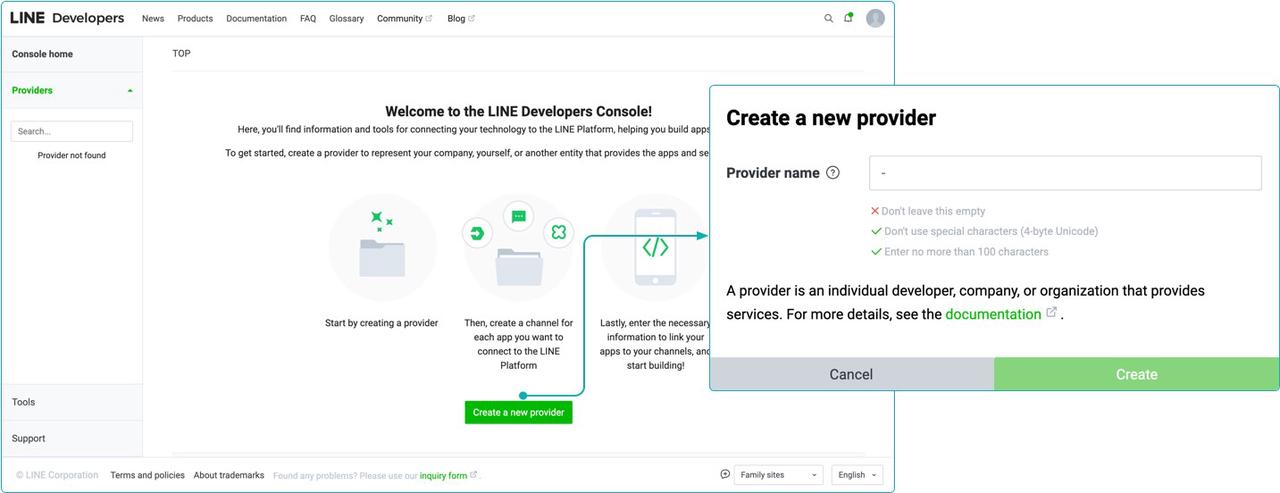
Create a Line Provider.
-
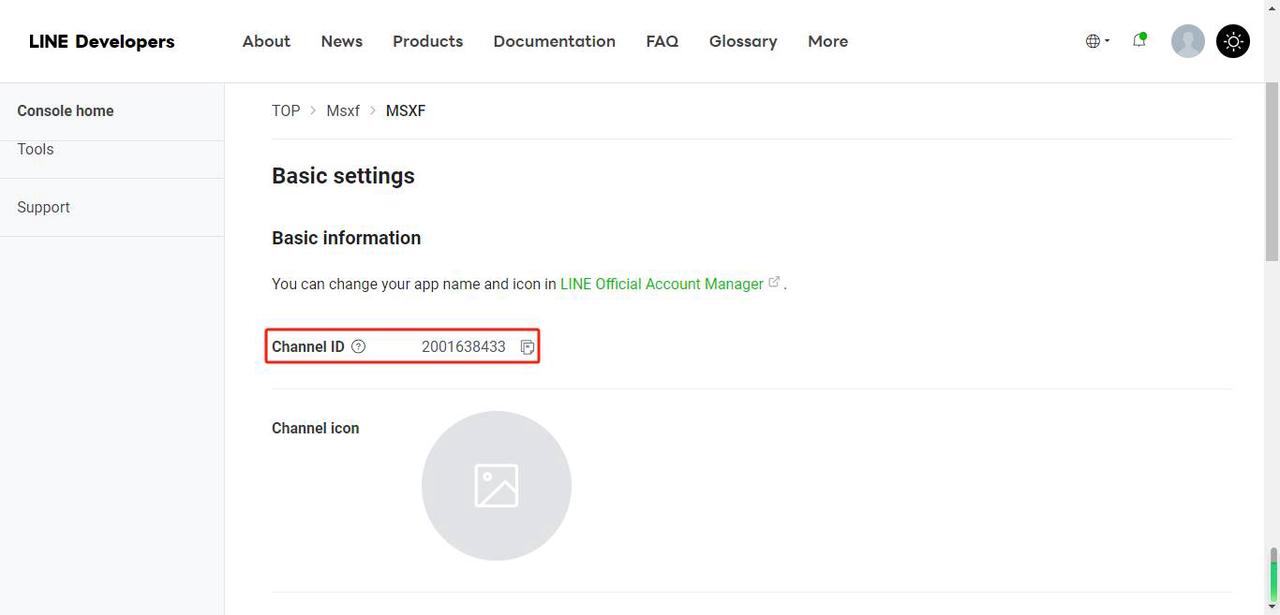
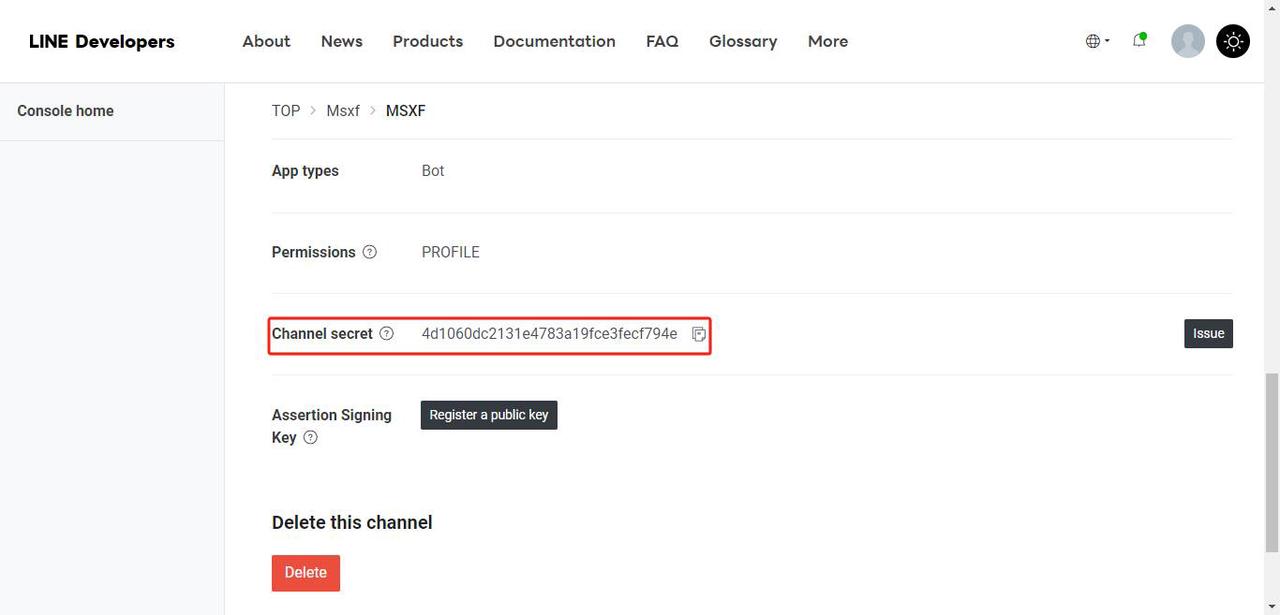
Create a Messaging API channel, and record the Channel ID, Channel Secret, and Channel Access Token for the Messaging API channel.
-
The customer logs into tenant account, Navigate to Configuration Management → Channel Management → LINE → click "➕" to add channel.
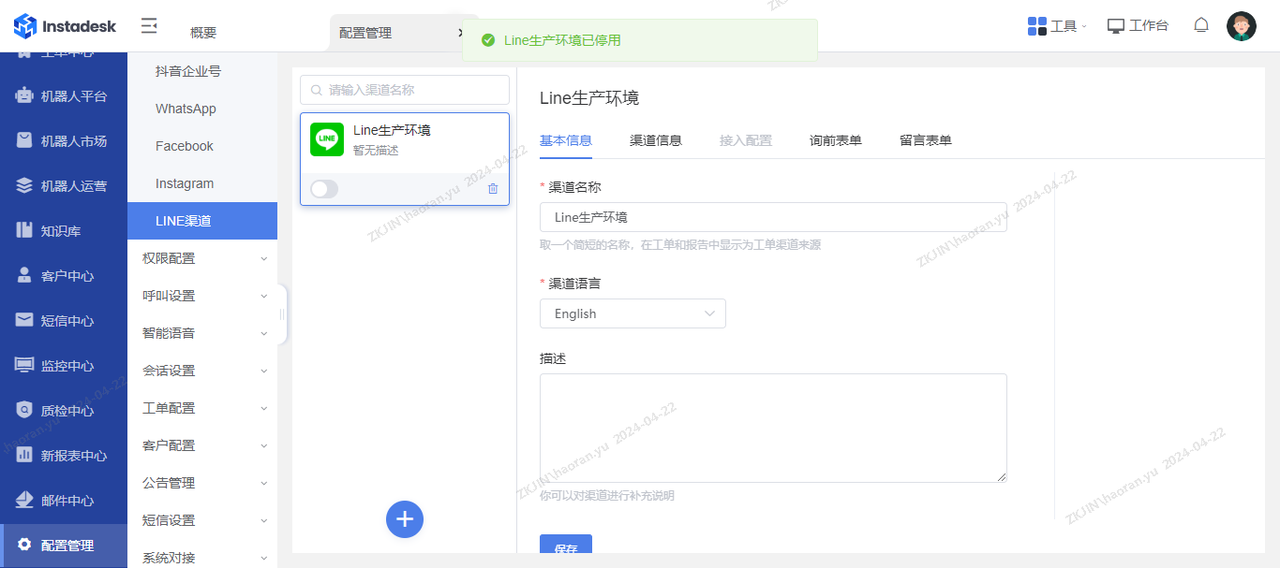
-
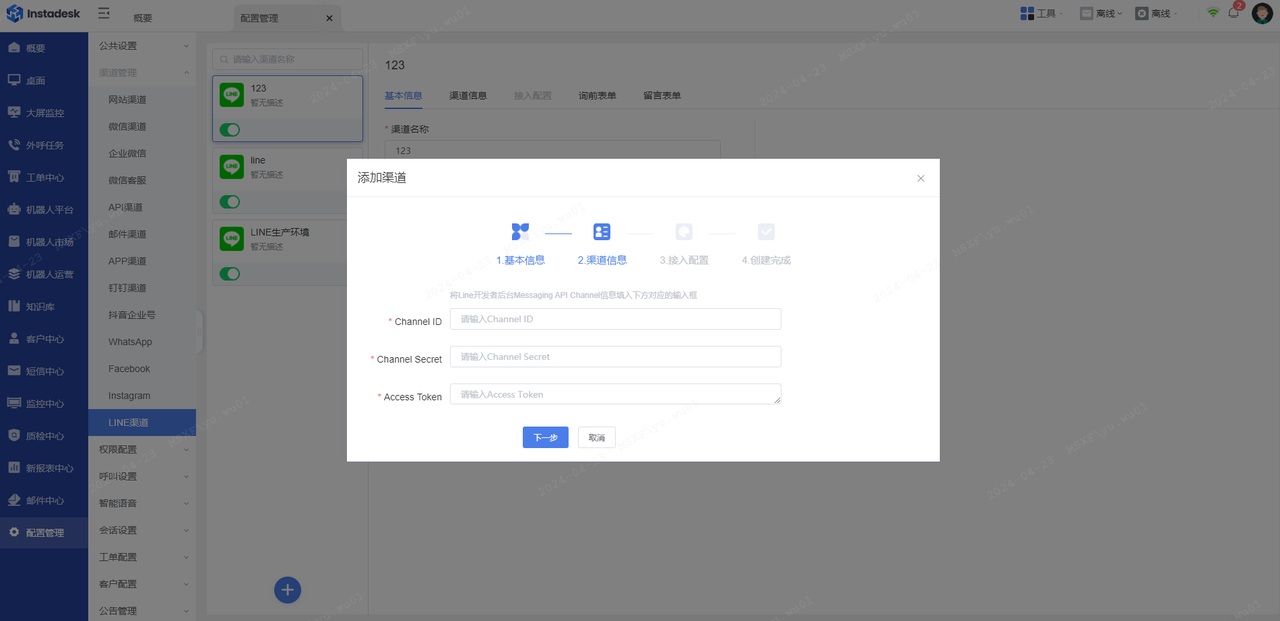
Enter channel name, language, remarks → Next → input Channel ID / Secret / Access Token → Next → obtain Webhook URL.
-
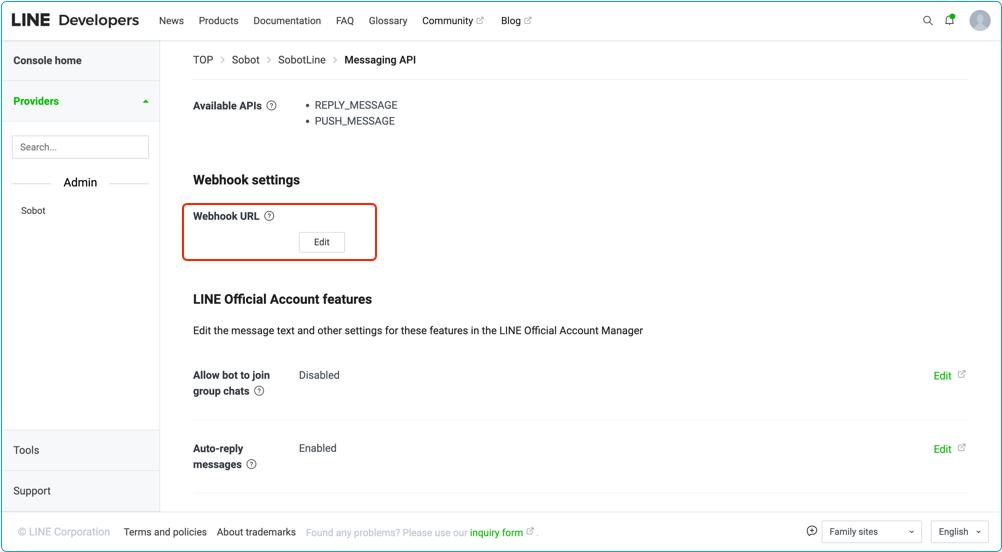
Return to the LINE Developers Platform, select the application that needs to be configured, open the Messaging API settings page, and proceed with the Webhook URL configuration.
-
Open the LINE Official Account management platform, go to the account details page, click on Settings → Response settings, and configure the response mode for the channel as shown in the diagram below.
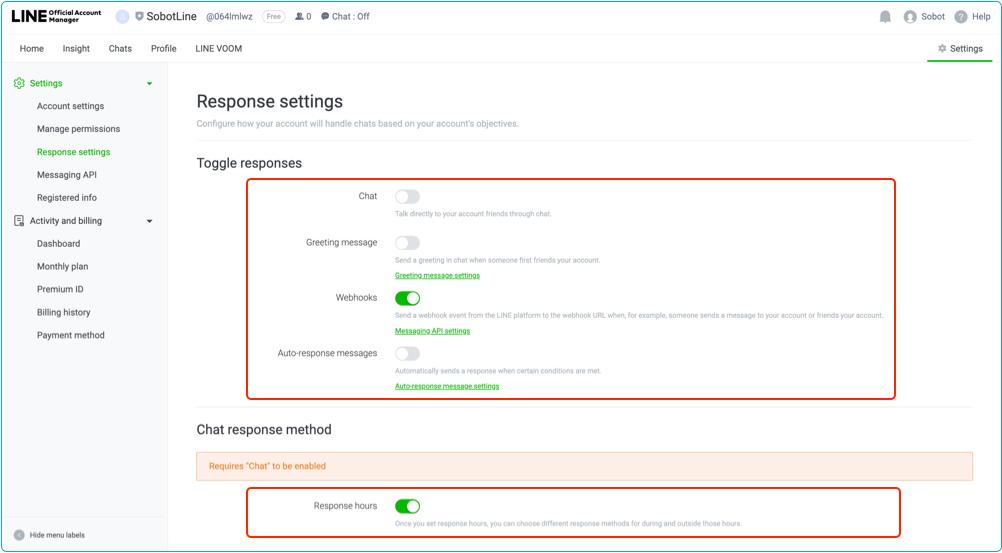
This completes the Line channel binding process.
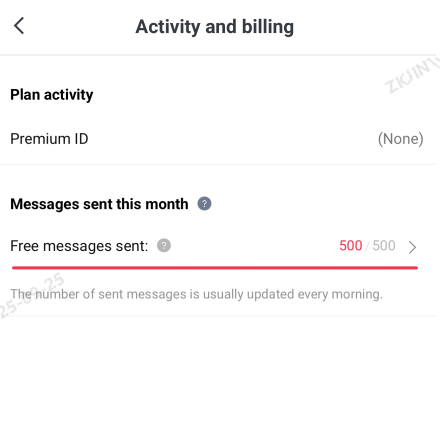
Note: Line provides only a limited quota of free messages. When the quota is exhausted, agents cannot send messages. As shown in the diagram below, this account has 500 free messages per month; exceeding this requires recharging in the Line backend.
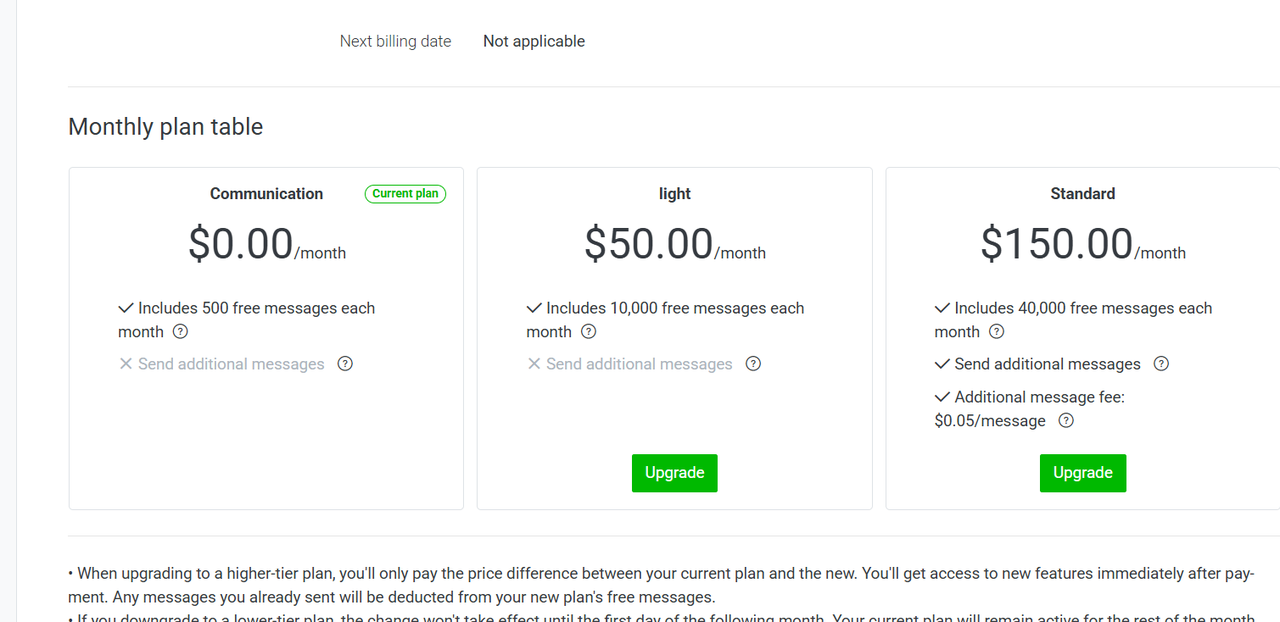
Refer to the chart below for the official Line pricing rules.
3.6 Telegram
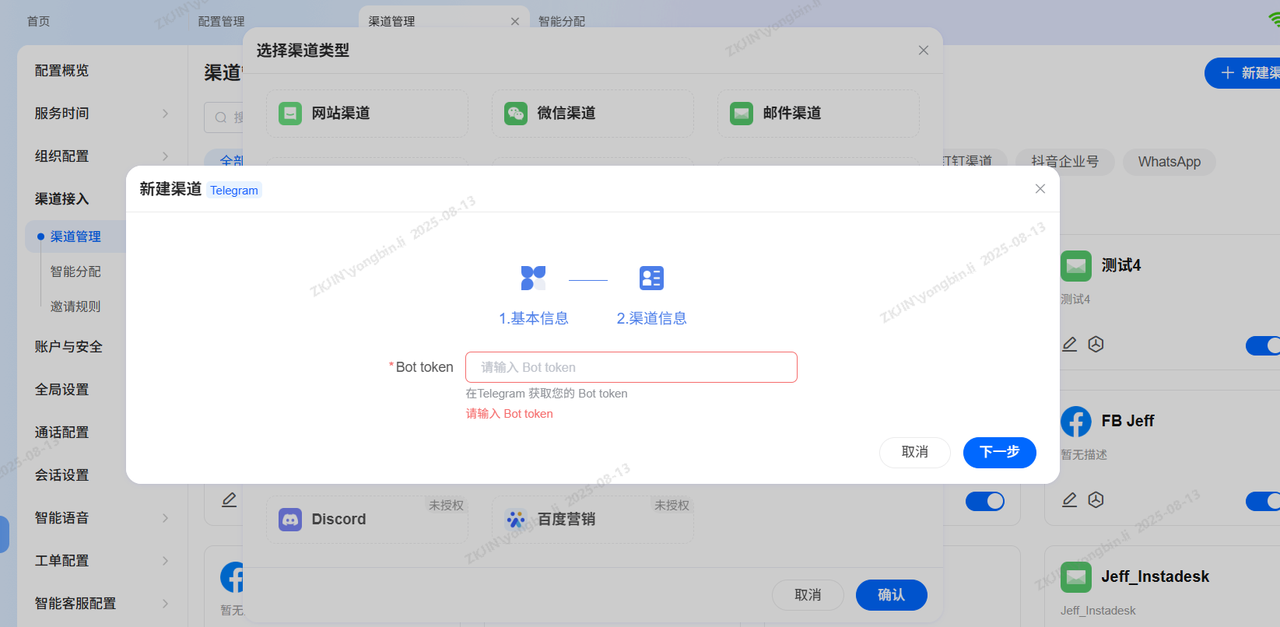
-
To add a Telegram channel in Channel Management, you must obtain the Bot Token from Telegram Bot backend.
3.7 Amazon
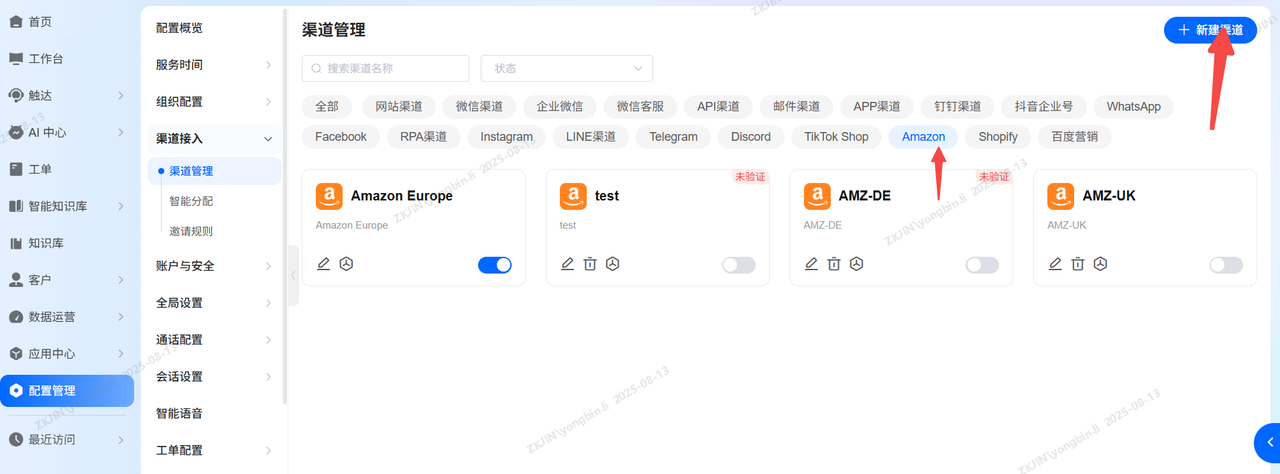
-
To add an Amazon channel, Navigate to Configuration Management > Channel Management, you need to configure the store email and the corresponding authorized site within the channel settings.
-
As shown in the figure below, after clicking "Authorize," you will be redirected to the Amazon website, where you need to log in to your Amazon account and the authorization.
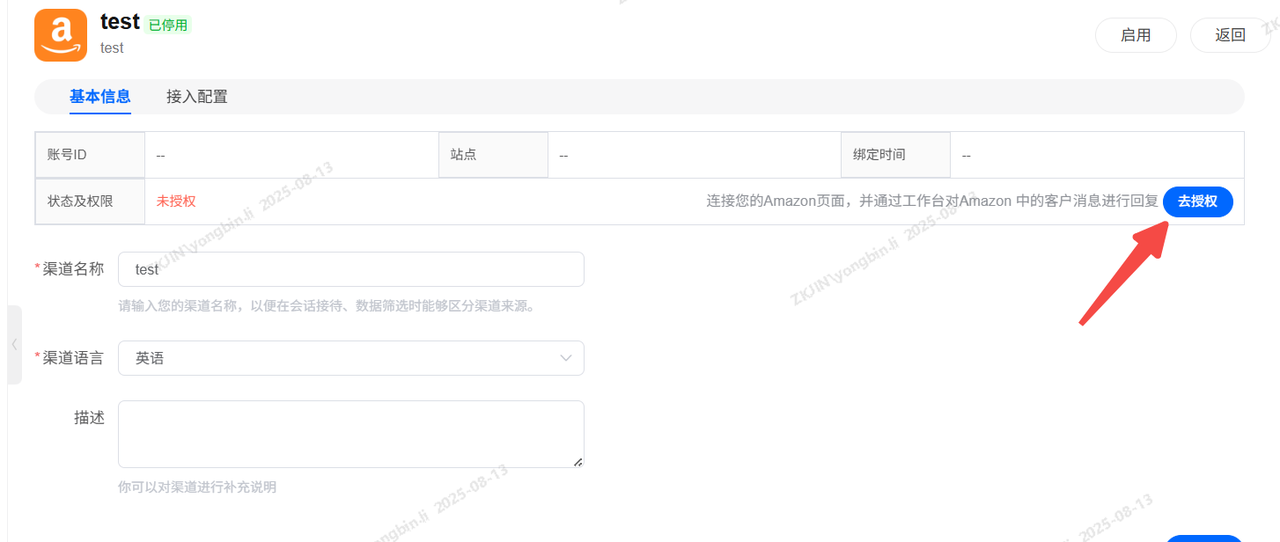
Note: For issues during the binding process, please contact Development Team (@王文学 ).
As of August 13, 2025, only European site order data can be retrieved. North America, Japan/Korea sites are not yet supported.
-
Enable the sidebar display permission for Amazon channel orders in Role Permissions, as shown in the image below.
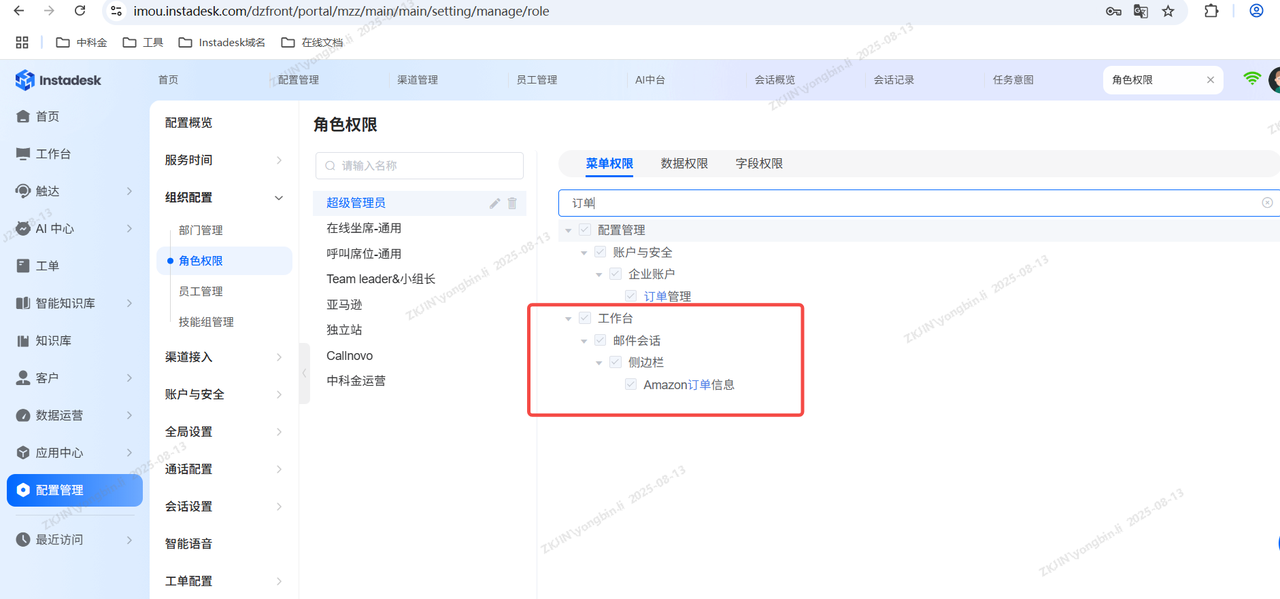
-
After successful connection, Amazon messages will display order information on the right panel.
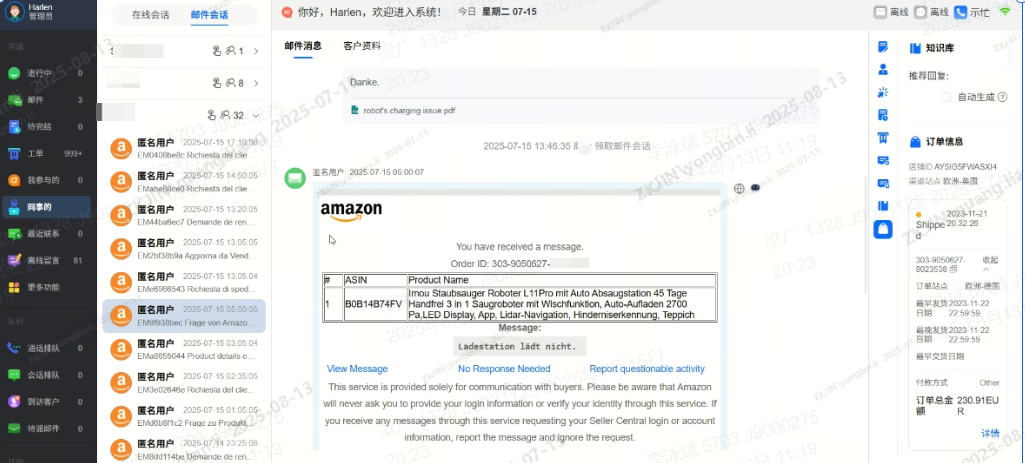
3.8 Shopify
3.8.1 Setup
-
Search for the Instadesk app in the Shopify App Store.
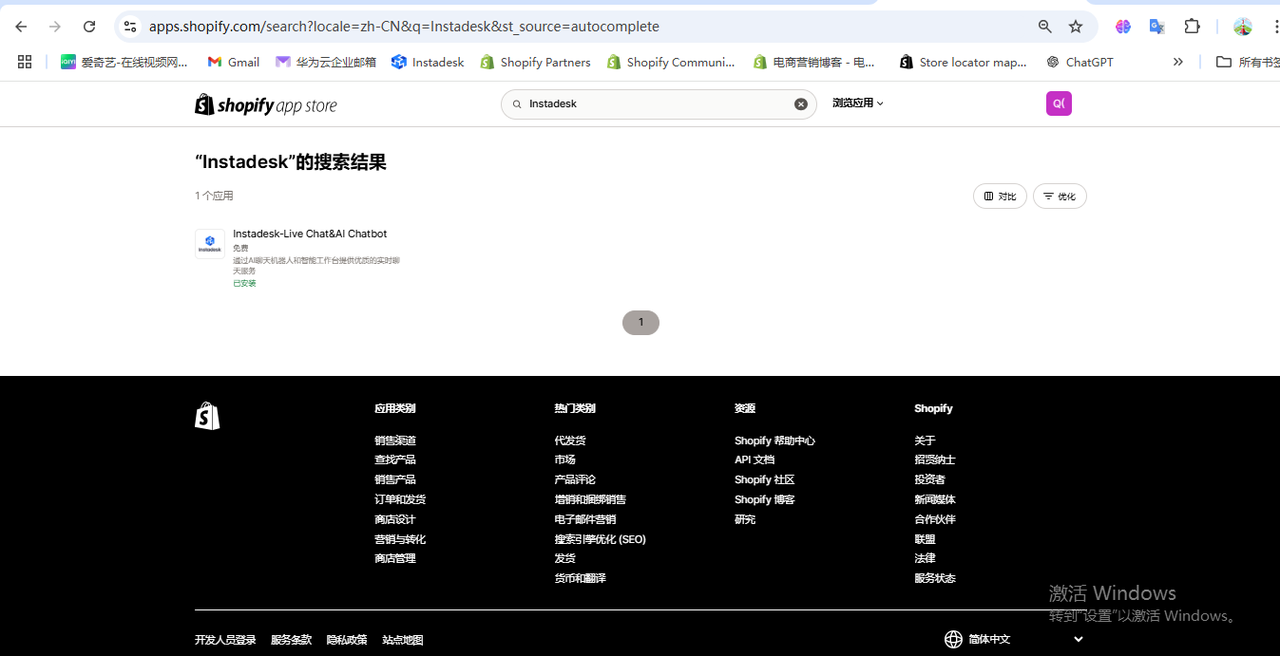
-
Install the Instadesk app.
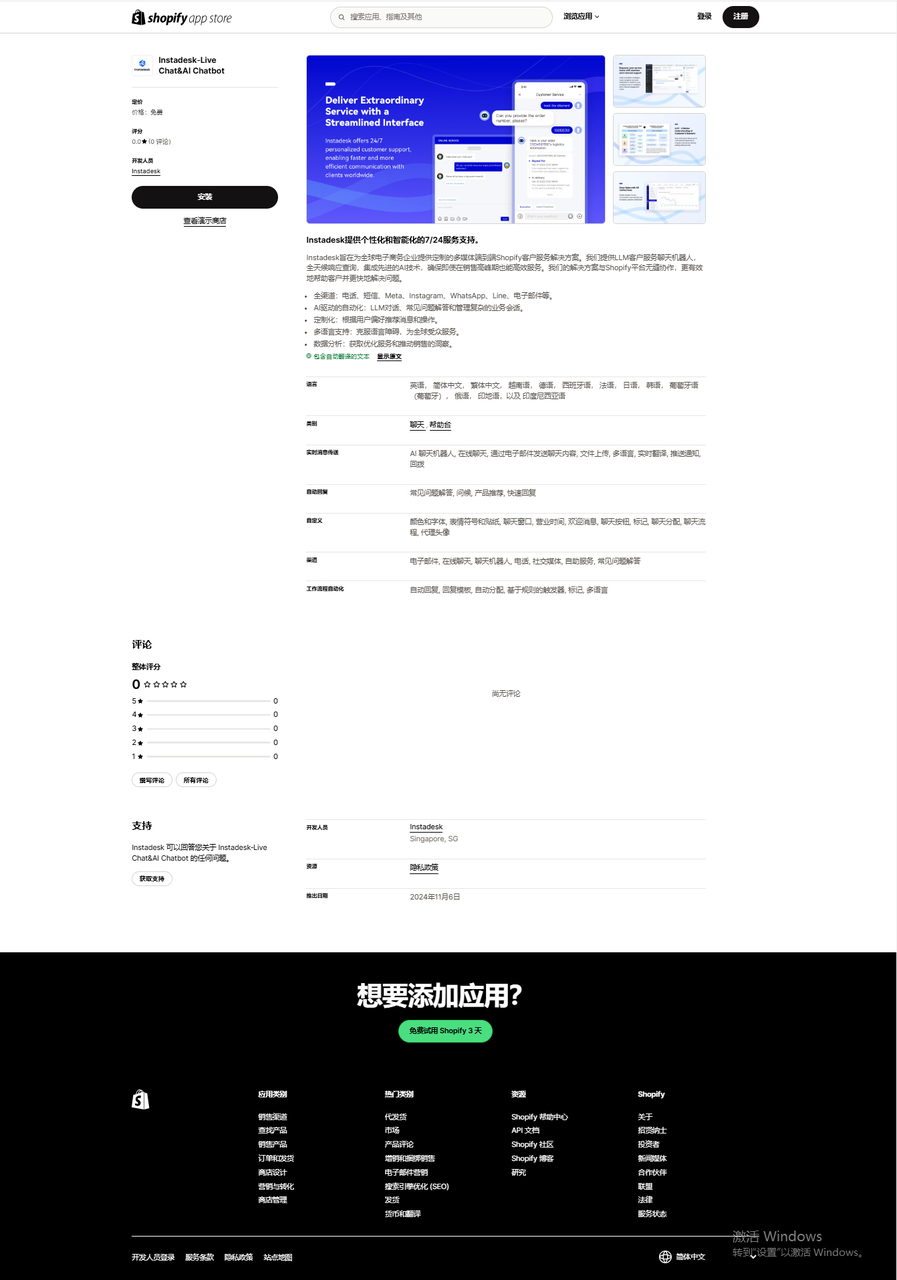
-
Redirect to the integration page, manually enter the B-side subdomain prefix, and submit.
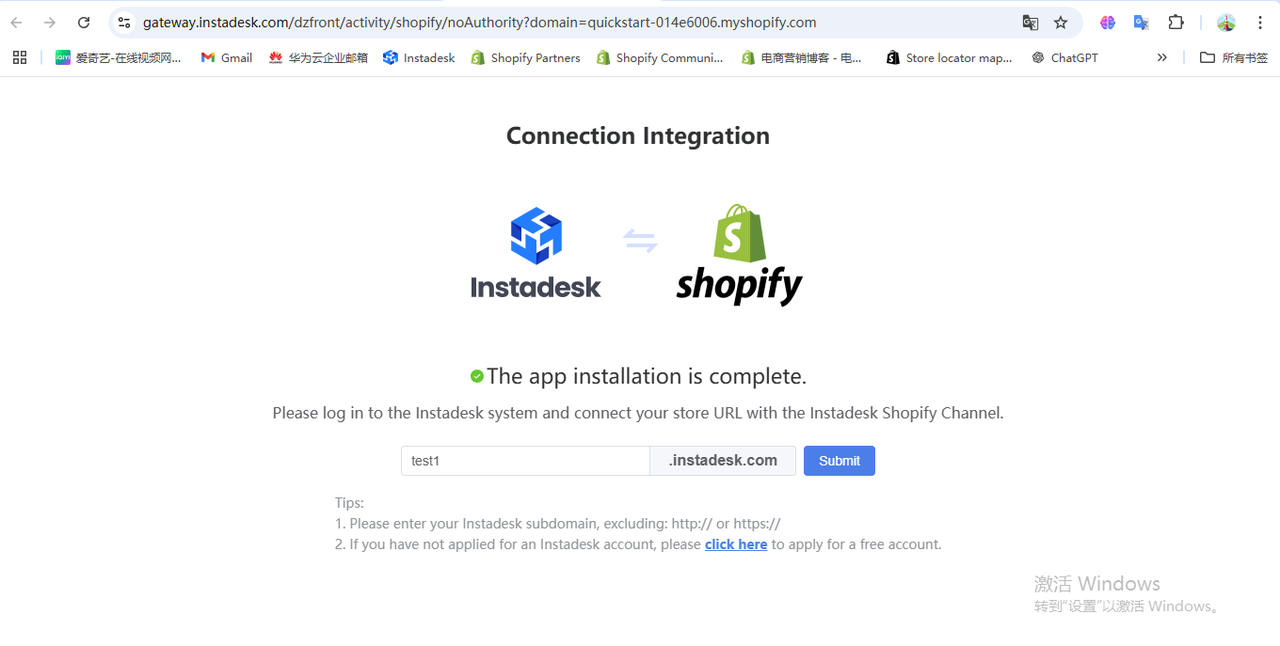
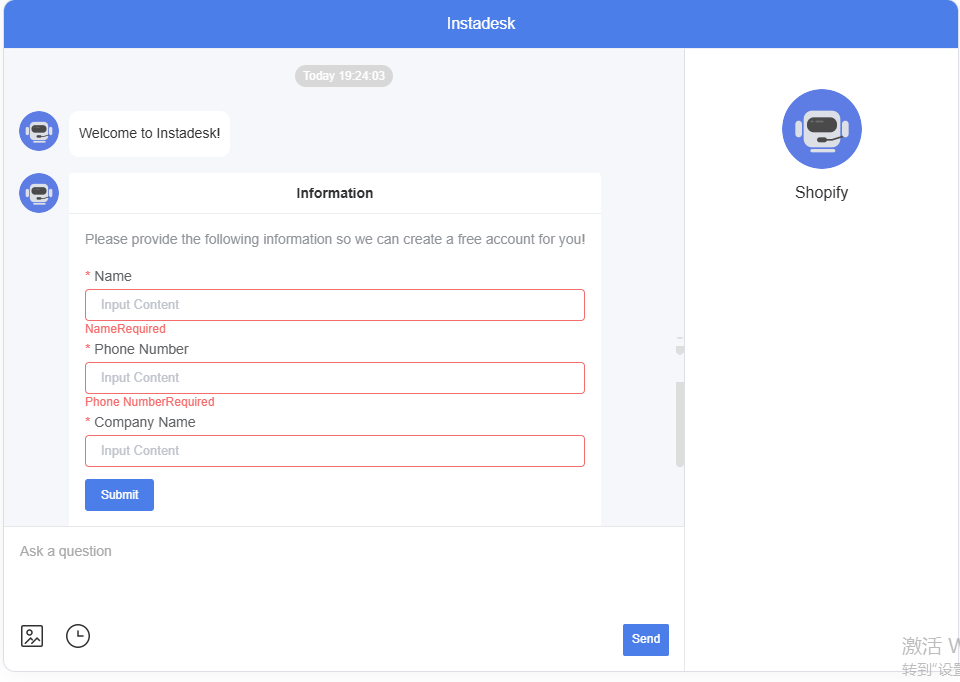
Note: If you do not have an Instadesk domain account and password, click “click here” to open the Instadesk account application chatbot. Fill out the application form, and wait for the Overseas Business Department to contact you via email to activate the tenant.
-
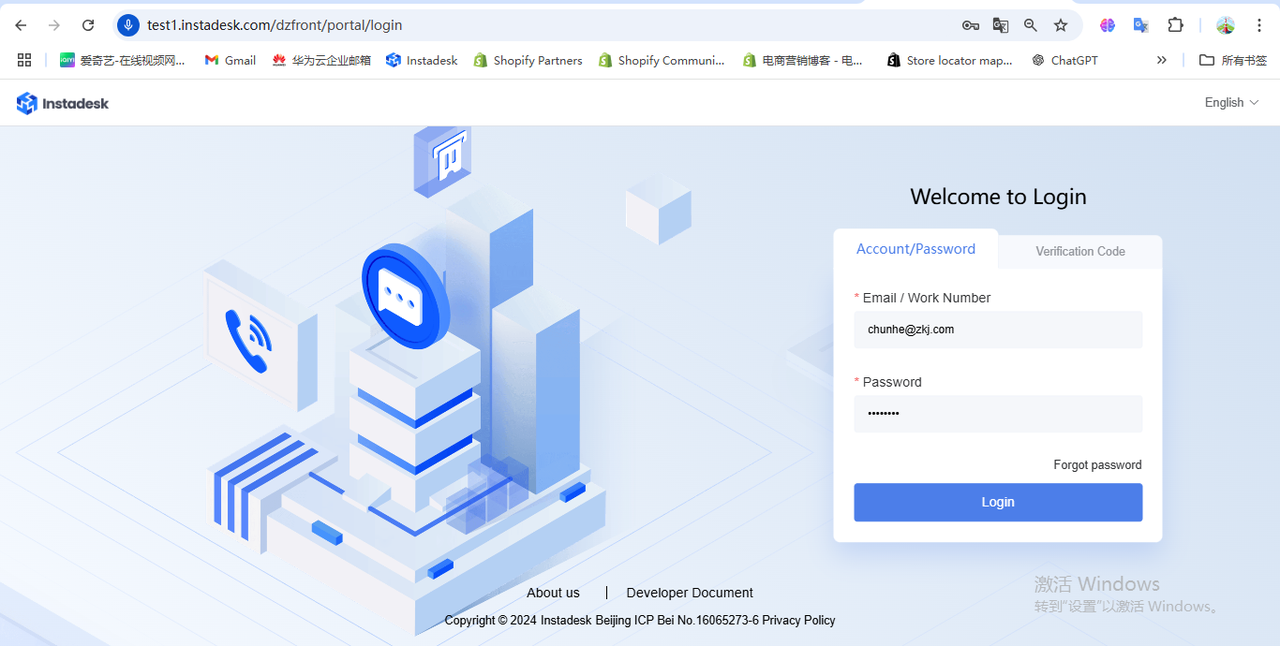
You will be redirected to the Instadesk B-side login page. Enter your account and password, then submit.
-
If you have previously logged in and the short-term cookie has not expired, the system will directly redirect you to the Shopify channel creation page (see Step 5).
-
If the short-term cookie has expired, you will be redirected to the B-side login page again (see Step 4).
-
Redirect to the Shopify channel creation page.
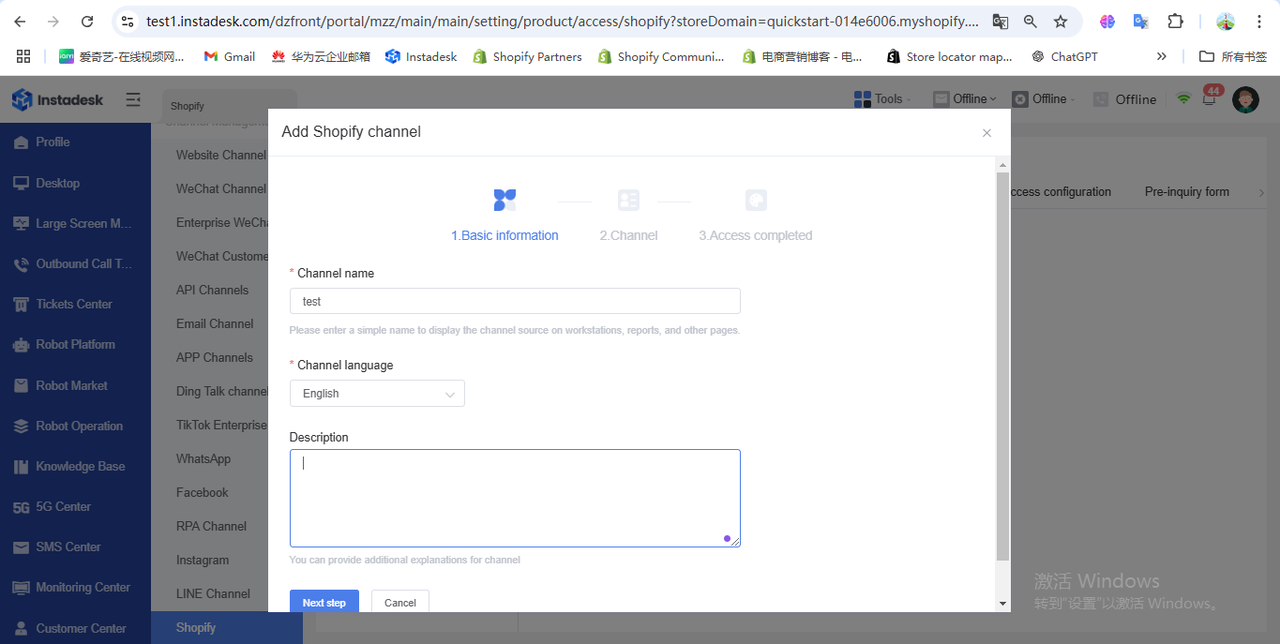
-
Automatically binds the Shopify store address without manual entry.
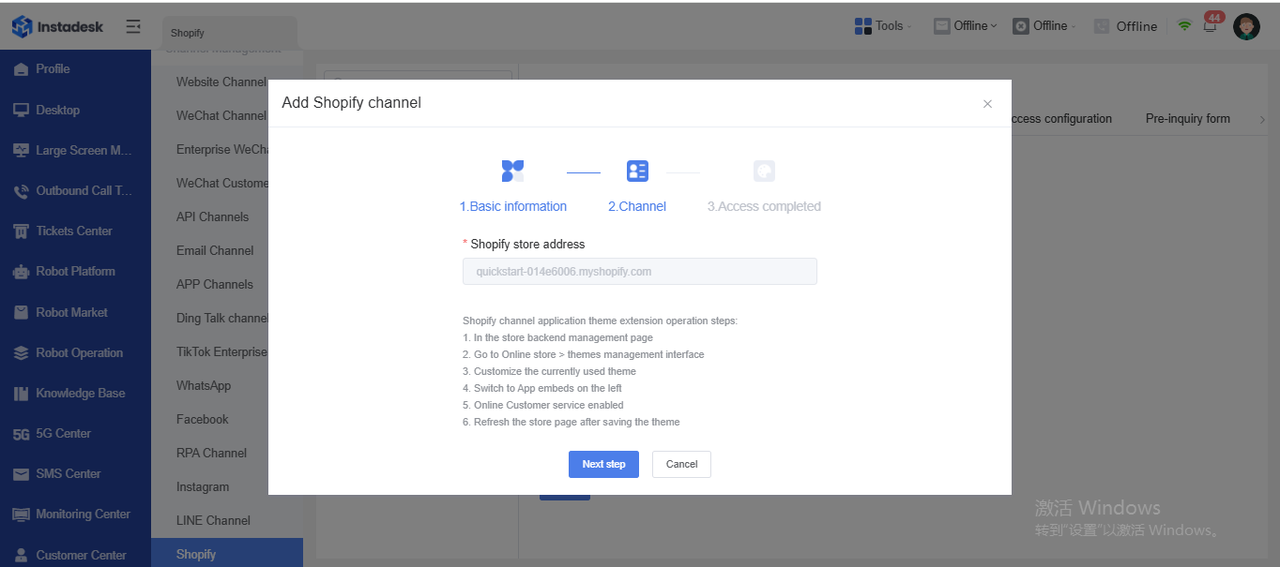
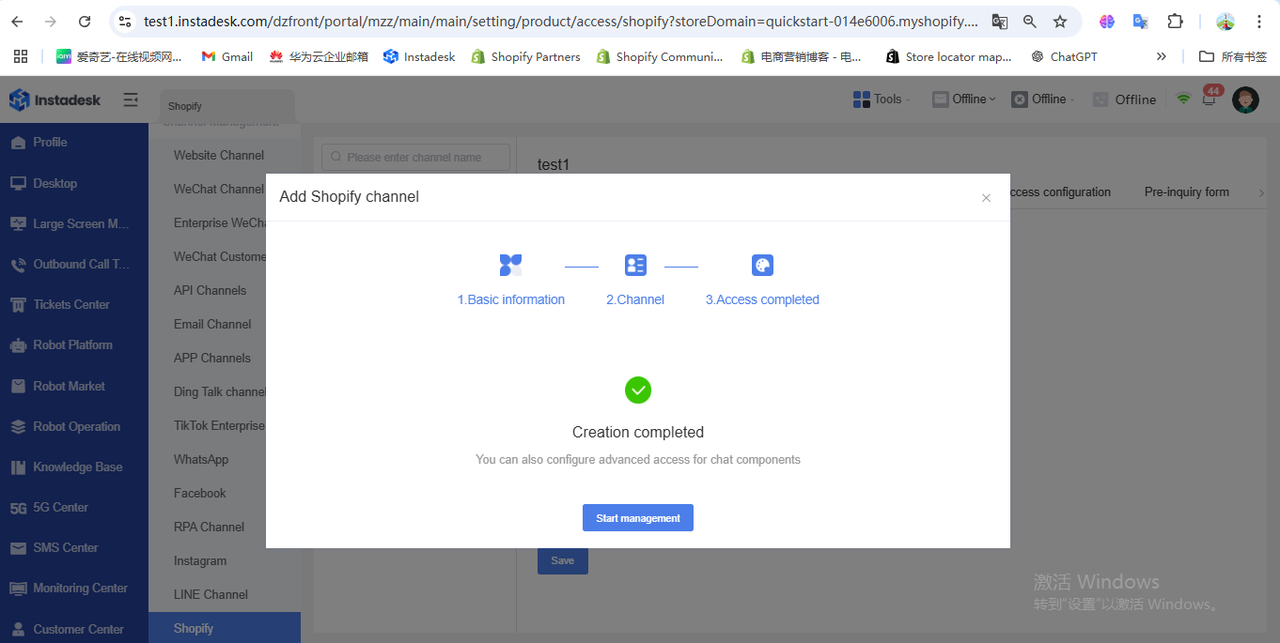
-
Shopify channel binding completed.
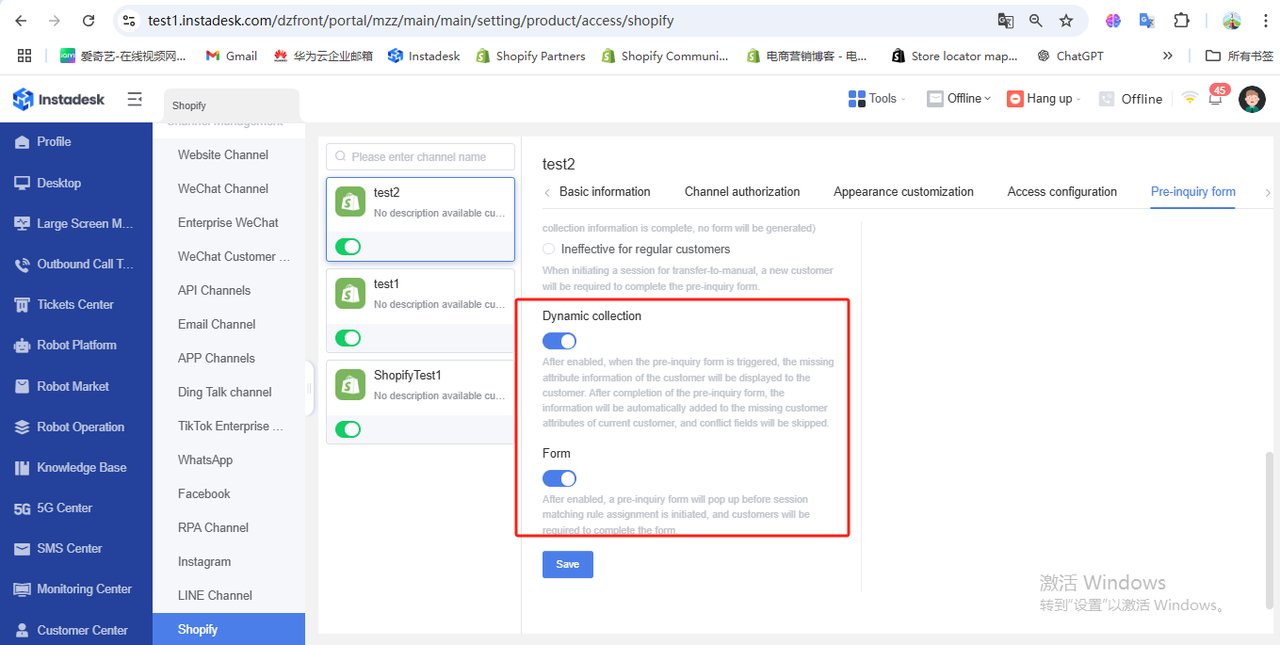
-
Open the pre-chat form.
-
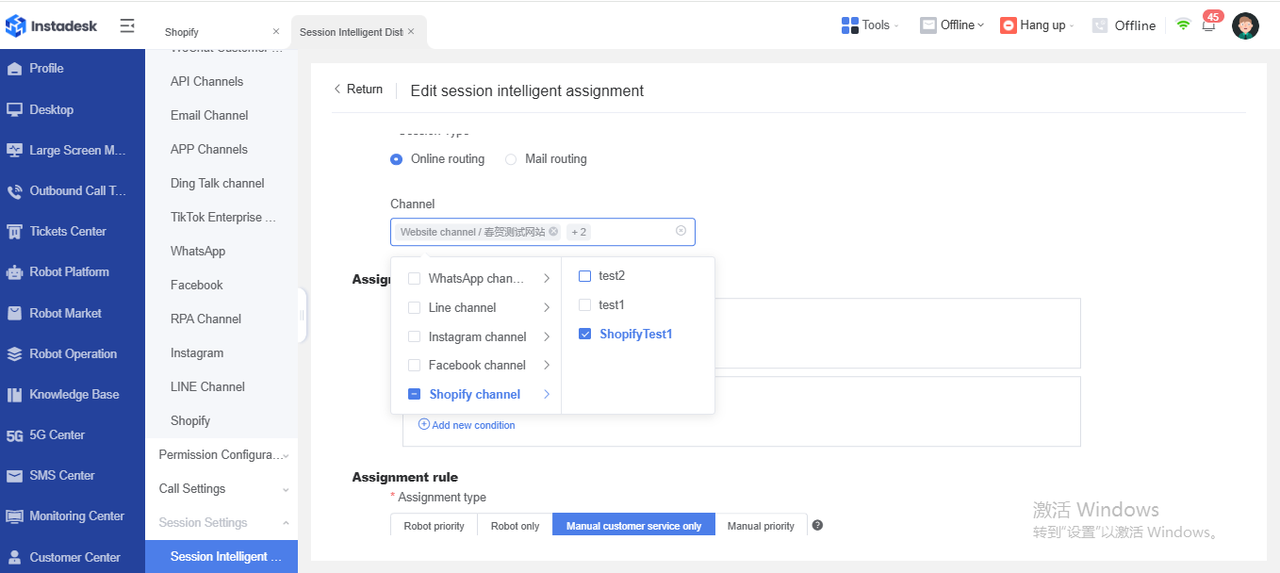
Adjust Intelligent Conversation Routing: Change the routing source to Shopify Channel to start receiving chats.
3.8.2 Configuration
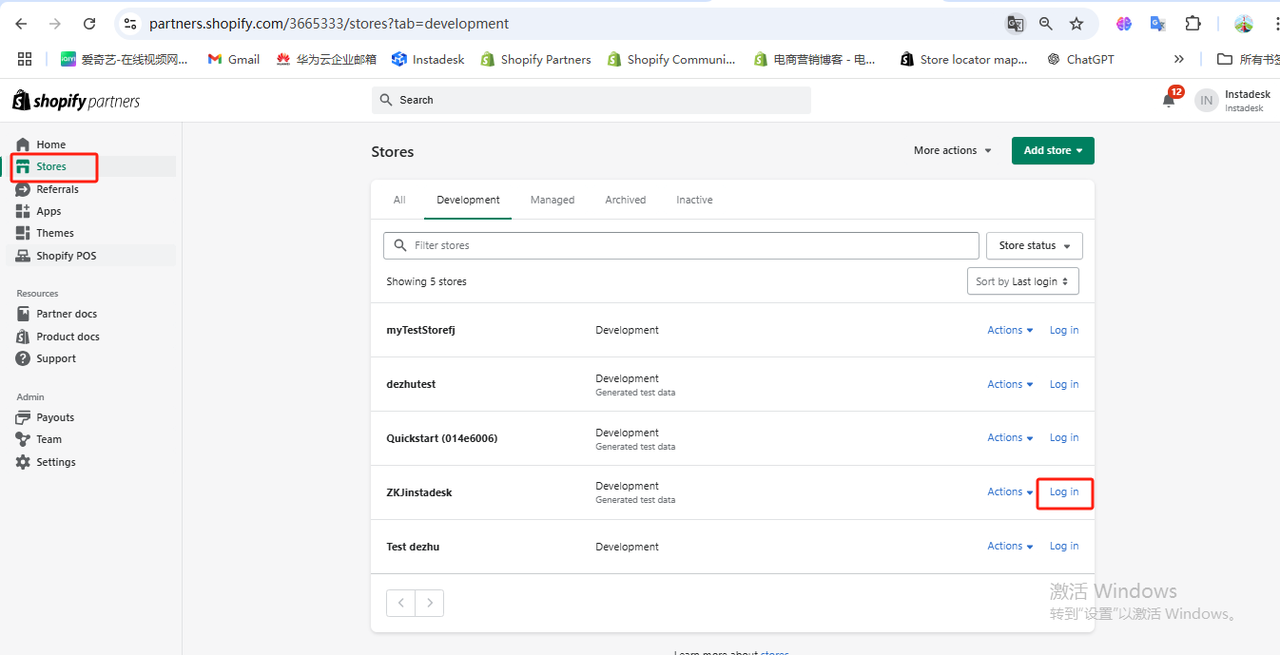
-
Log in to the Shopify store admin panel.
-
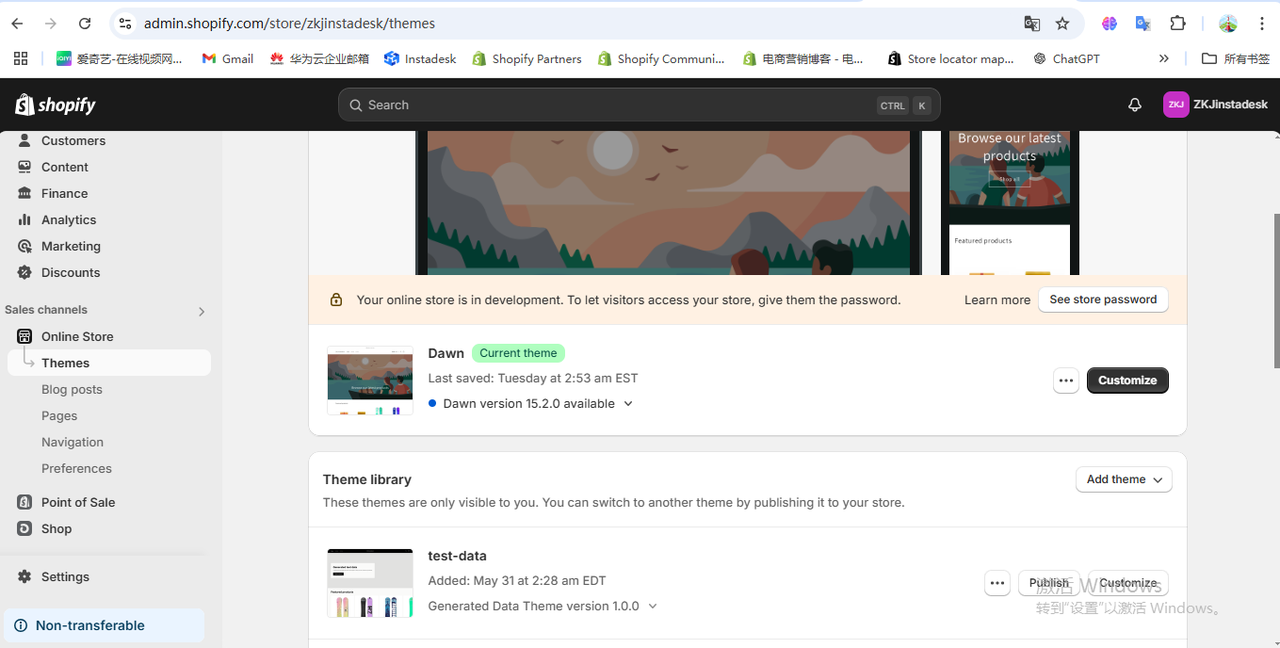
Navigate to: Online Store → Themes
-
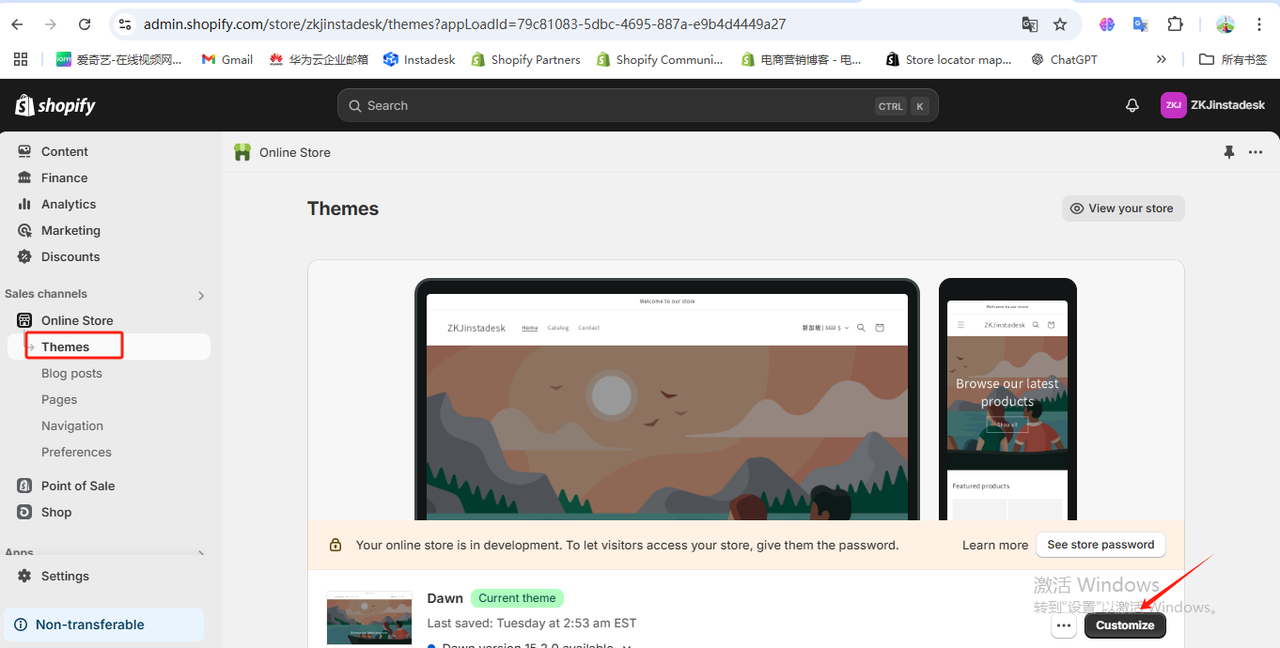
Customize the theme currently in use — click Customize.
-
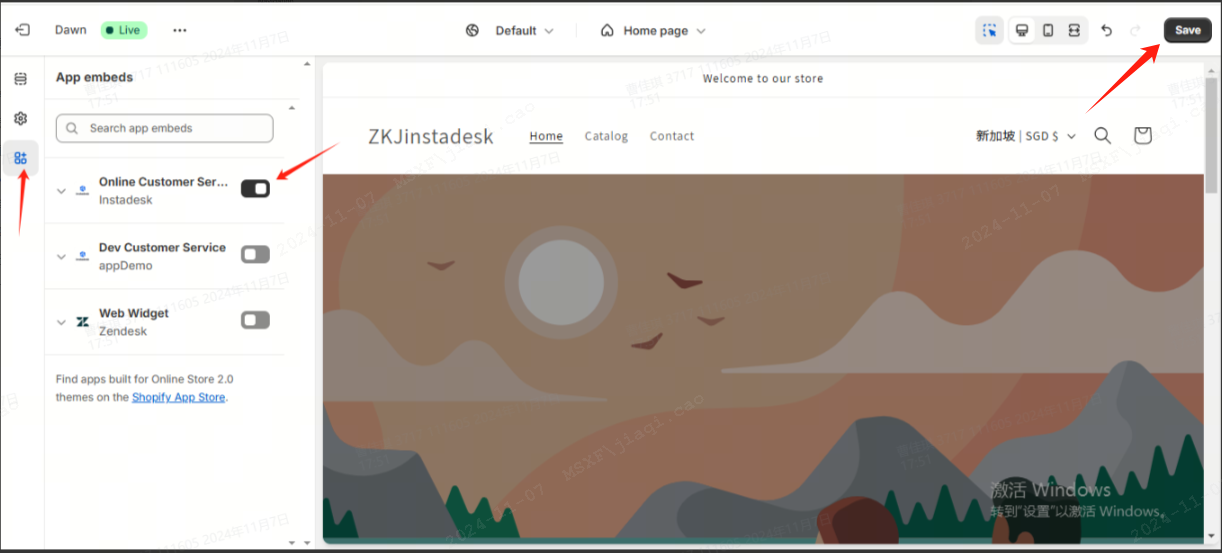
In the left panel, switch to App embeds, enable Online Customer Service, and click Save.
-
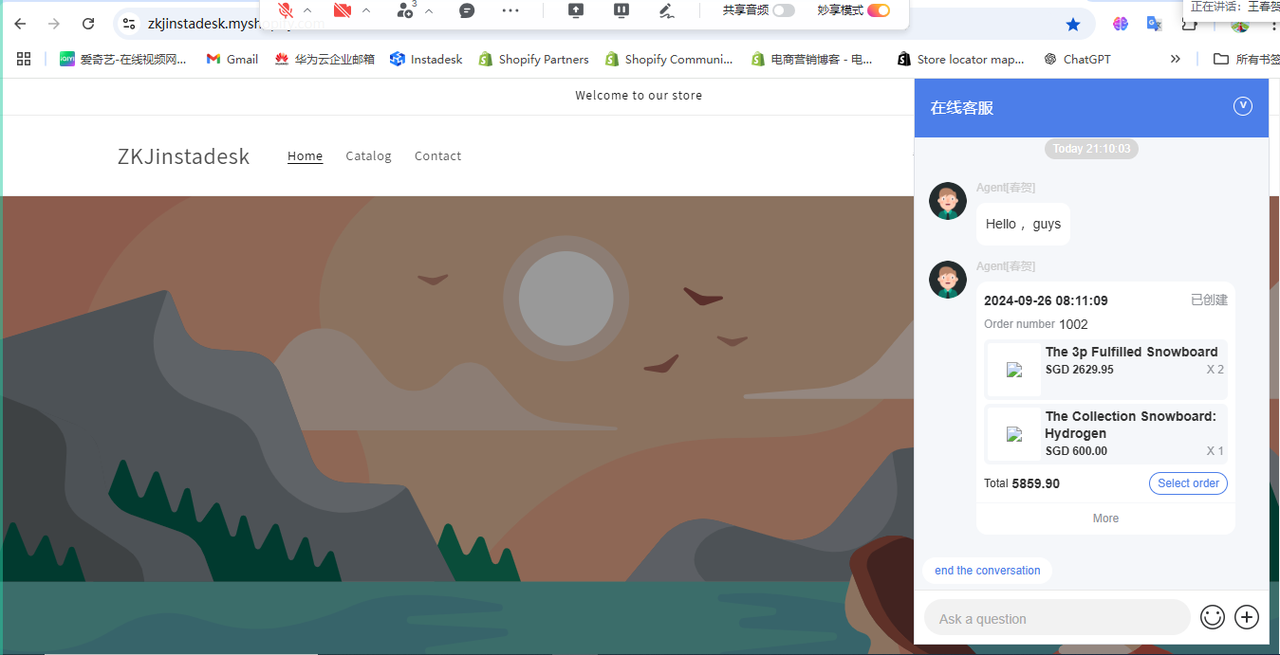
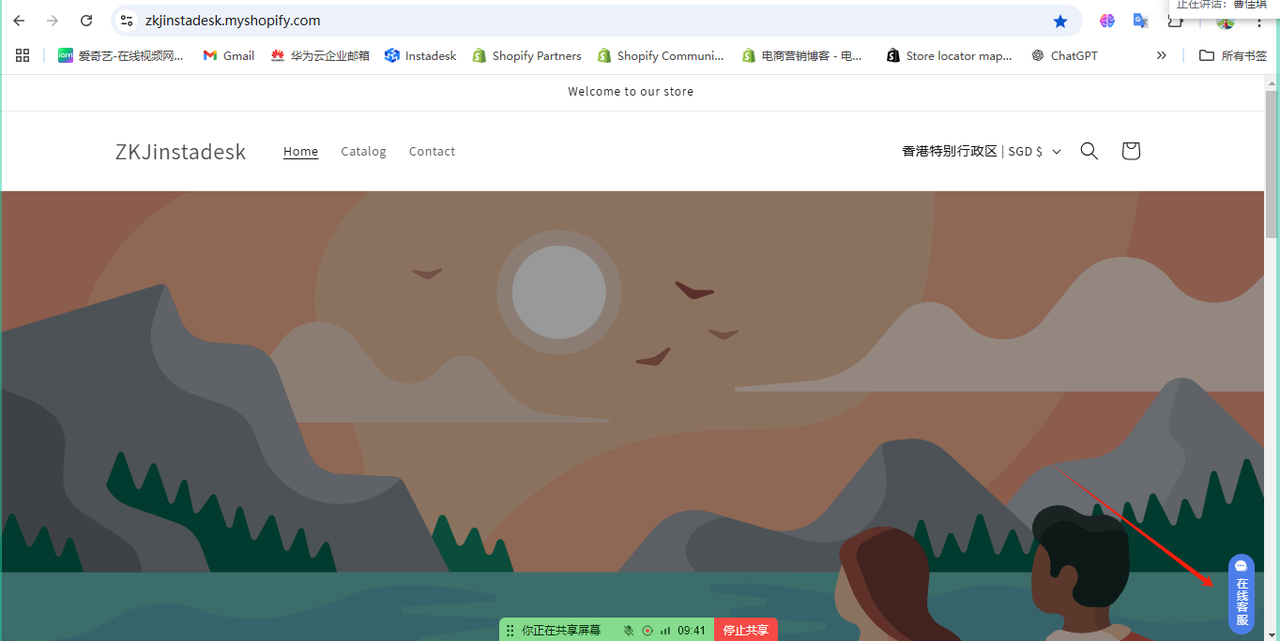
After saving the theme, refresh the storefront page. The online customer service entry will appear at the bottom-right corner of the store.
-
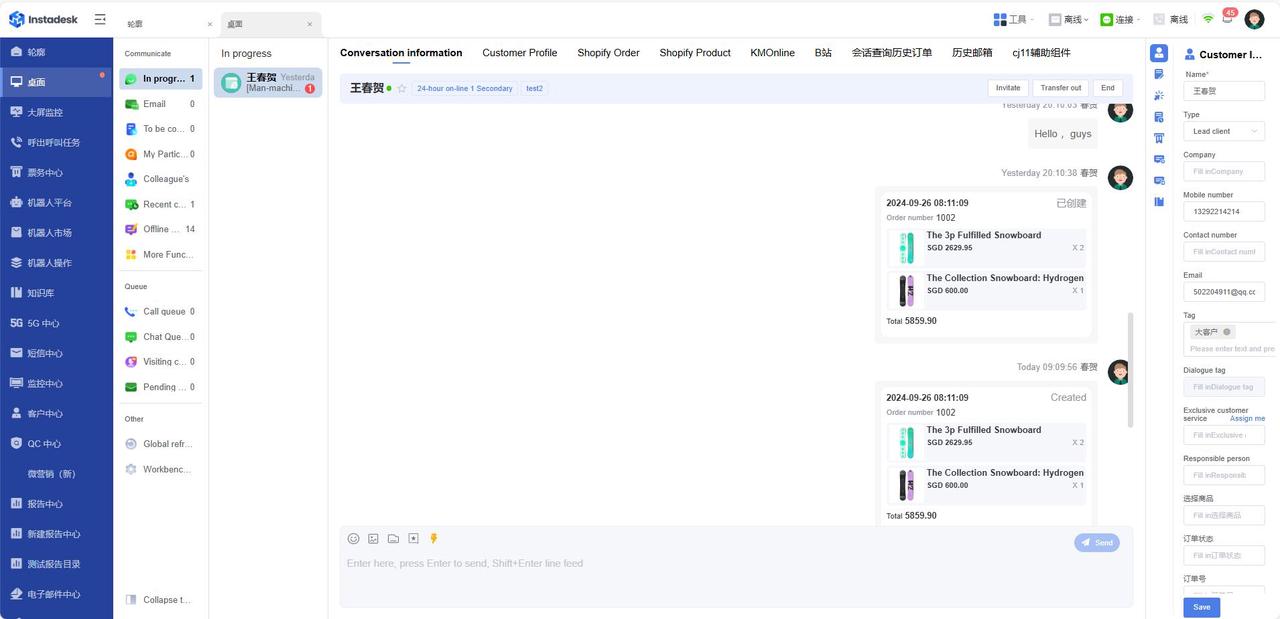
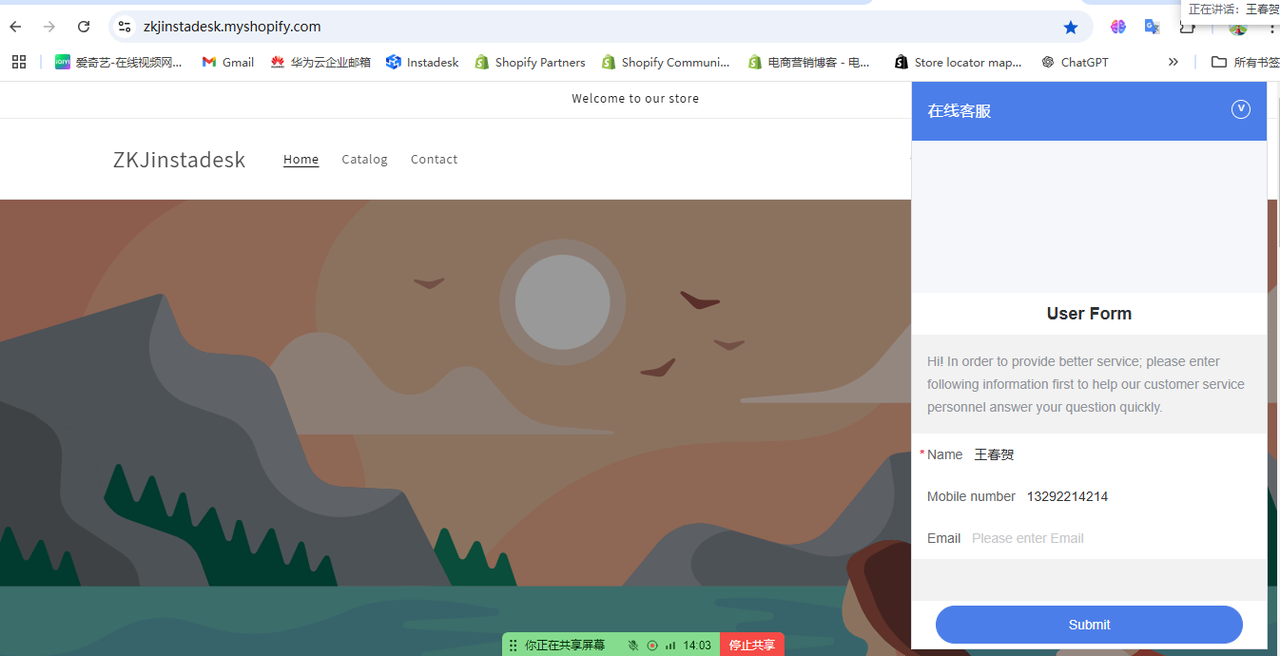
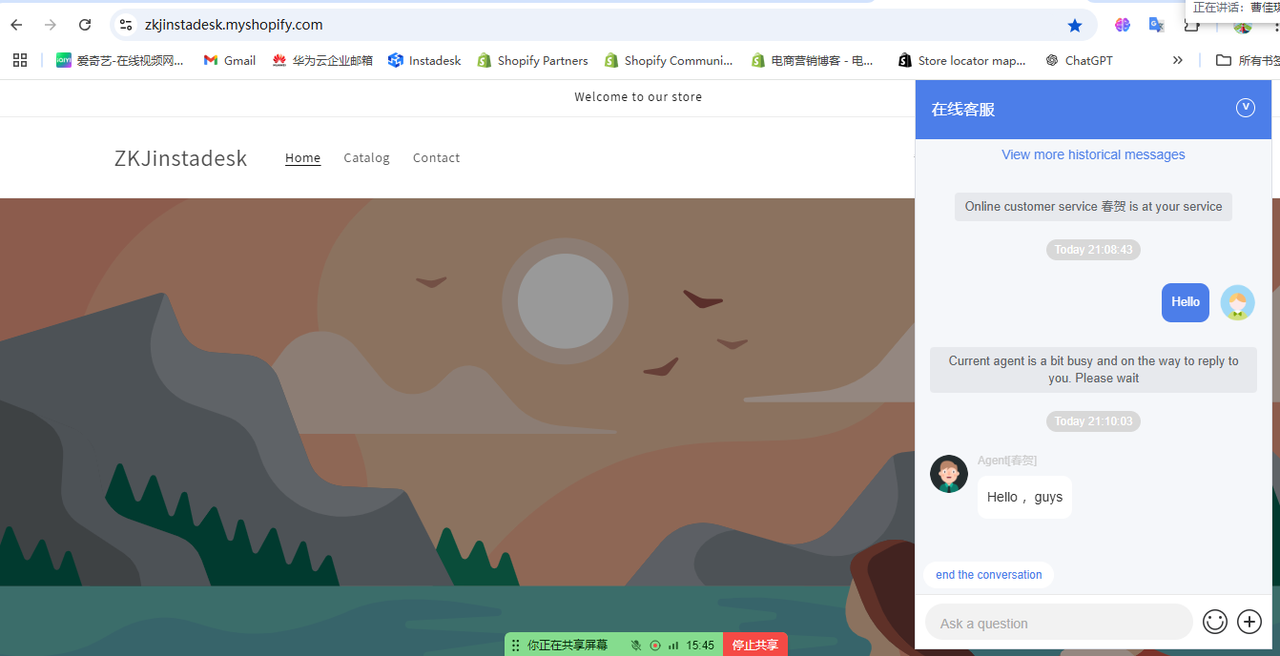
Customers initiate an online chat from the bottom-right corner of the store. To retrieve customer identity and order information on the B-side, the system must first collect the customer’s email or phone number (e.g., 13292214214) through the pre-chat form.
-
If the pre-chat form collects the customer’s email or phone number, the system can retrieve customer profile and order information from Shopify via API. If the pre-chat form is not enabled, this information cannot be retrieved.
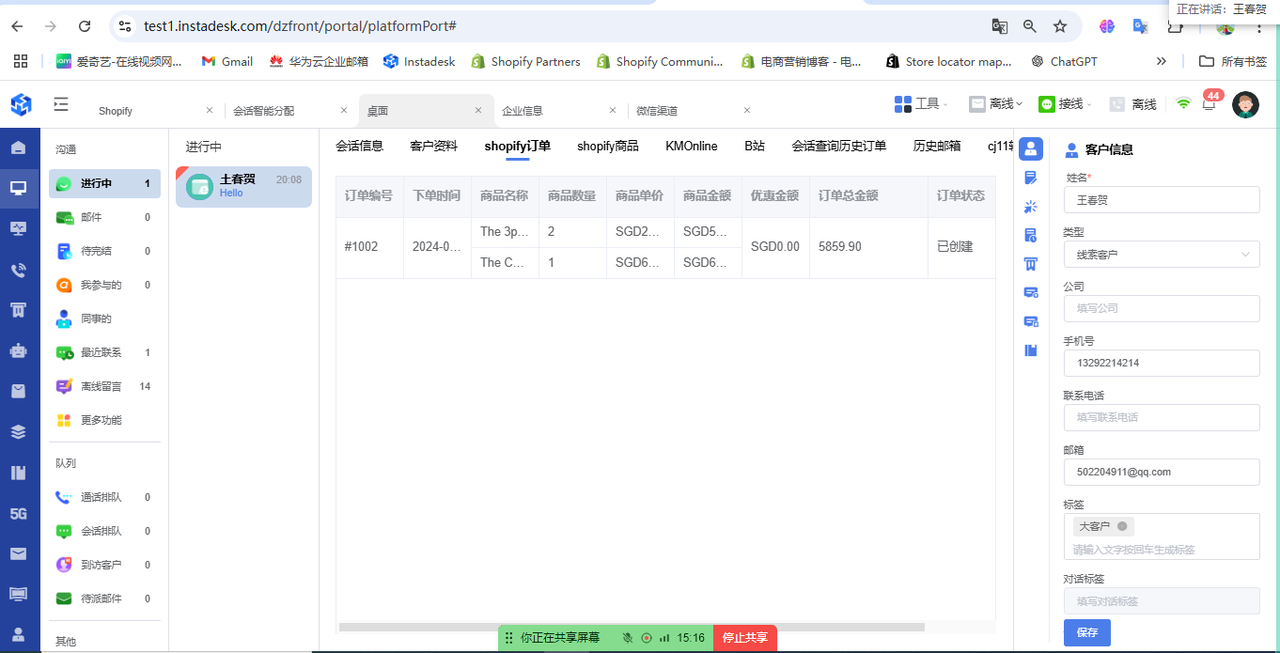
-
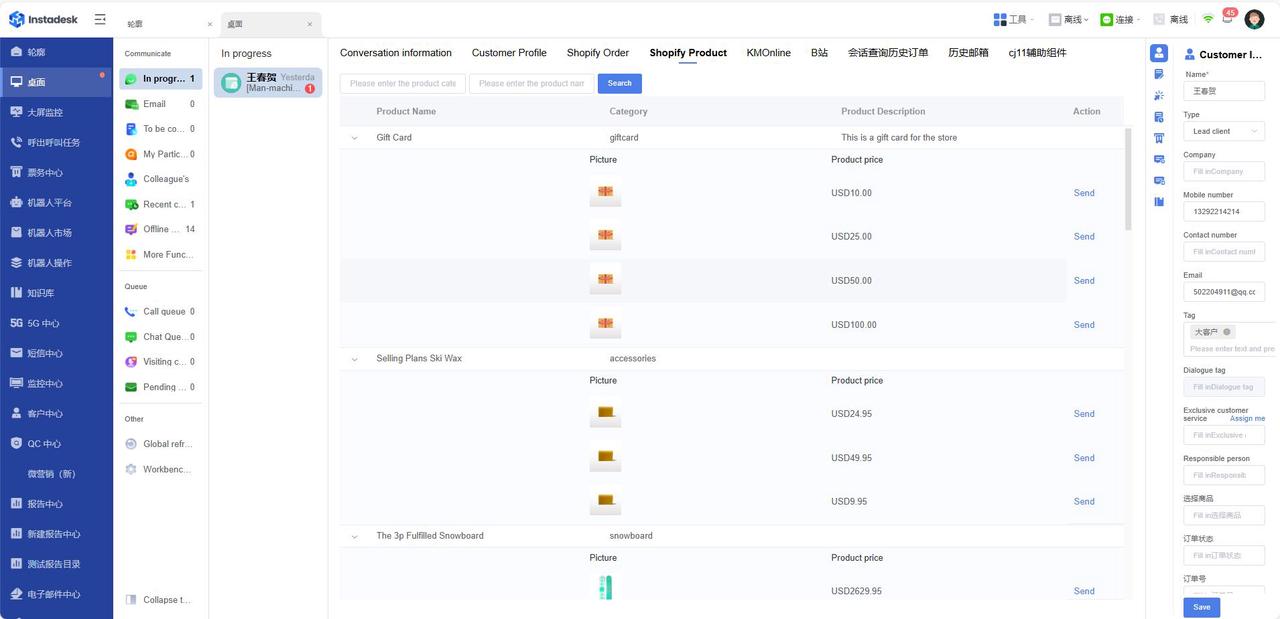
For pre-sales scenarios, agents can search the product list to respond to customer inquiries accordingly.
-
The system supports sending orders or products as cards to C-end customers. Product cards support click-through to the product detail page.