
1.Inbound Voicebot (NLP)
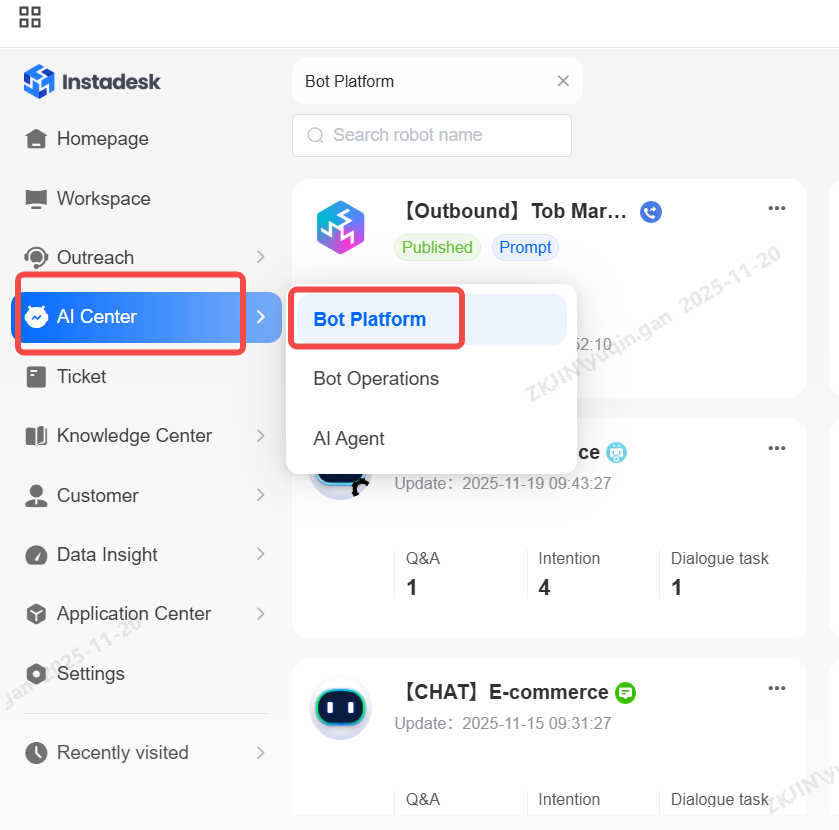
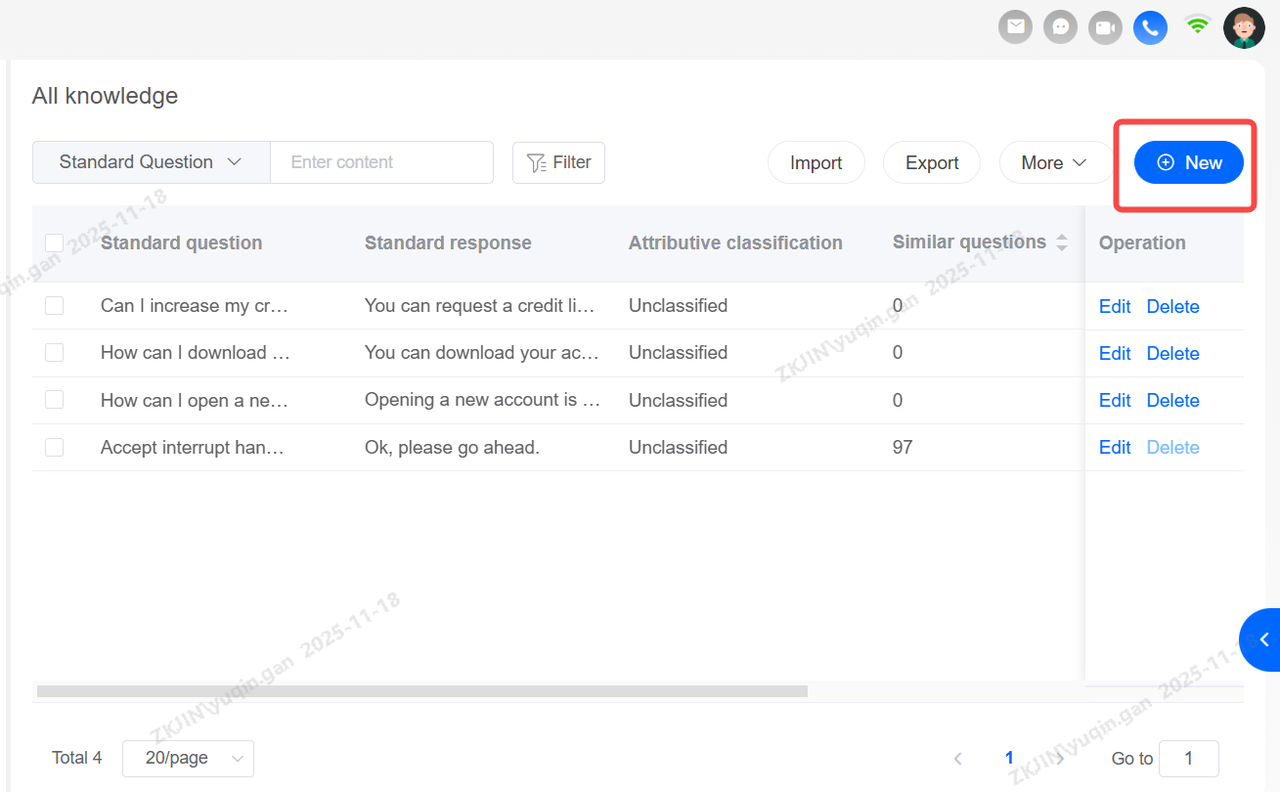
Navigate to AI Center > Bot Platform to create bot.
Bot can be created in the Bot Platform, which supports naming, editing and deleting.
-
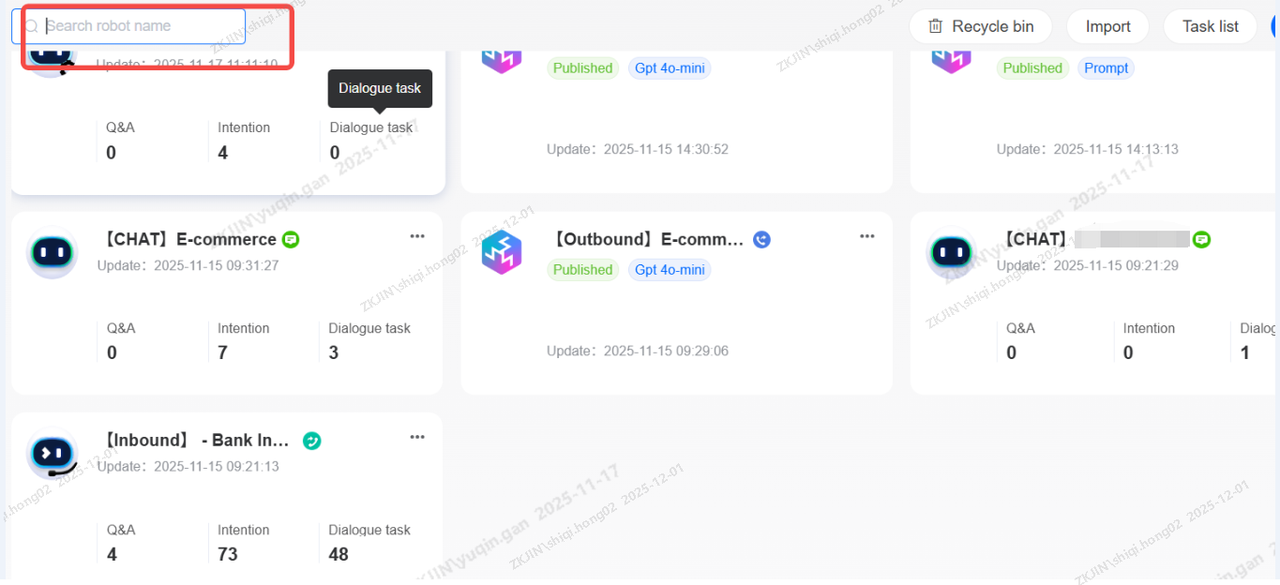
Search Bot
Enter the bot's name in the search box to find it. Fuzzy search is supported.
-
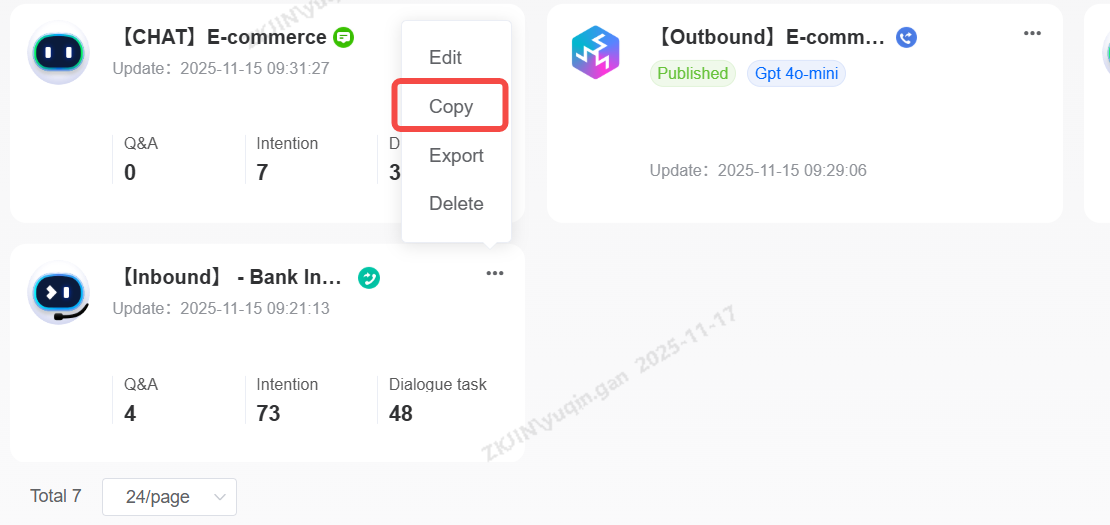
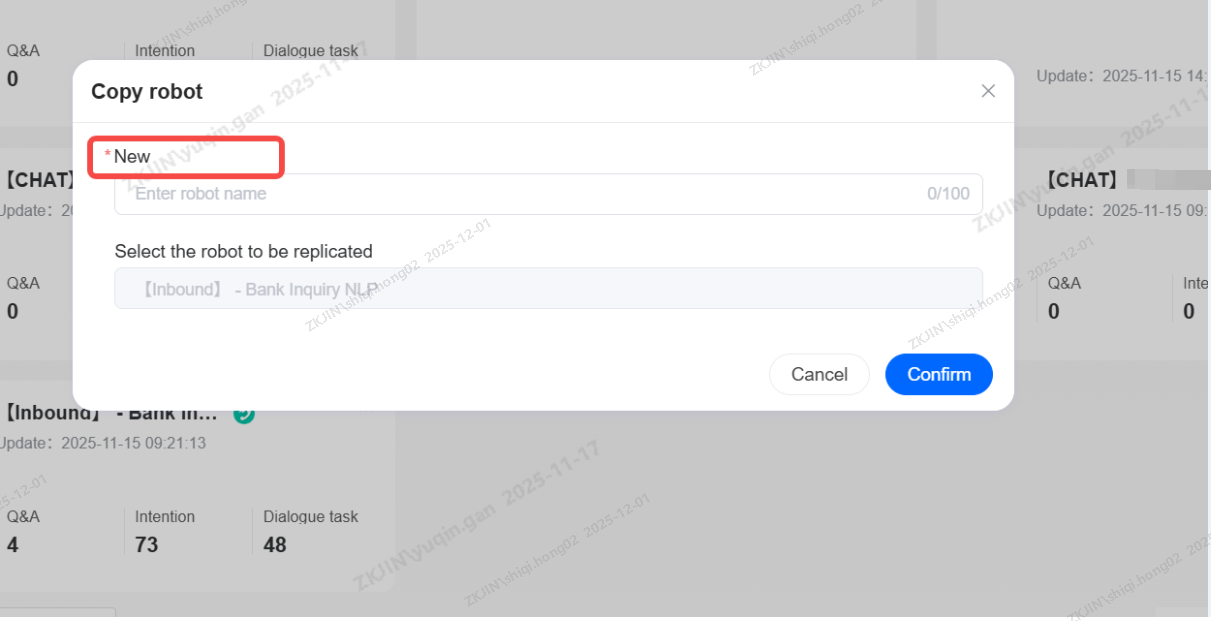
Duplicate Bot
Click the Copy button on the bot card, enter the new name, and click Confirm to duplicate the robot.
-
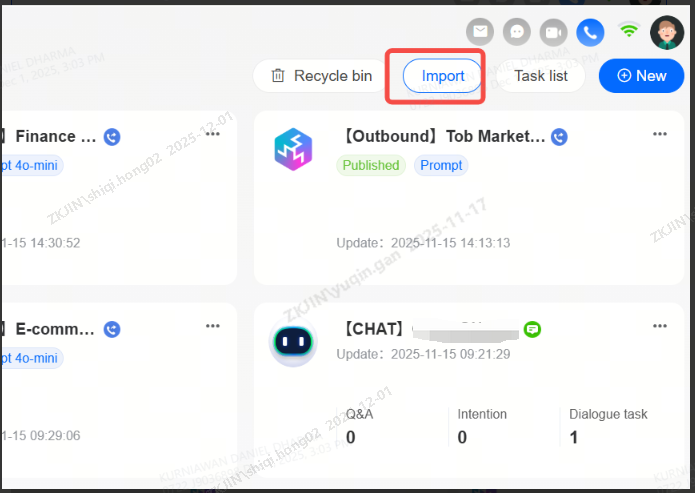
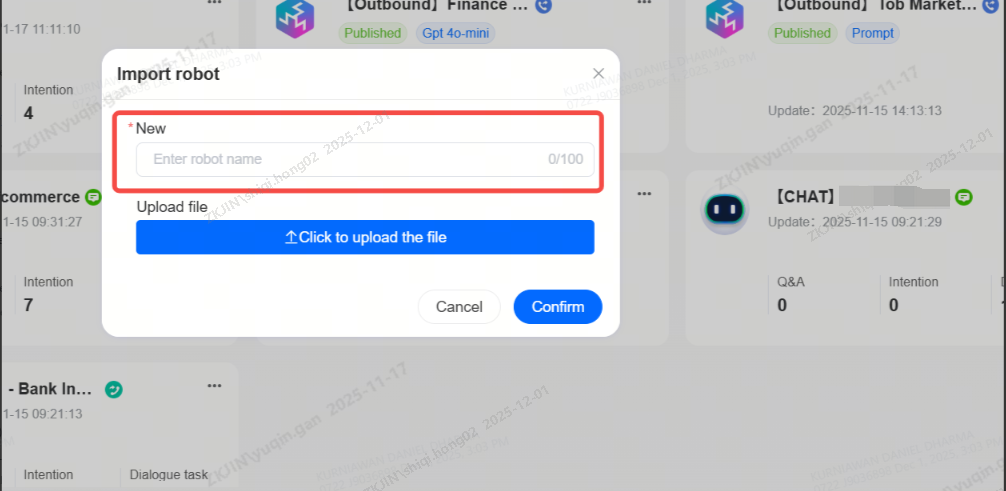
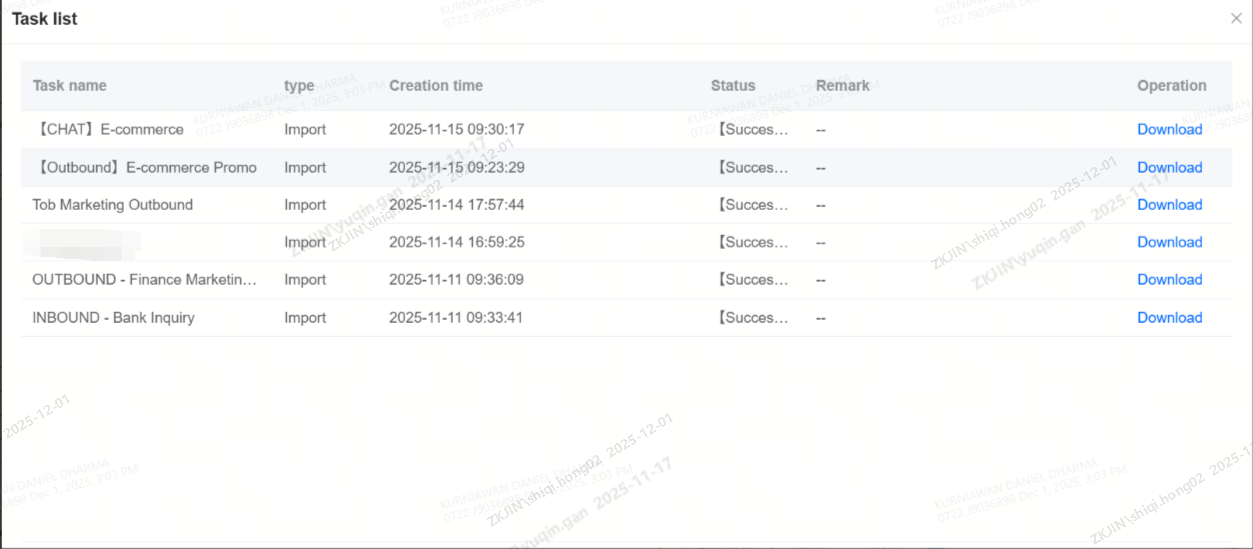
Bot Export & Import
Click the Export button in the bot card to download the bot file.
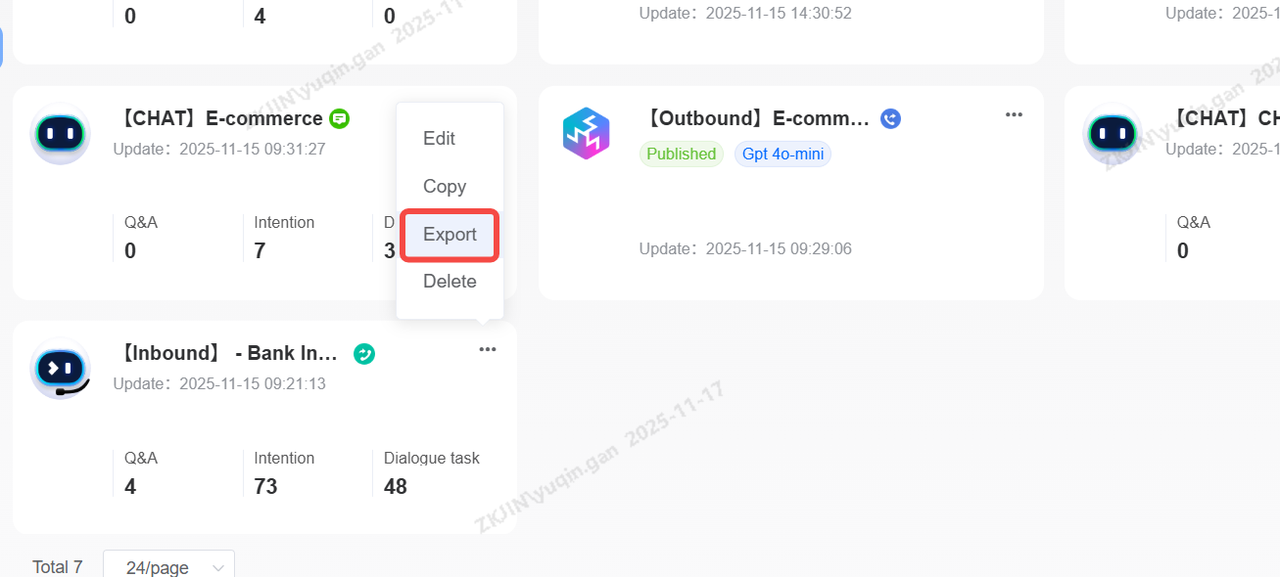
Click on the task list in the top right corner to view the records of bot import, export, copy, and template application. The task list supports downloading compressed files for bot import and export.

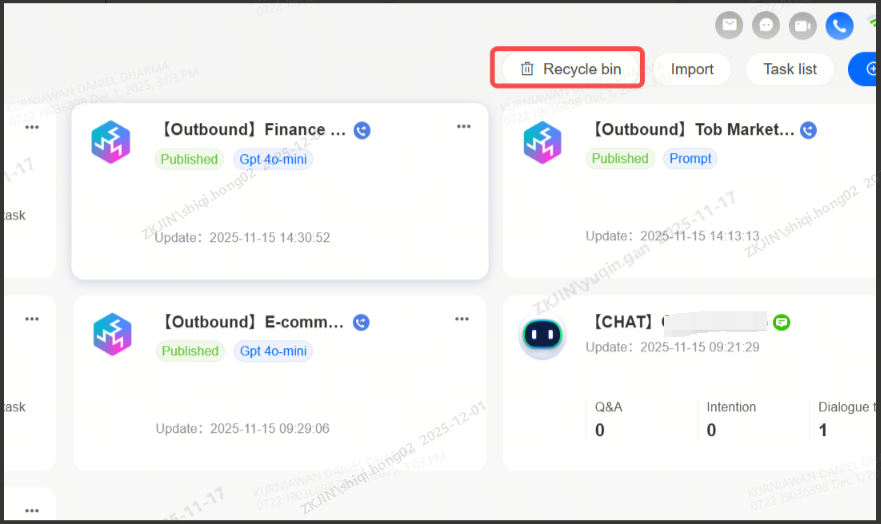
Recycle Bin
Deleted bots will first be placed in the Recycle Bin.
You can search the bot that was deleted within a certain timeframe by using the Delete Time filter.
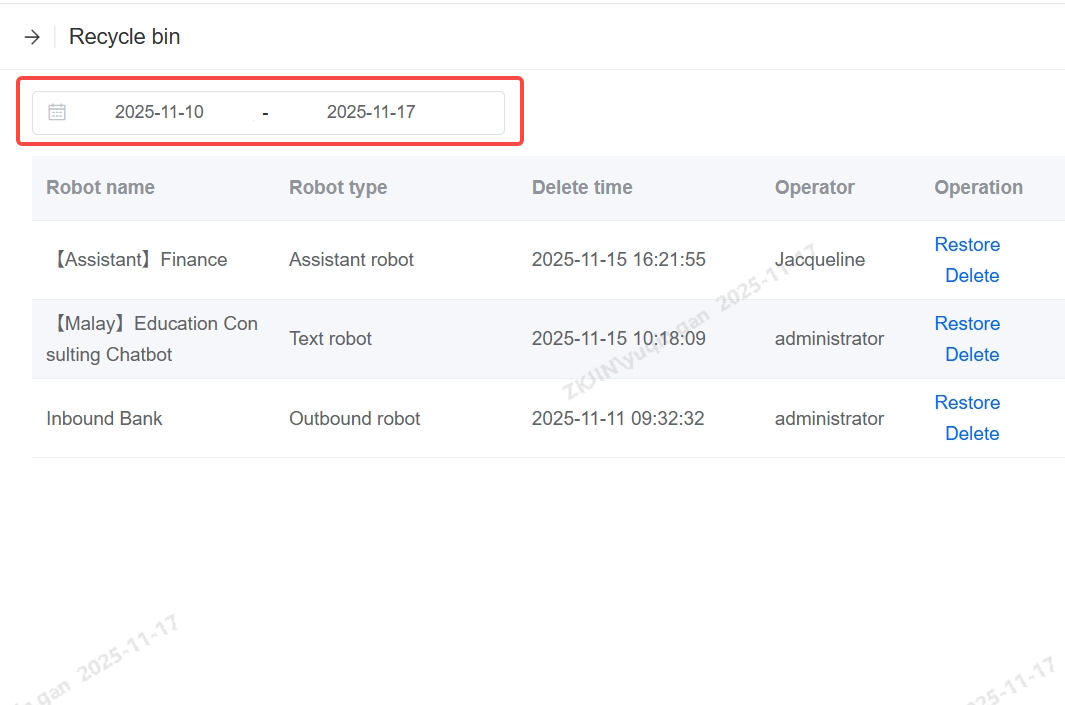
It also supports restoring deleted bots in the Recycle Bin.
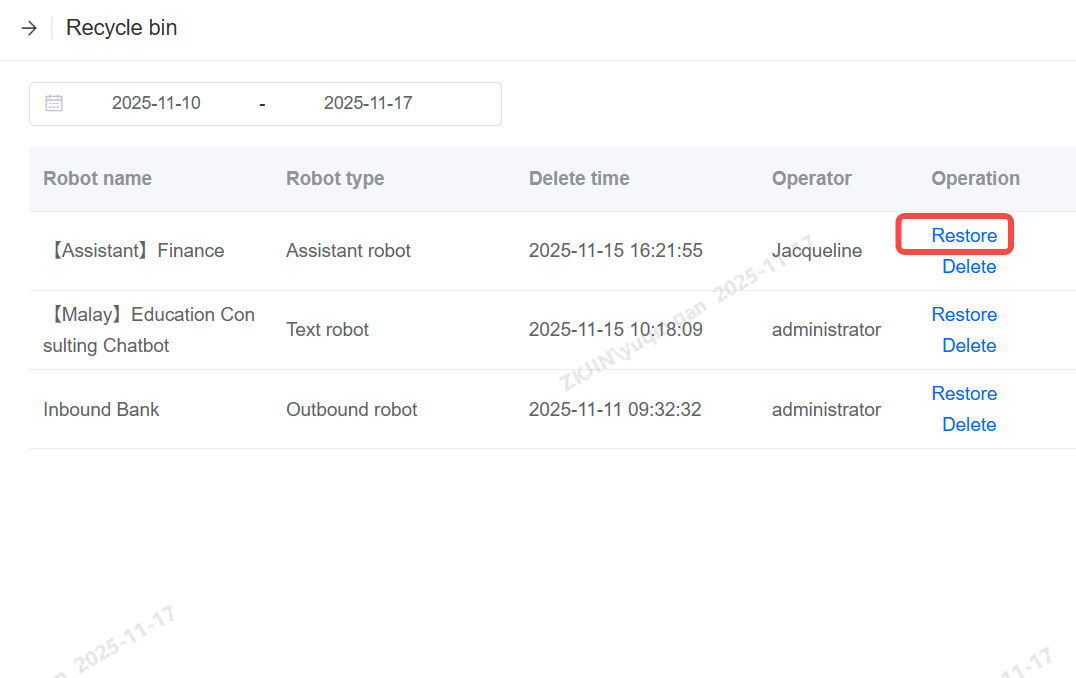
Note: If you click Delete in the Recycle Bin, the robot will be permanently deleted and it cannot be restored. Please exercise caution when using.
1.1 Knowledge Base Management
Knowledge Base Management primarily handles content management for the bot's knowledge base, encompassing the management of Q&A Knowledge, Chit-Chat Base, and Document Q&A, along with page updates.
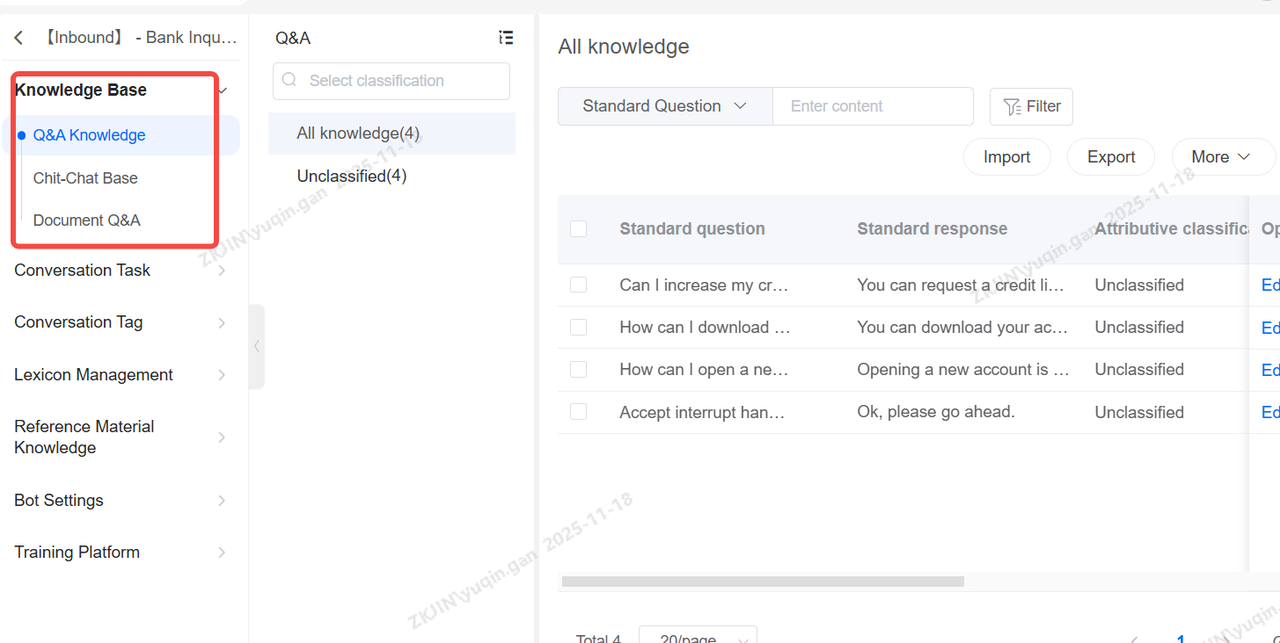
Q&A Knowledge
Q&A Knowledge is structured into two main parts:
-
Category Directories are used to display and organize knowledge points into categories.
-
Knowledge Point Management handles all operations for individual knowledge points, including adding, deleting, searching, editing, and enabling/disabling them.
A Knowledge Point is the fundamental unit of knowledge, typically structured as a single question and a single answer. It can be expanded to include multiple answers or similar questions, enabling a one-to-many Q&A structure.
Create Category Directory
You can customize category names and edit the directory structure to fit your business needs. The knowledge base supports creating, deleting, and modifying categories, and allows you to search for them by name.
Note: Each category level must not exceed five levels.
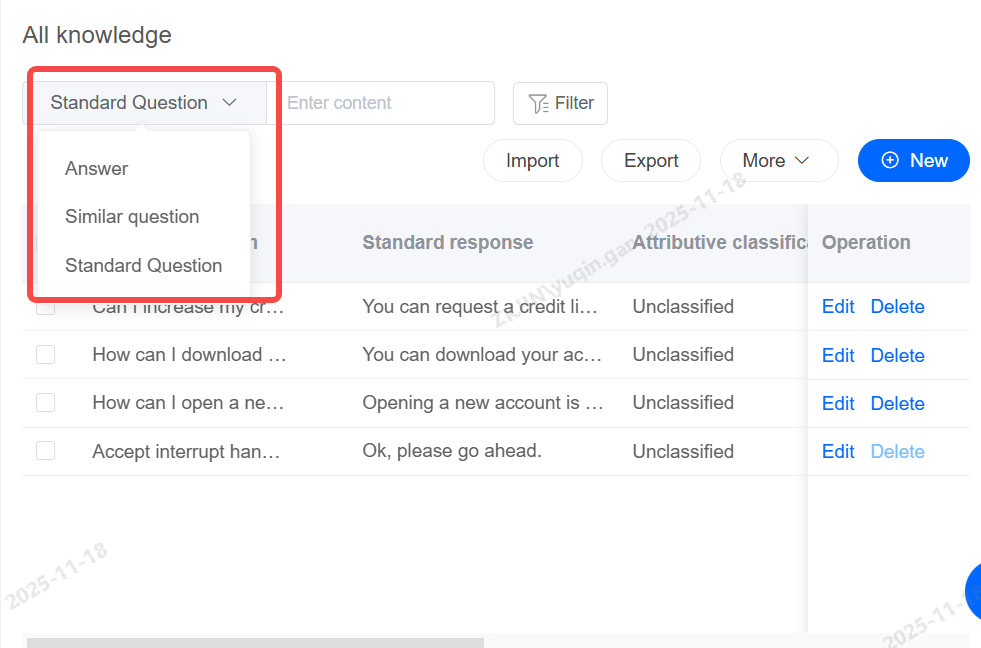
Knowledge: Search
Quickly search for specific knowledge based on answers, similar questions, or standard questions.
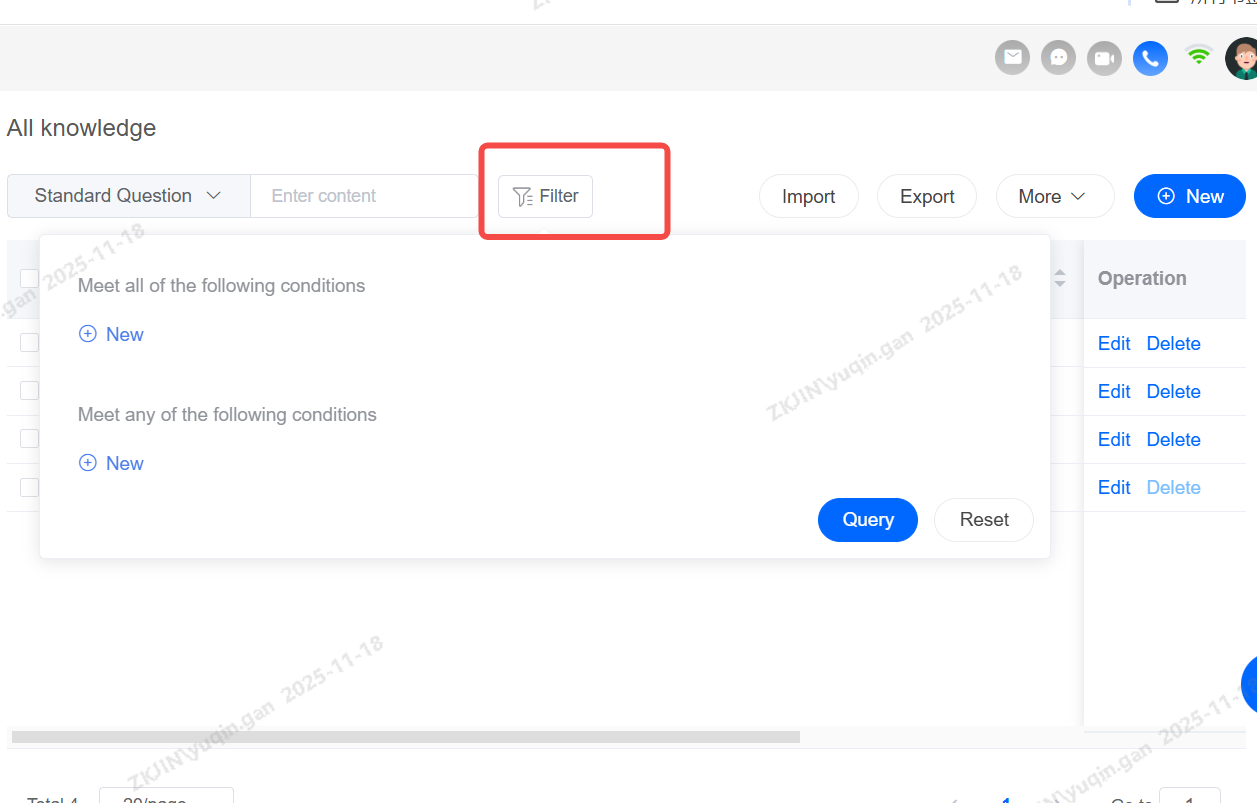
Knowledge: Filter
Multiple conditions can be filtered.
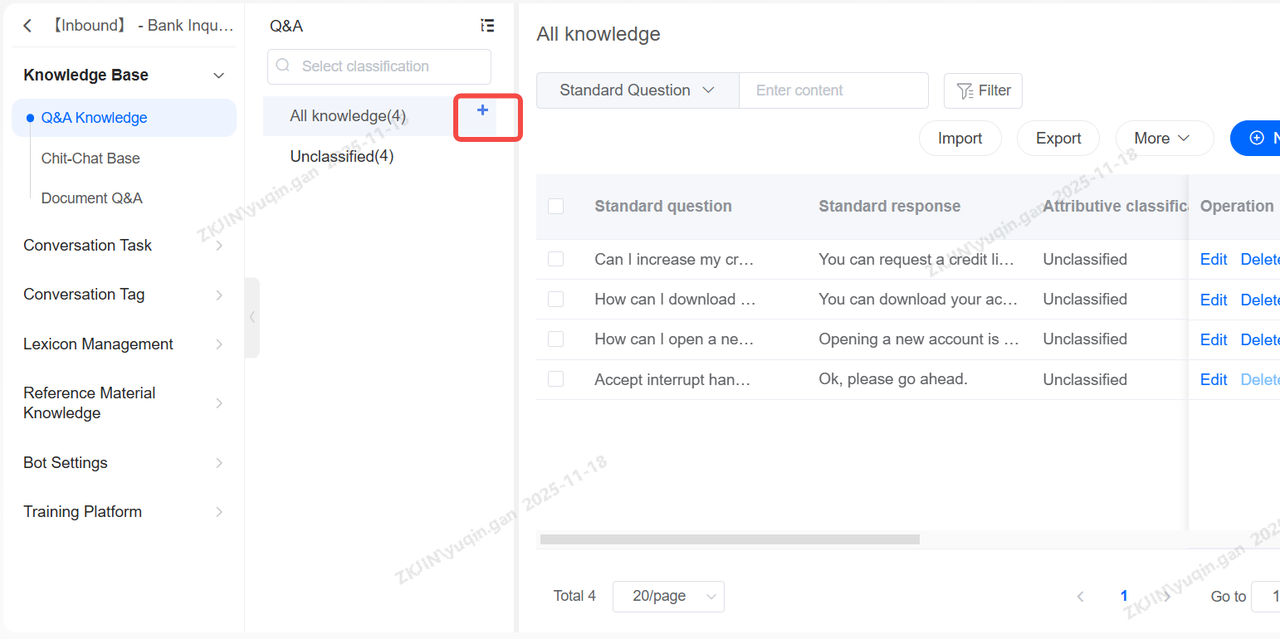
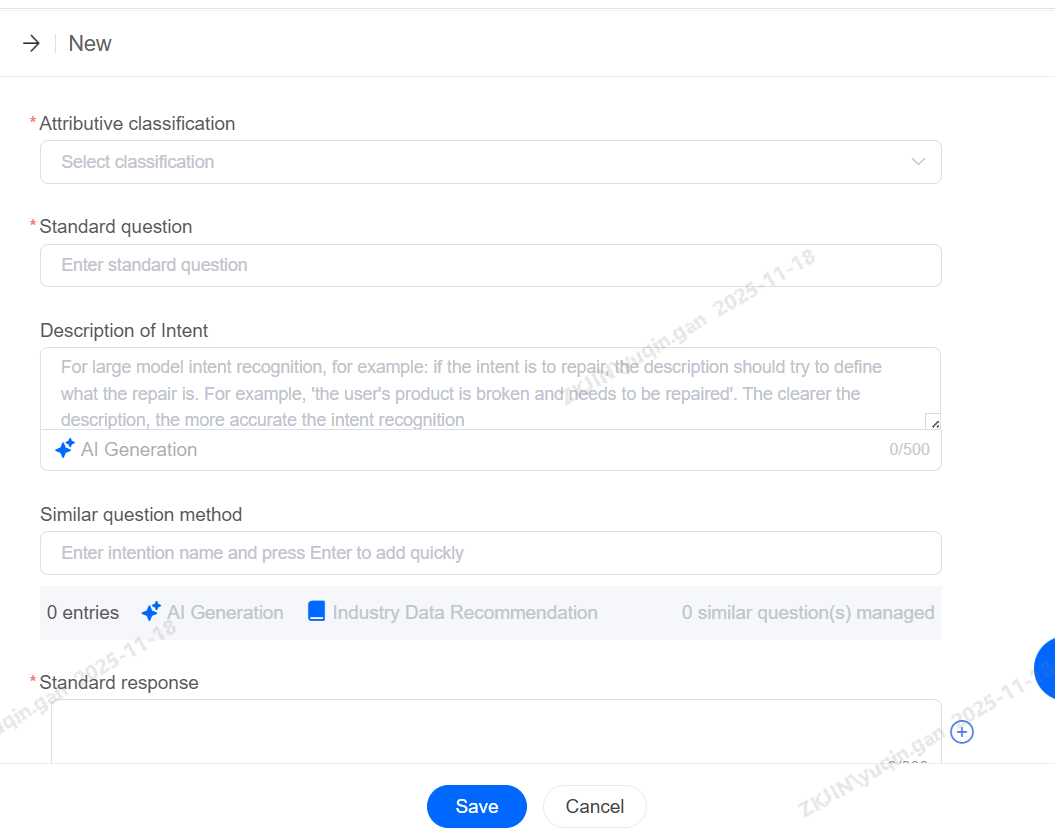
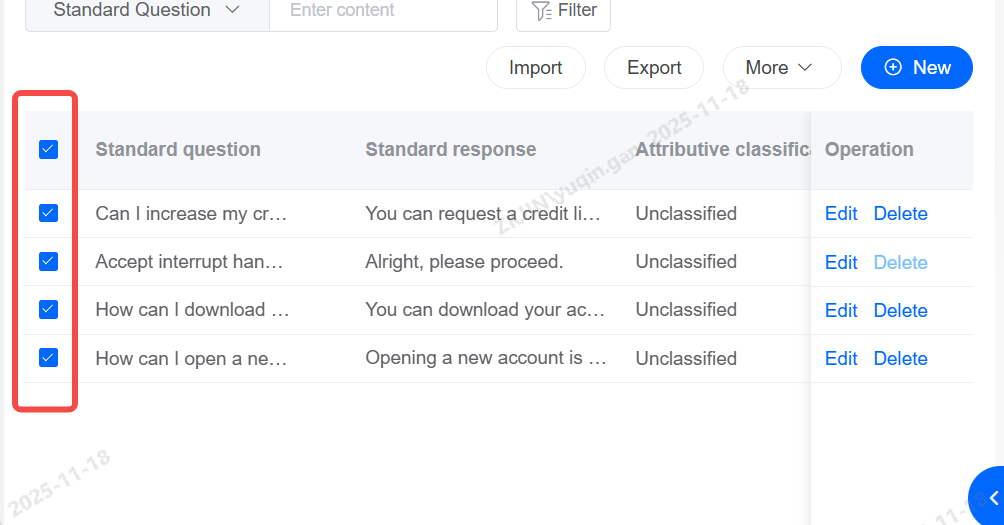
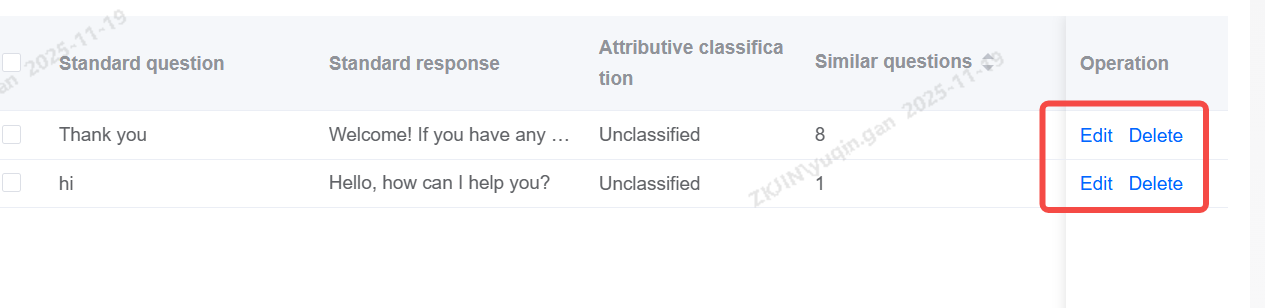
Knowledge: Add, Delete, and Modify
Click New to add knowledge points.
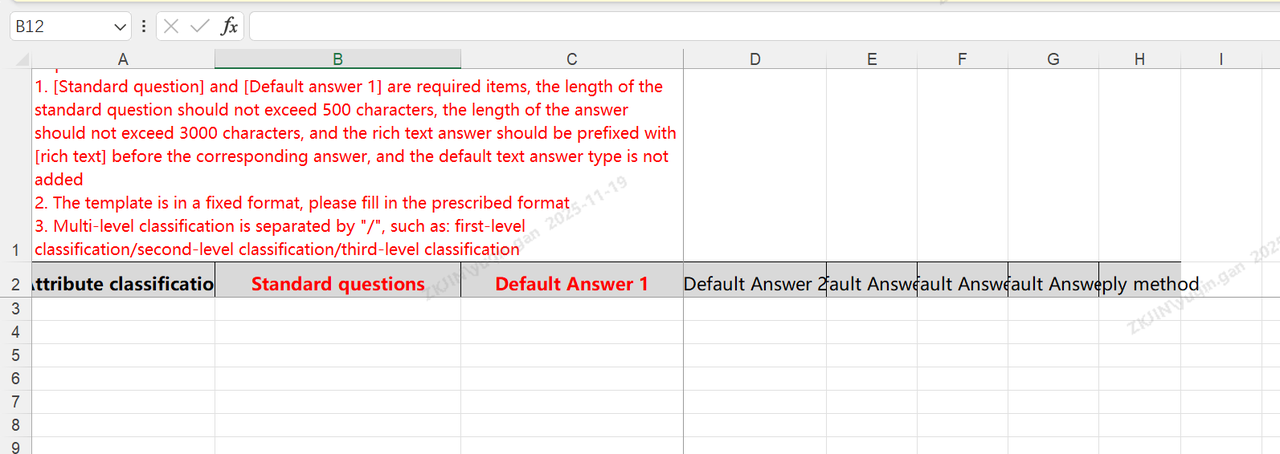
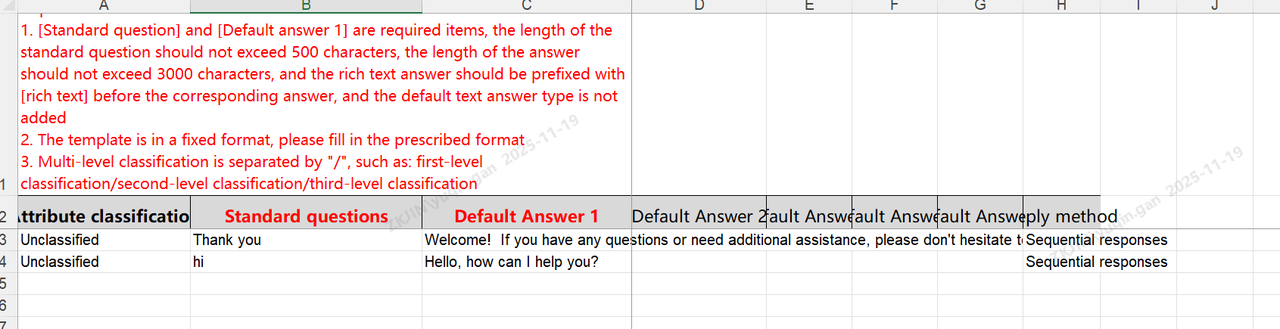
After creating a knowledge entry, you must fill in the three required fields:
-
Knowledge Base Category
-
Standard Question
-
Standard Answer
after which you can edit or delete the entry.
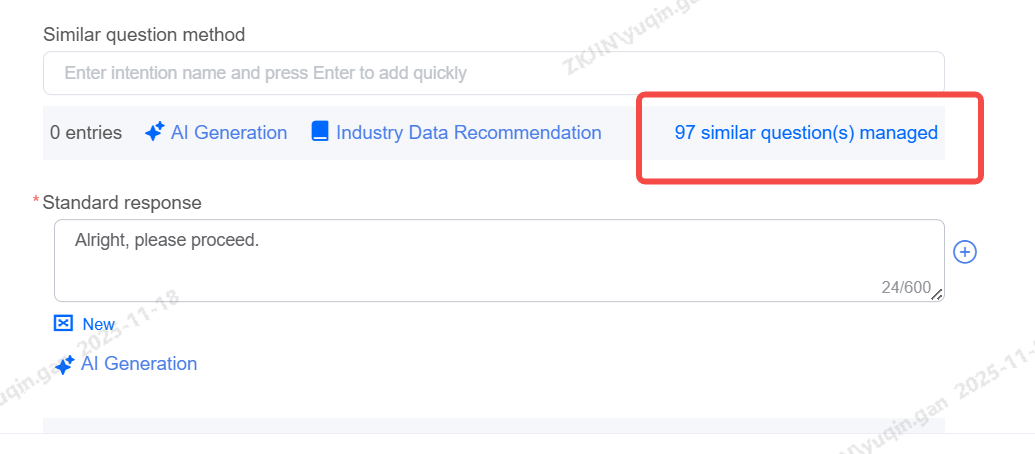
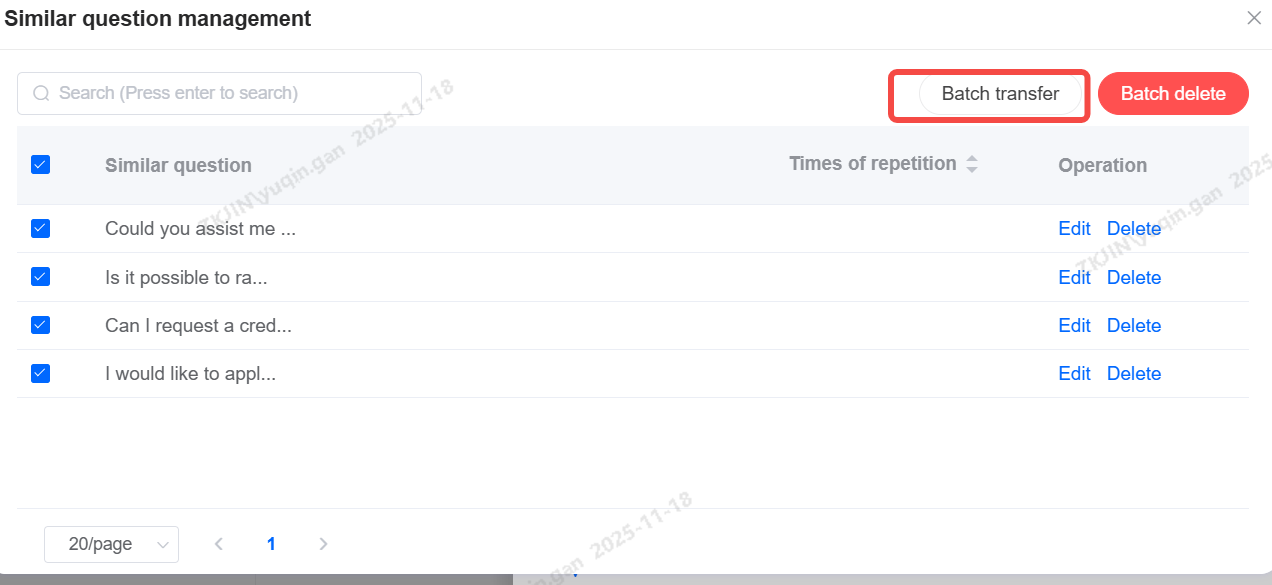
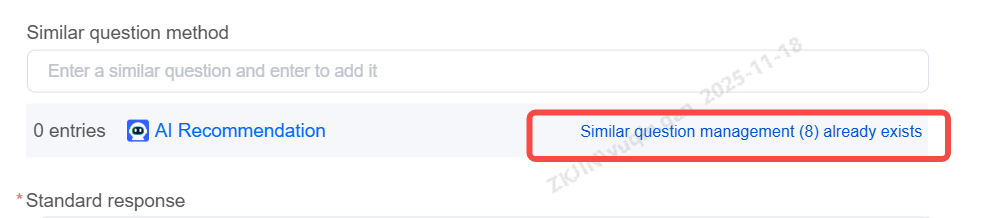
Knowledge Base: Similar Question Management
For a given question, users may express it in various ways. After receiving the user's query, the robot performs semantic similarity matching against the alternative questions in the knowledge point. To increase the recognition rate of the bot, it is necessary to provide several alternative phrasings for that knowledge point.
For example, for the knowledge point "How to download the app," you can click "Add Similar Question" to add them one by one:
-
Where can I download the app?
-
How do I download the app?
-
Where should I go to download your app?
Adding similar questions supports clicking to add, edit, and delete.
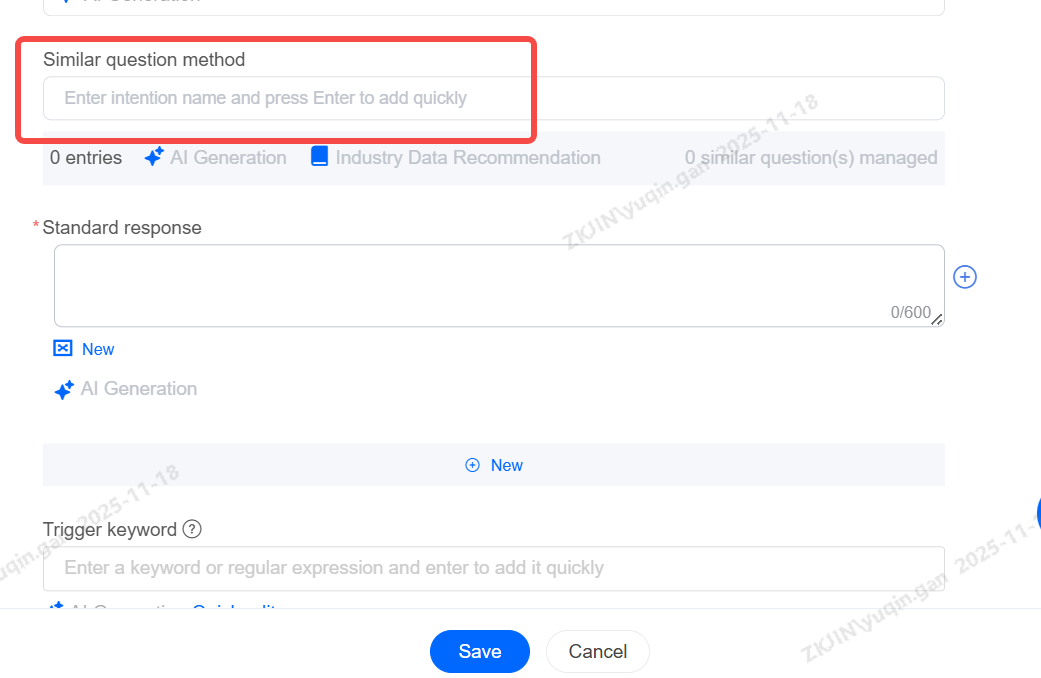
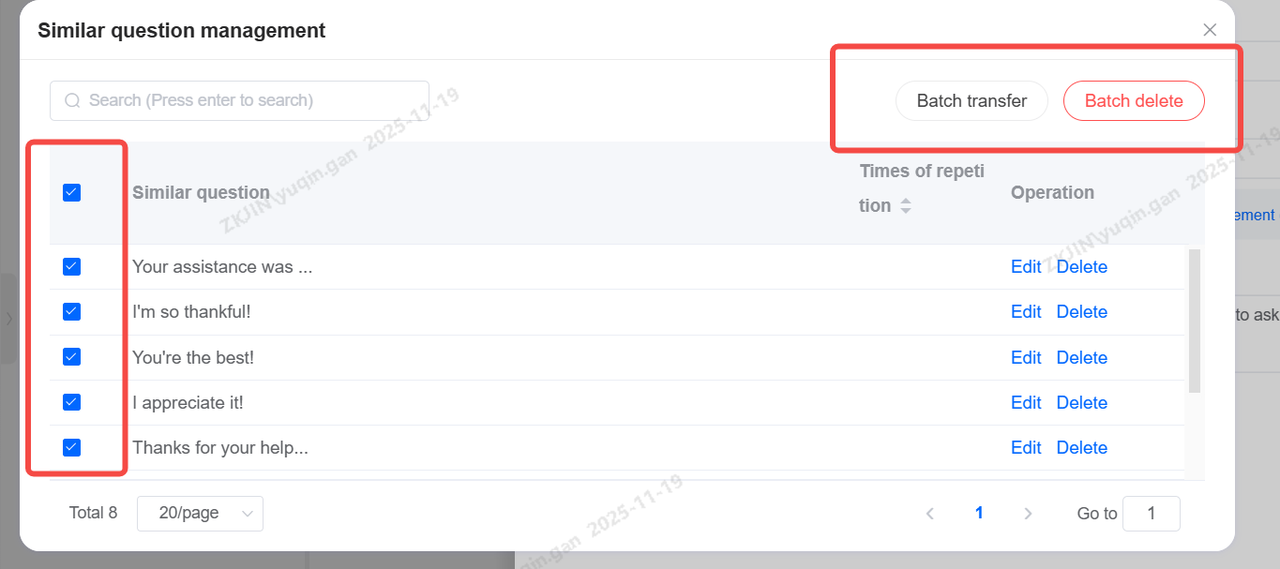
To manage similar questions, select Manage Similar Questions to access functions for editing, deleting, bulk deletion, and bulk transfer.

Select the similar questions you wish to transfer, select Batch Transfer, and move them to the corresponding category.
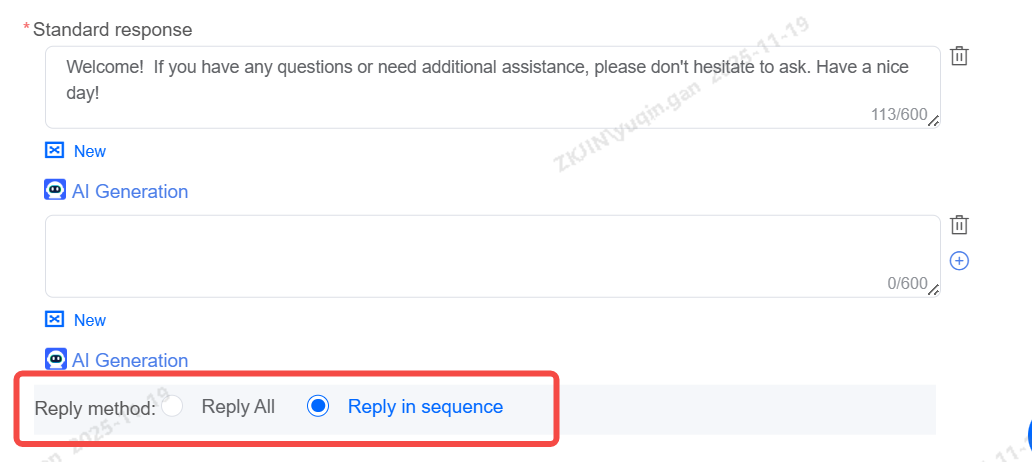
Standard Response
After matching the user's question, the bot will send a standard response. Multiple responses can be configured, and replies will be delivered in sequence.
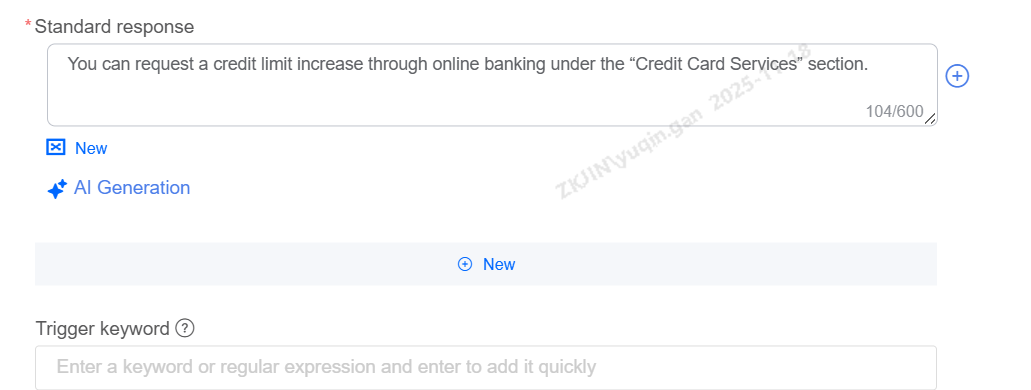
Keyword-based Answers: Different answers can be set based on the keywords triggered by the current question.
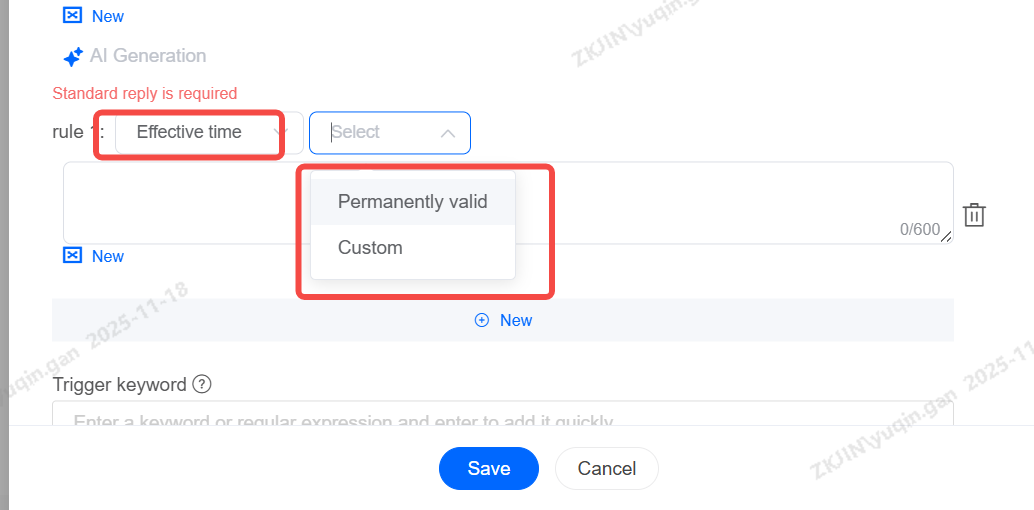
Effective Time: The effective time for this category is primarily set for categories where answers are only valid for a specific period, such as promotions or time-limited activities.
Supports adding rule-based answers for keywords, time, etc.
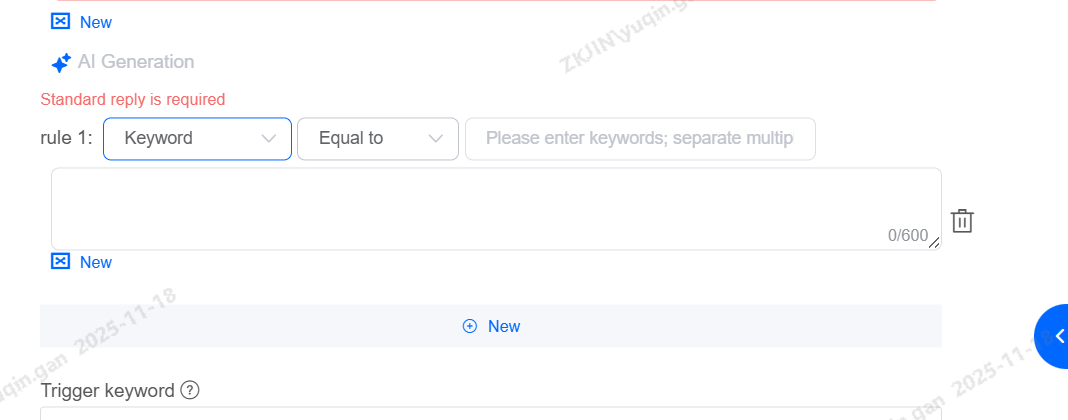
Keywords: Add & Edit
Supports adding keywords, with keywords supporting regular expressions.

To modify multiple regular expressions, click Quick Edit. This mode supports one-click clearing, copying, and pasting keywords.

Regular expressions cannot be duplicated
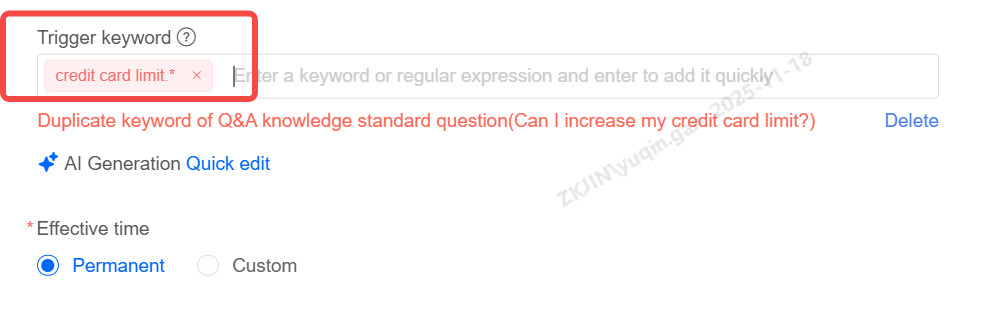
Effective Time
The effective time can be set to either Permanent or Custom
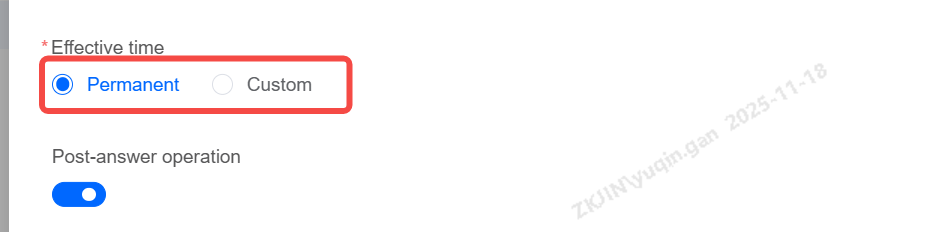
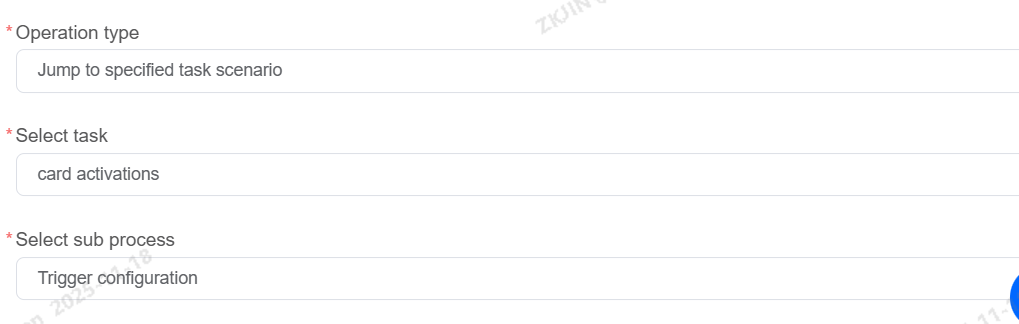
Post-Response Actions
Post-response actions support redirecting to a designated task scenario, waiting for user response, and hanging up.
Knowledge Status: Enabled/Disabled
Can be enabled or disabled based on business needs.
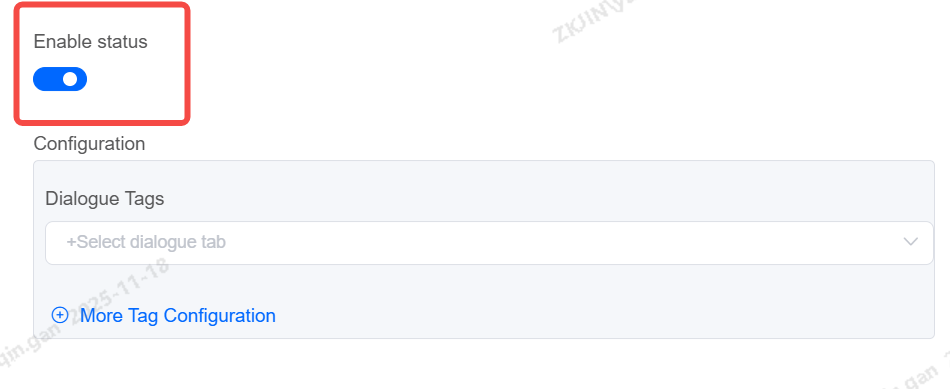
Dialogue & Customer Tags: Add
Supports adding tags to every chat imported into the knowledge base.
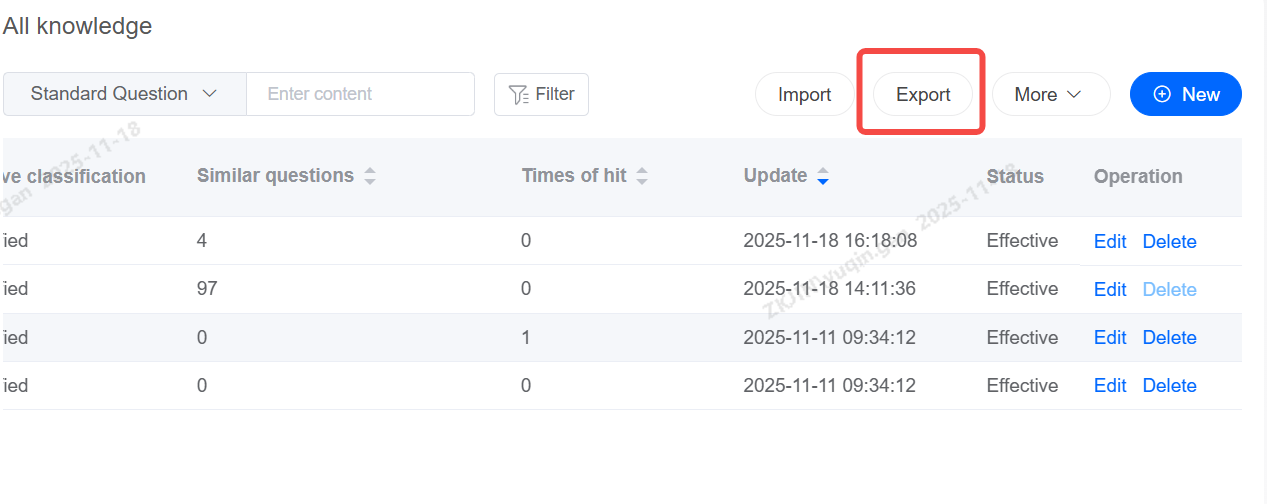
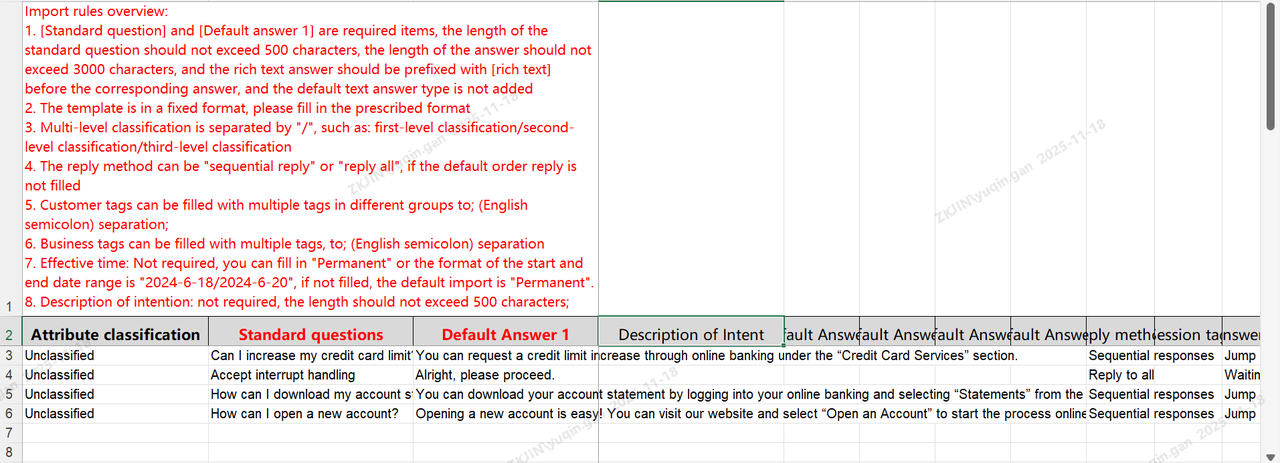
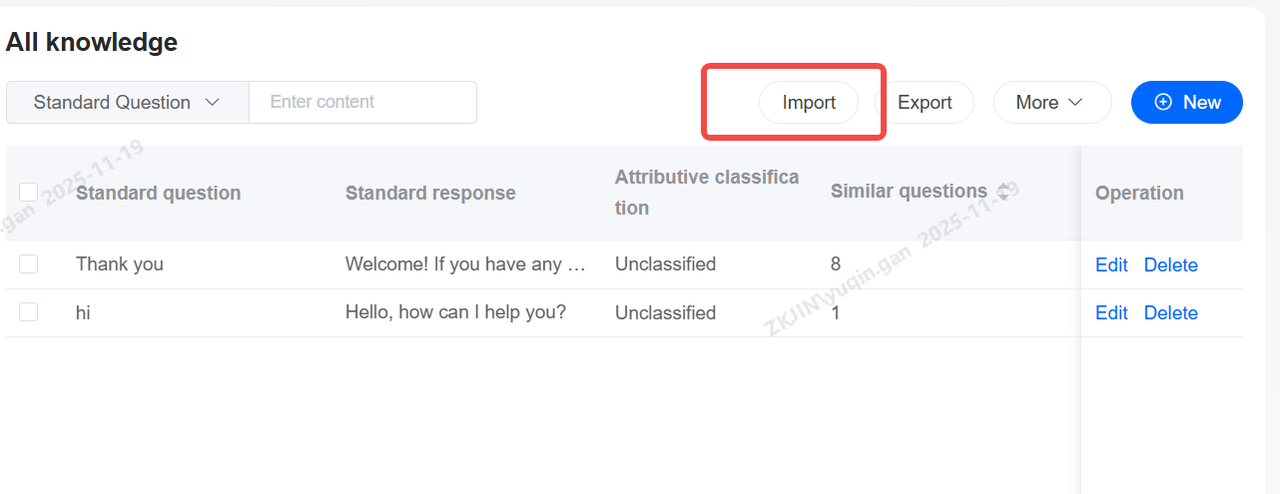
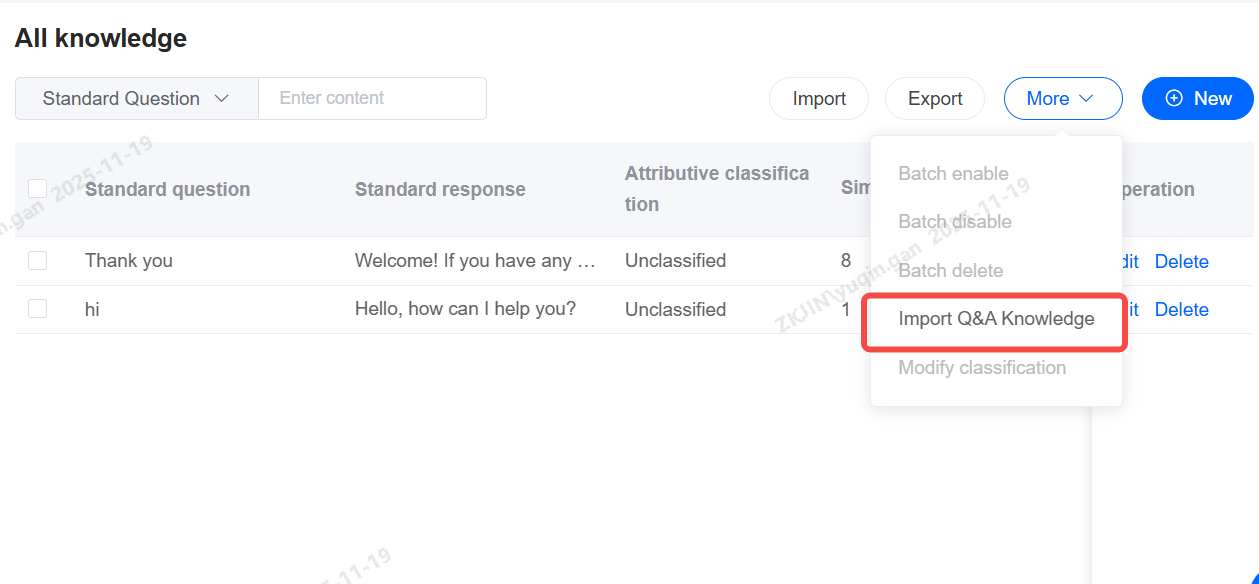
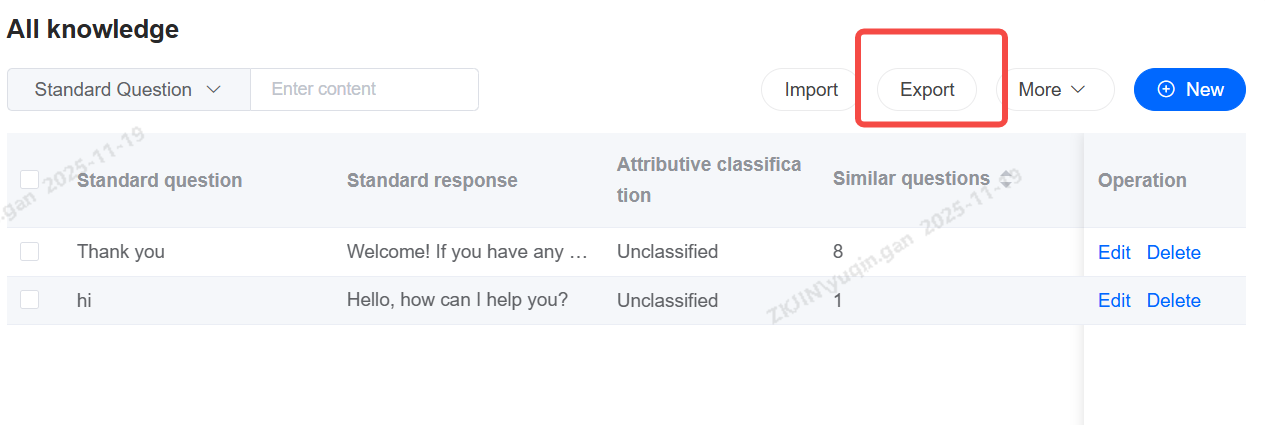
Knowledge Base: Import & Export
The Knowledge Base also supports batch import and export, reducing maintenance time.
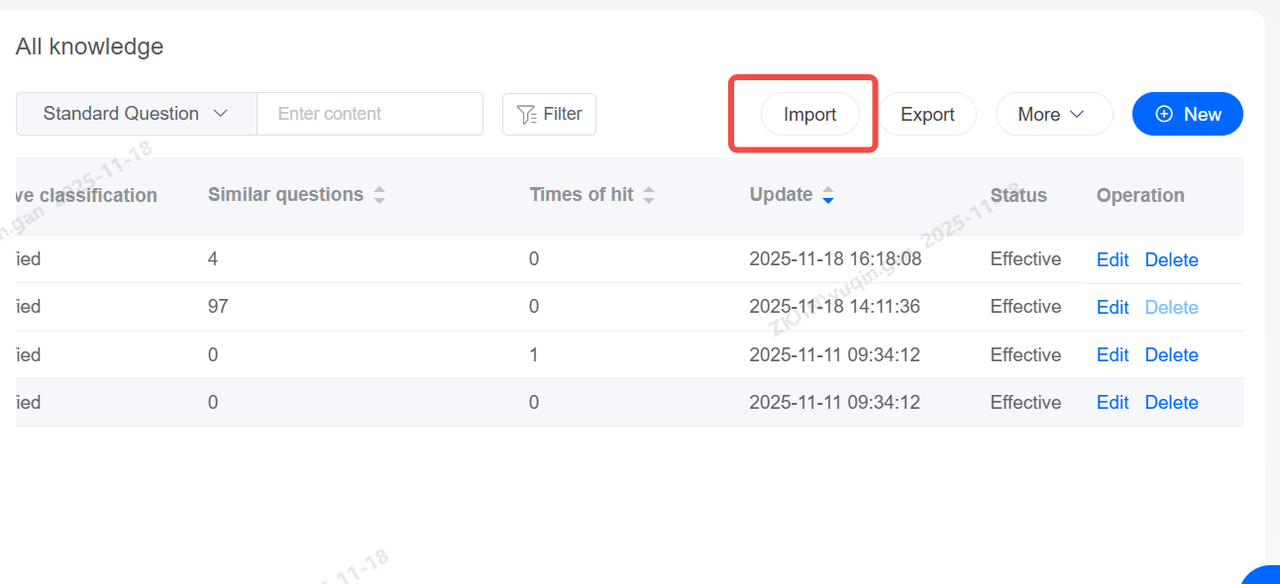

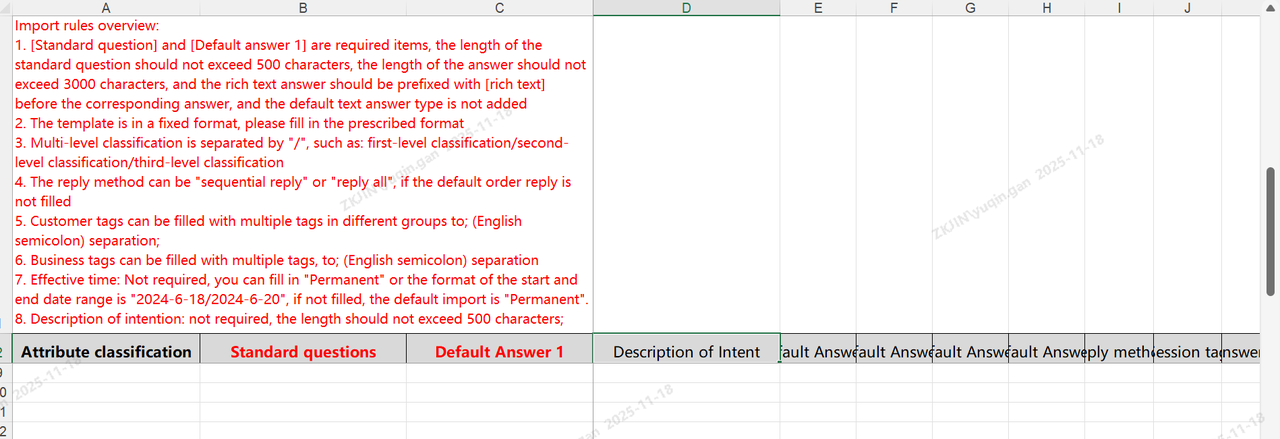
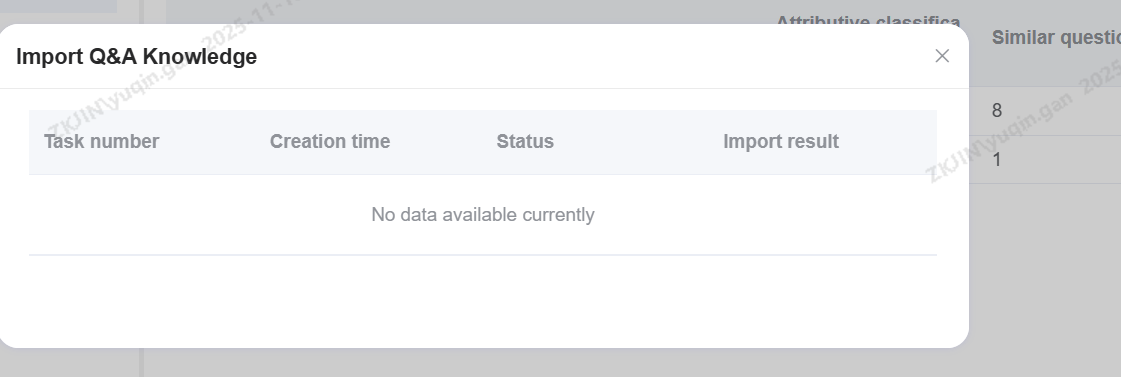
After importing the knowledge base, click Import Tasks to view task status and progress.
Export Knowledge
Other Actions
Select Knowledge to Batch Delete, Batch Enable, Batch Disable, and Modify Categories
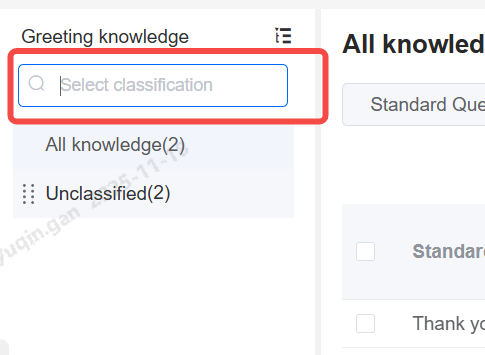
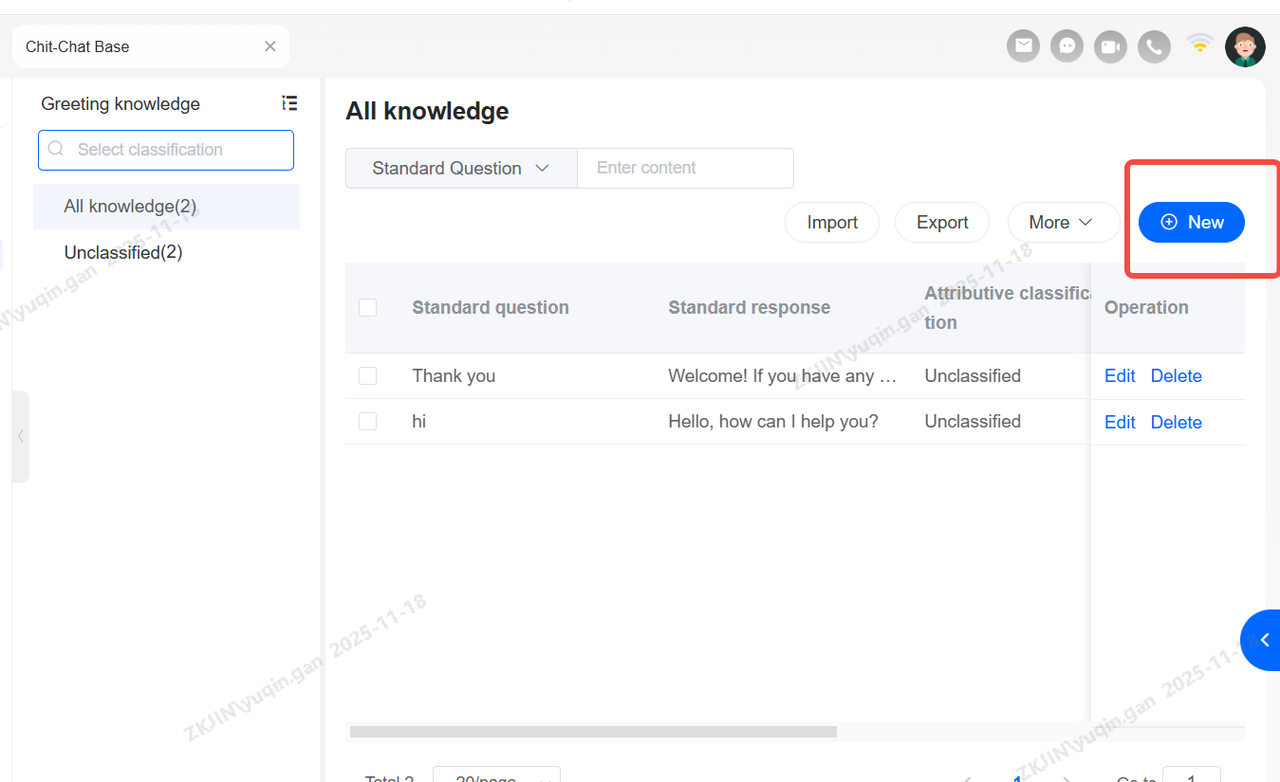
Chit-Chat Base
Voicebot equipped with Chit-Chat knowledge will engage in more natural conversations with users.
Create Category Directory
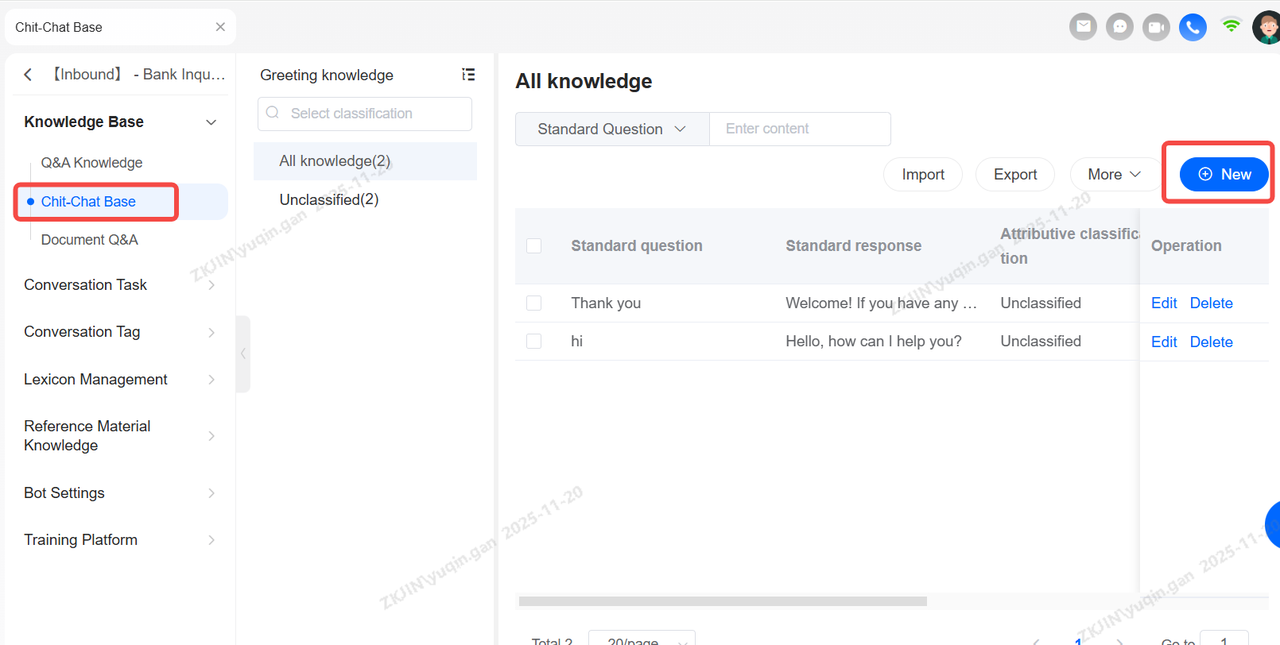
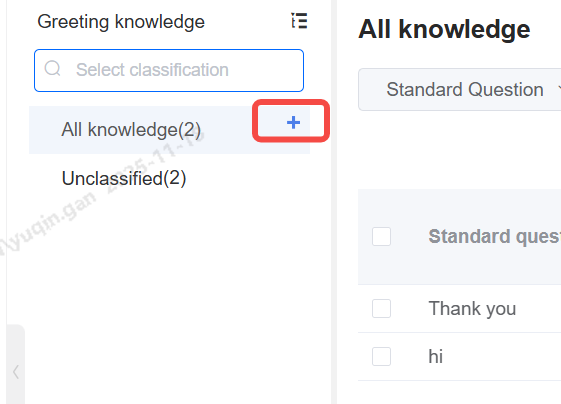
Search Category
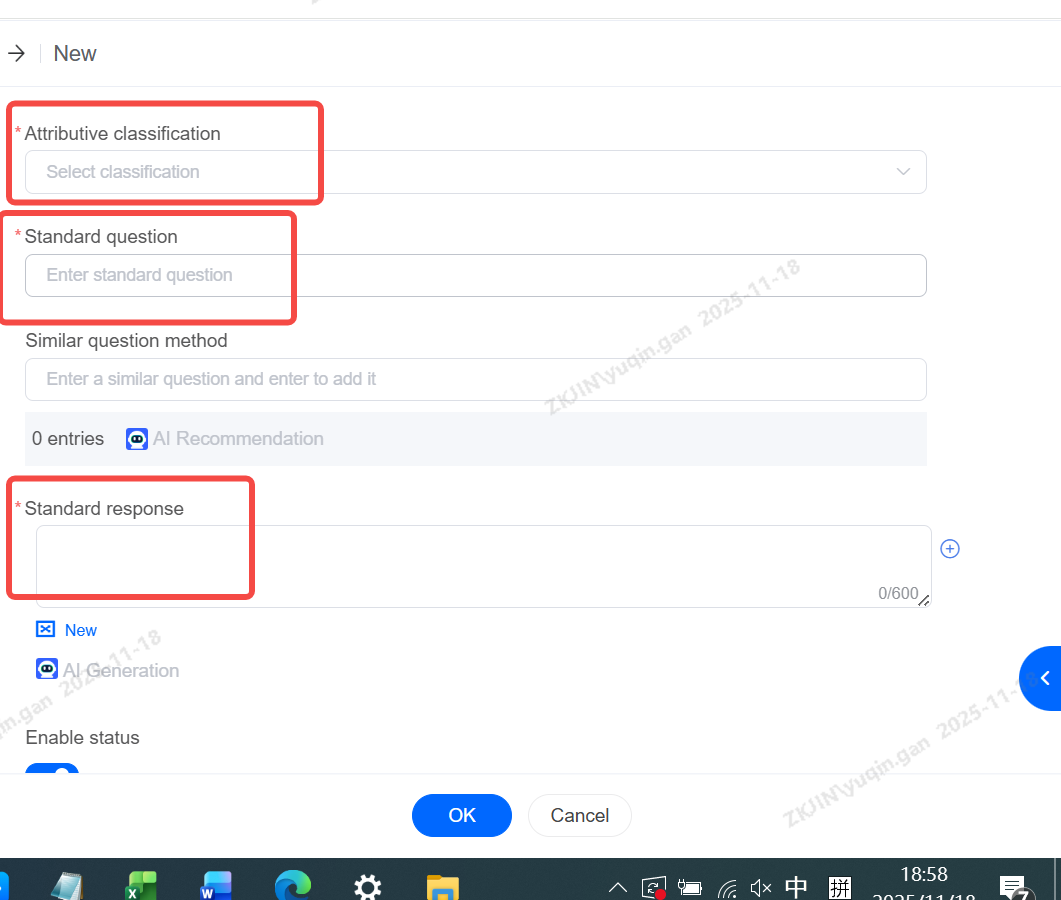
Small Talk Base: Add, Delete, Modify
New entries require three mandatory fields:
-
Category
-
Standard Question
-
Standard Response
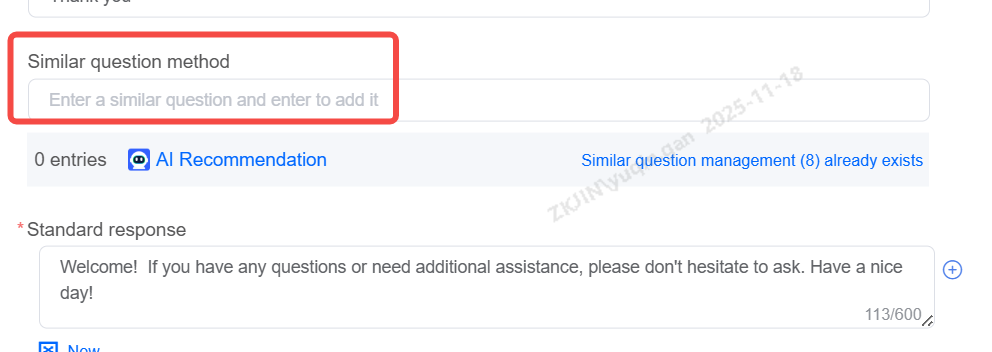
Chit-Chat Base: Similar Expression Management
Manage the Chit-Chat Base according to specific business needs, supporting editing, deletion, and transfer of small talk.
Chit-Chat Base: Transfer
Enter the Chit Chat Base editing page, select the corresponding similar expression, and choose Manage Existing Similar Expressions.
Batch operations are also supported. You can select multiple similar questions at once and choose either Batch Transfer or Batch Delete.

Standard Response
Chit-Chat Base: Add, Delete, Edit
Chit-Chat Base: Import
Note: A full replacement will overwrite all data under the current Q&A knowledge base. Please back up your data before importing.
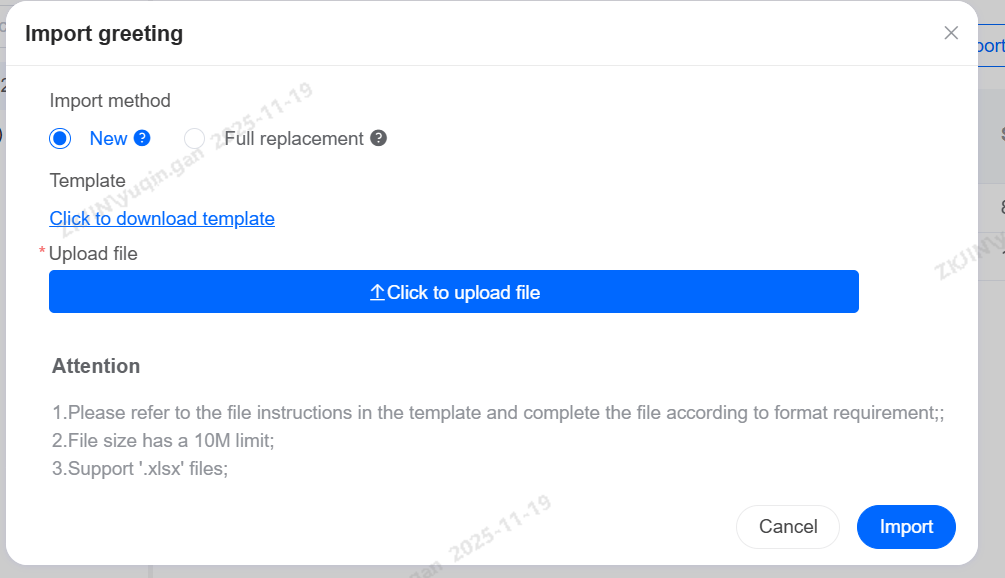
After importing the Chit-Chat Base, click Import Tasks to view task status and progress. If import fails, download the failed content to review the reasons for import failure.
Chit-Chat Base: Export
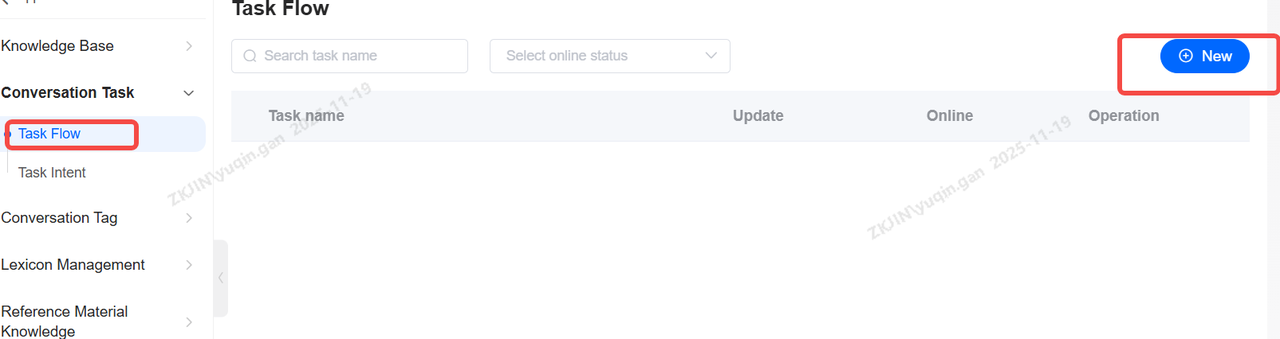
1.2 Task Flow
A structured conversational workflow designed for complex, multi-turn business scenarios like booking flights or hotels. It is built visually using nodes (representing steps like asking questions or making decisions) and connections with rules that determine how the bot moves between them. This allows the system to guide the user through a process, collect required information step-by-step, and ultimately complete a specific task. The 4 main components are:
-
Sub-processes
-
Nodes
-
Node Transition Conditions
-
Connections
The flow is constructed through the coordination of these elements.
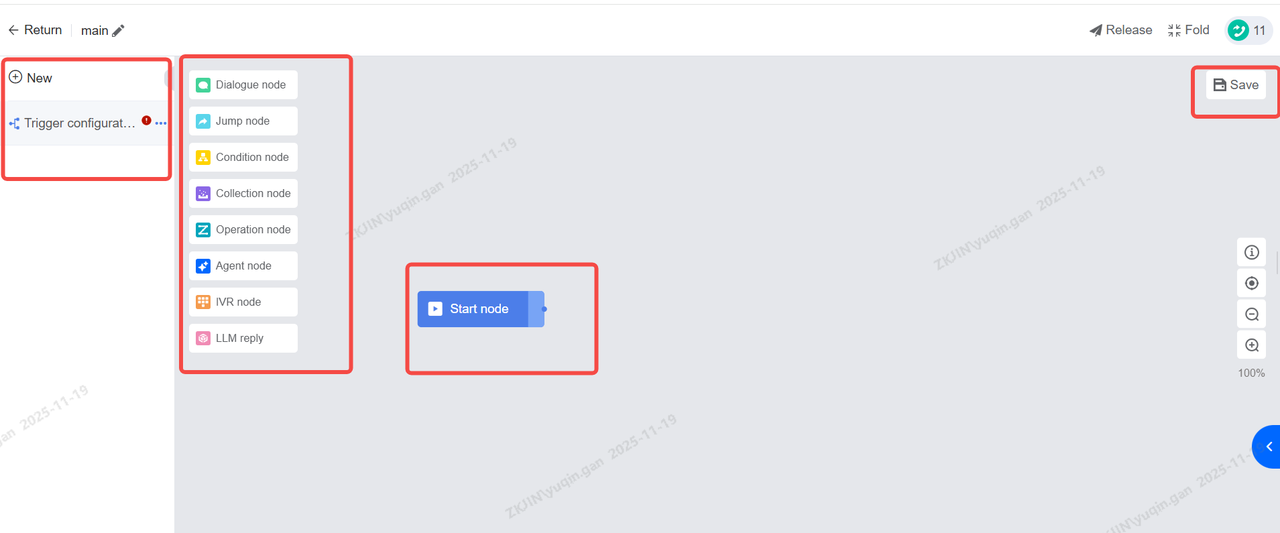
Main Process
You can click New to create your own task flow.
Process
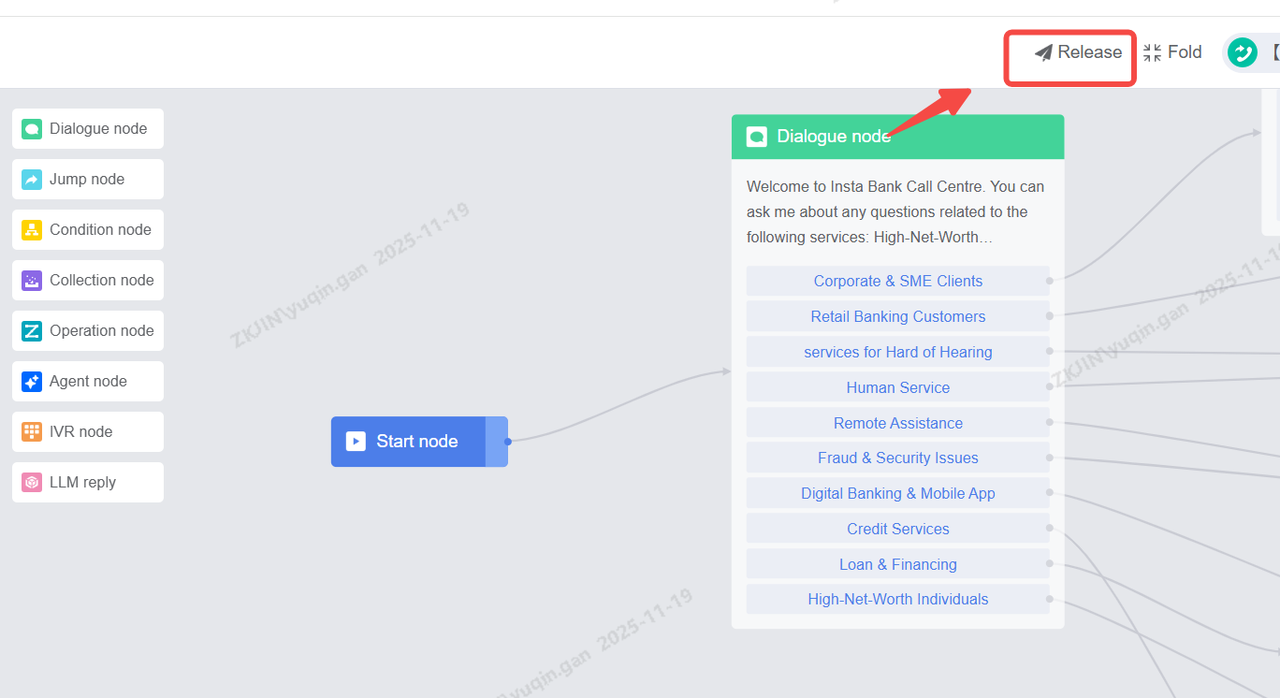
Task Flow: Save & Release
Save
Canvas Example:
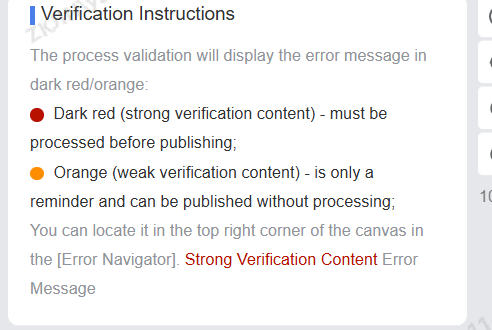
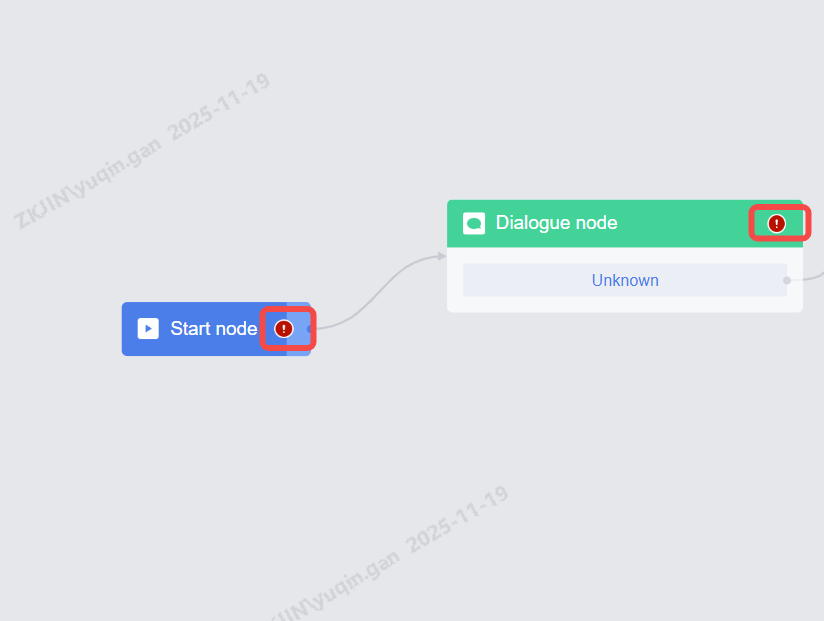
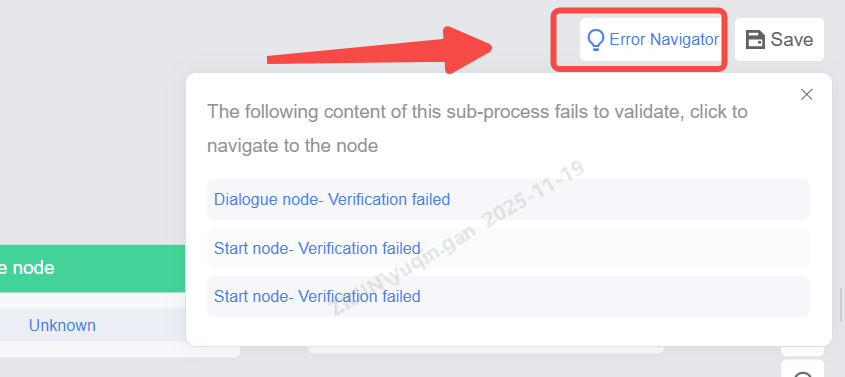
Clicking an error navigation will display the specific error node name, branch, and error content. Clicking the content will automatically navigate to the specific node on the process canvas.
Release
Release is a necessary step. If the configured content is only saved but not published, it will not take effect in the robot function eventually.
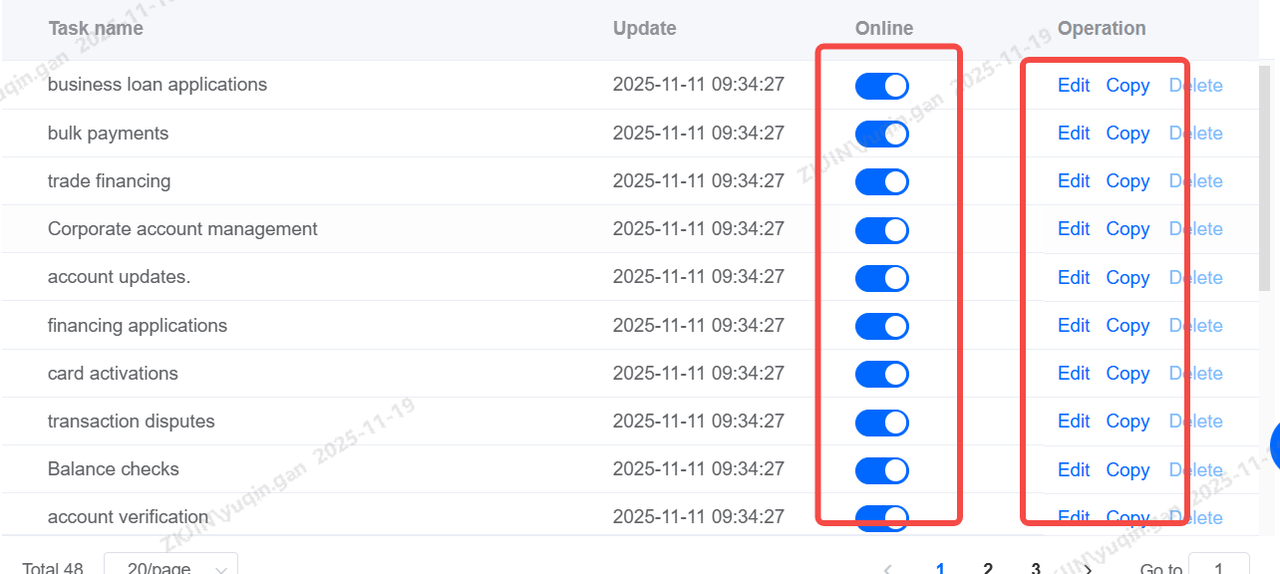
Task Flow: Enable/Disable
-
Task flows must be enabled before use. Those not needed can be disabled. Editing and copying are supported. Once activated, deletion is not permitted; to remove a task flow, it must first be disabled.
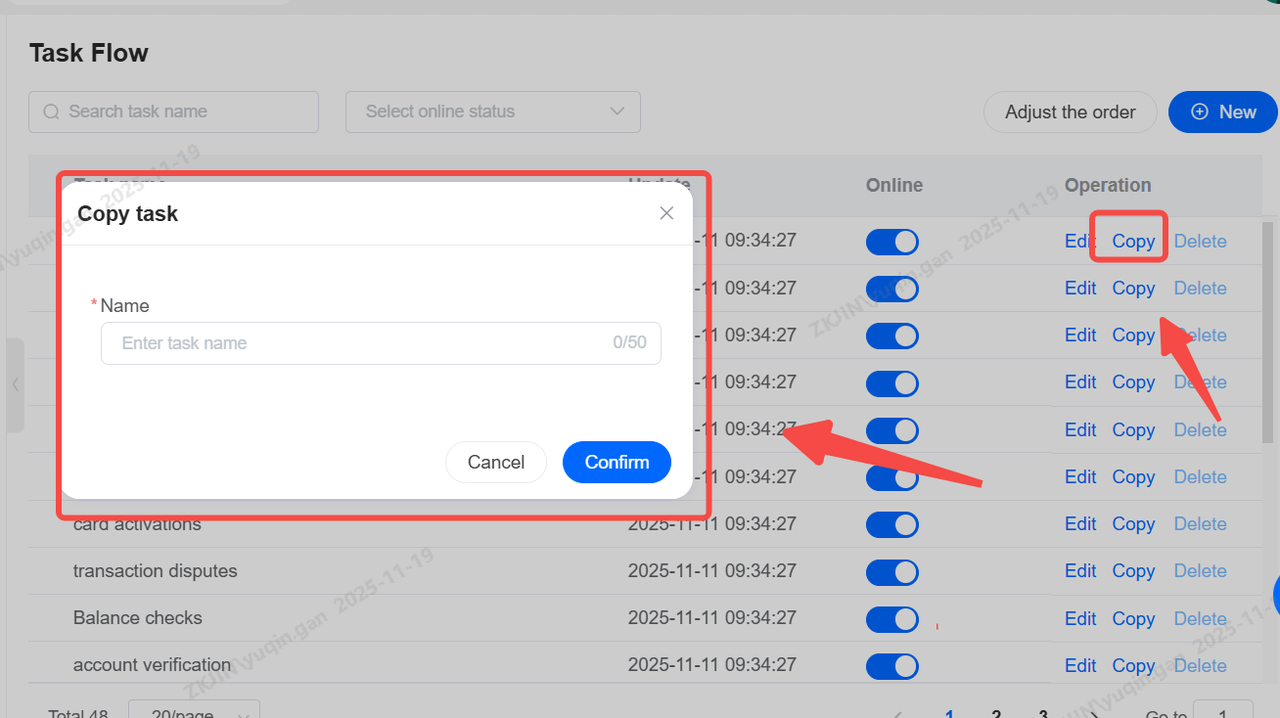
Task Flow: Duplicate
Task Flow can be copied, but after copying, internal nodes must be re-edited, including selecting skill groups and other configurations;
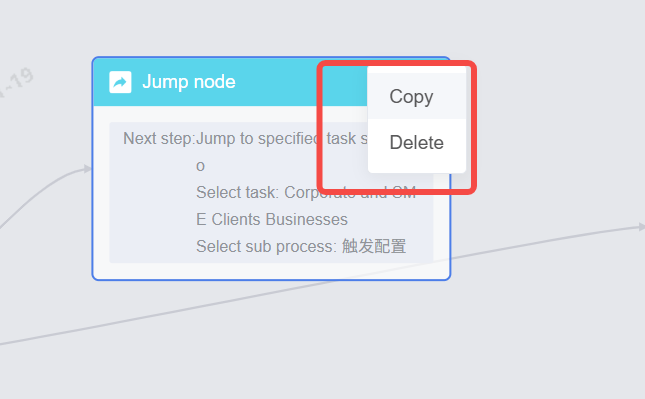
Shortcuts:
Selection: Ctrl + click nodes; Ctrl + A to select all. If selected nodes are connected, the connecting lines are also selected.
Copy:
-
Right-click the selection and choose Copy or,
-
Use the keyboard shortcut Ctrl+C.
Connections between selected nodes are copied along with them.
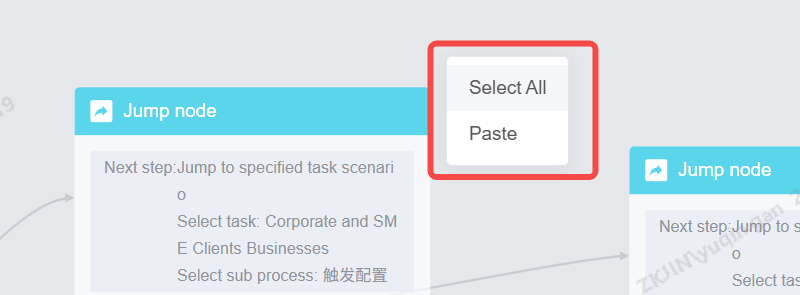
Paste:
-
After copying, click to paste in an empty area of the canvas or,
-
Use the keyboard shortcut Ctrl+V.
Connections between nodes are also pasted.
Nodes
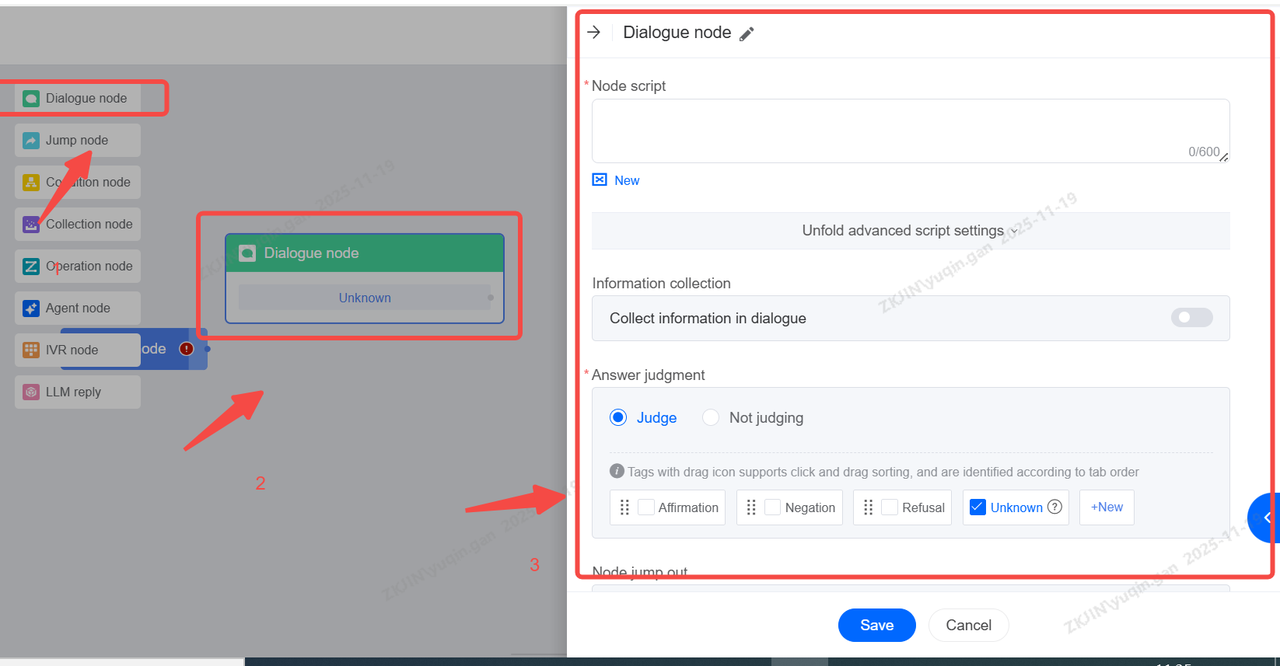
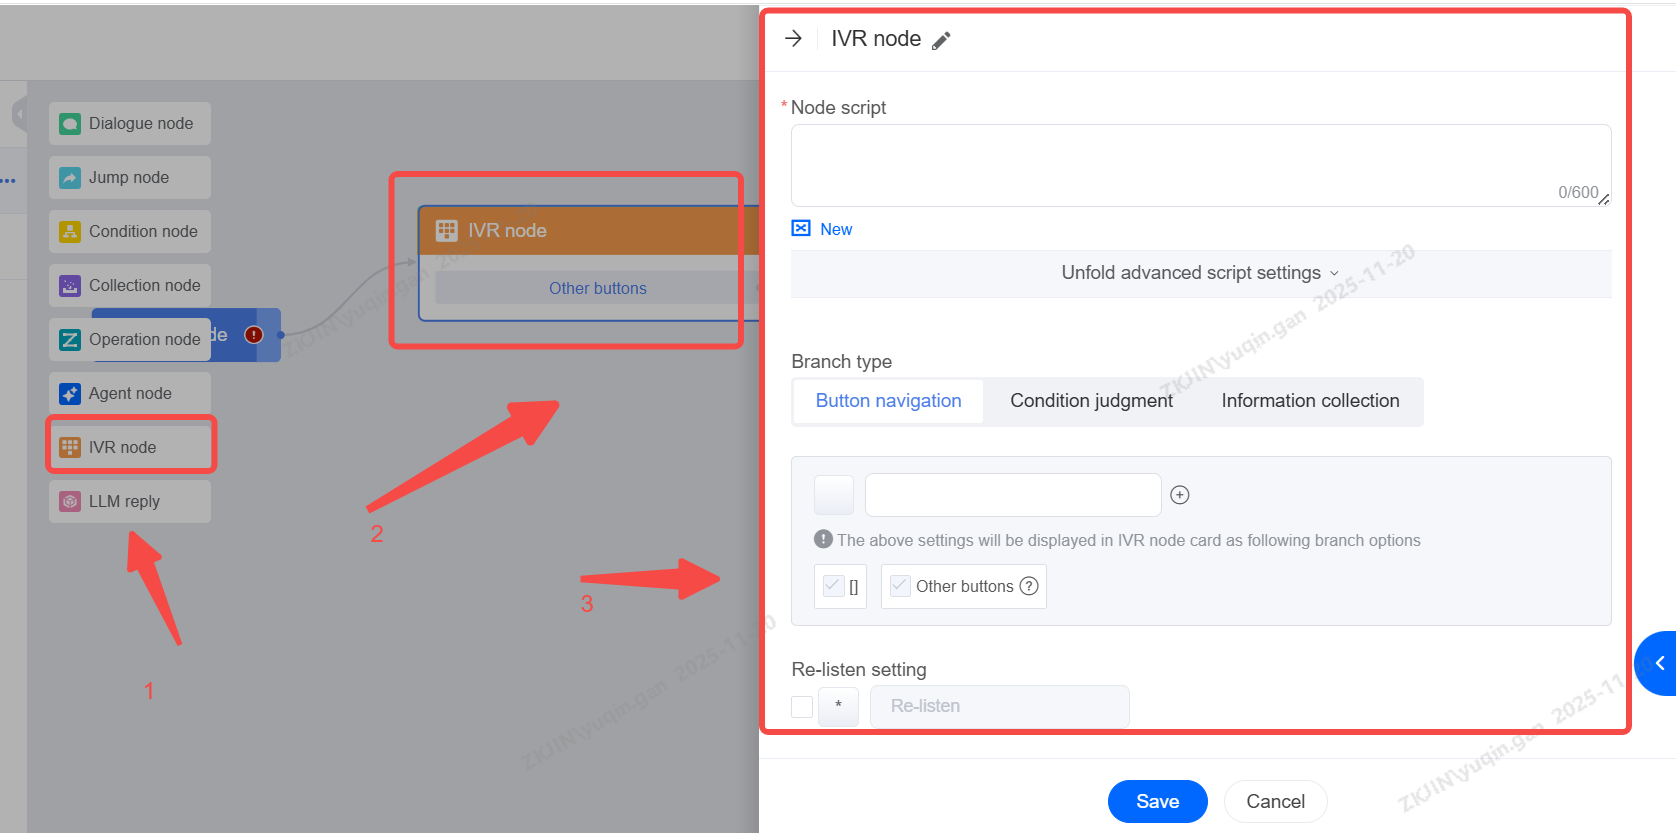
Nodes are the individual steps or actions the bot executes. Different node types are used for different functions. Within the Task Flow there are 6 types of nodes which are:
-
Dialogue Node: The bot says something to the user.
-
Jump Node: Moves the conversation to another part of the flow.
-
Condition Node: A decision point that checks a rule.
-
IVR Node: Presents a menu for keypad input
-
Collection Node: Gathers specific information from the user's response.
-
Operation Node: Performs a backend action, like creating a ticket or calling an API.
1.2.1 Dialogue Node
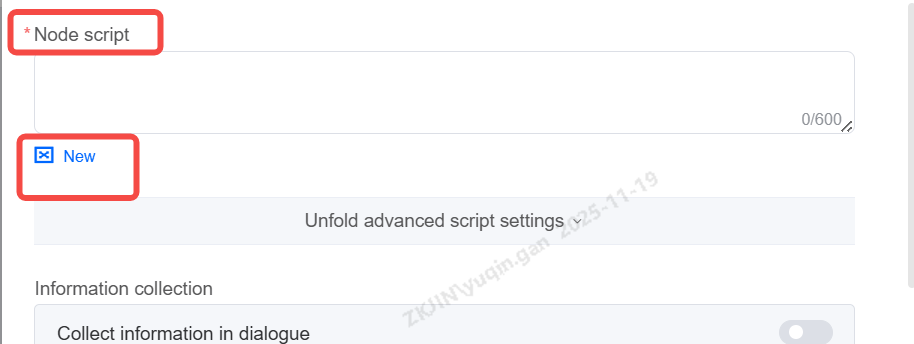
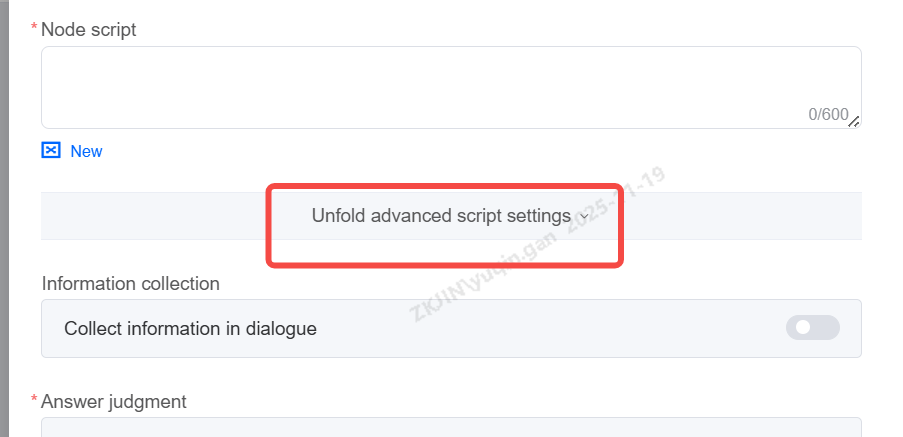
The Dialogue node is the most commonly used node. Under this node, you can directly enter the node content to reply (TTS will automatically convert it into voice), or you can use the LLM to write words and reply.
Enter the bot's script in the input box, supports variable input.
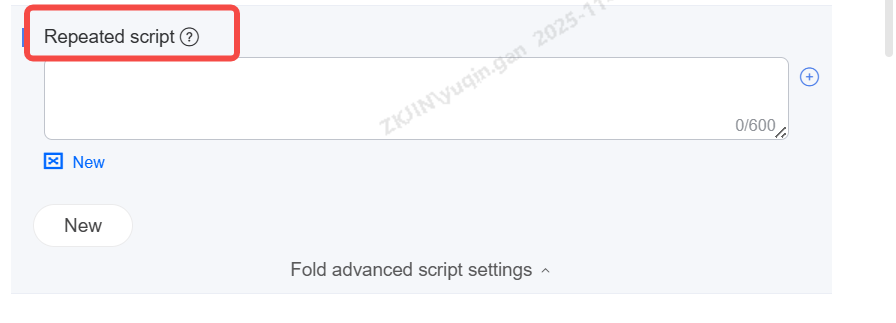
Repeated Script
Configure multiple alternative messages for a node. If the conversation loops back to it (e.g., user asks bot to repeat), the bot cycles to the next reply, avoiding repetition and creating a natural flow. This can be seen by unfolding advanced script settings as shown below
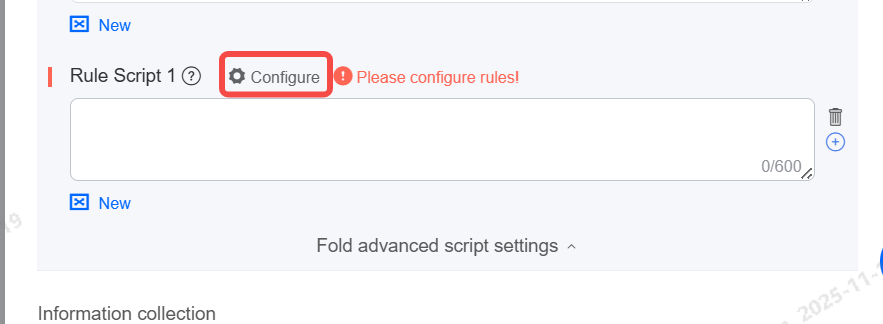
Rule-Based Script
Supports the insertion of rule-based scripts. Rule-based script conditions support variables and system time conditions. Rule-based scripts take priority over "node scripts and repeated scripts" for responses.
Note: If multiple rule-based scripts are triggered simultaneously, the script with the lower sequence number is prioritized for response.
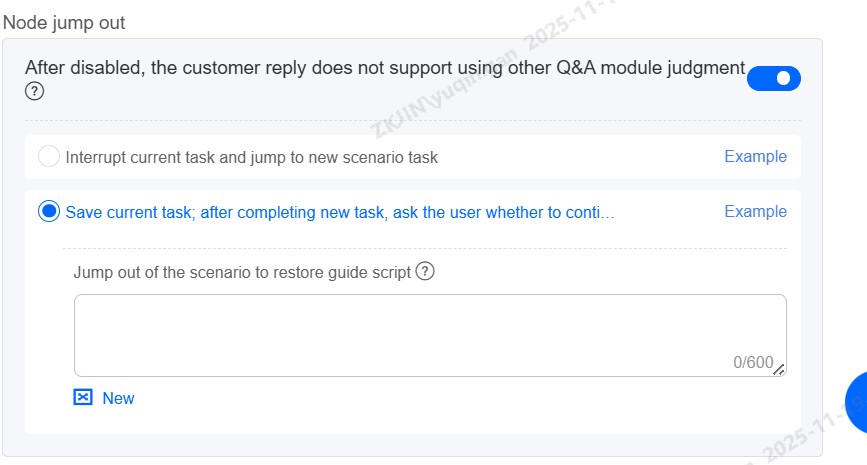
Node Jump Out
When disabled, customer inputs are processed exclusively through the connected branches of the workflow, bypassing other Q&A modules. If no branch condition is met, the system will respond with a global guiding and await new user input.
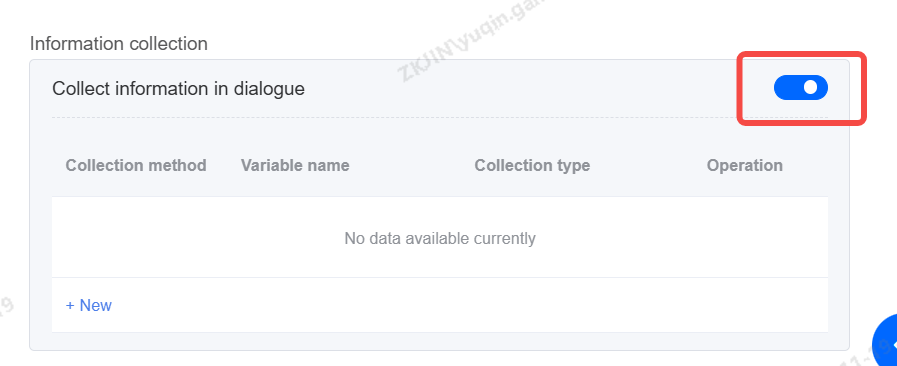
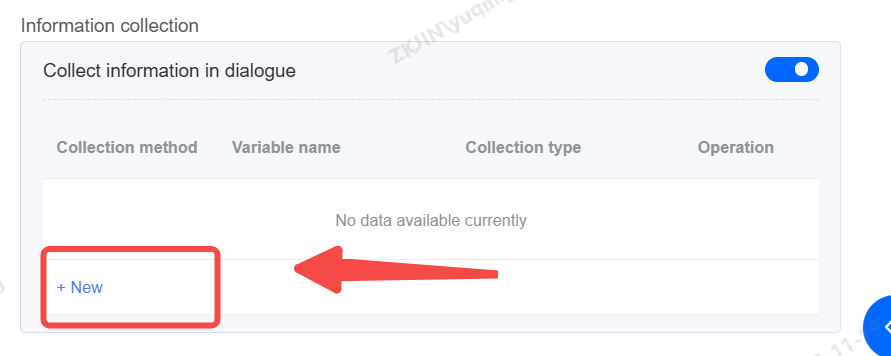
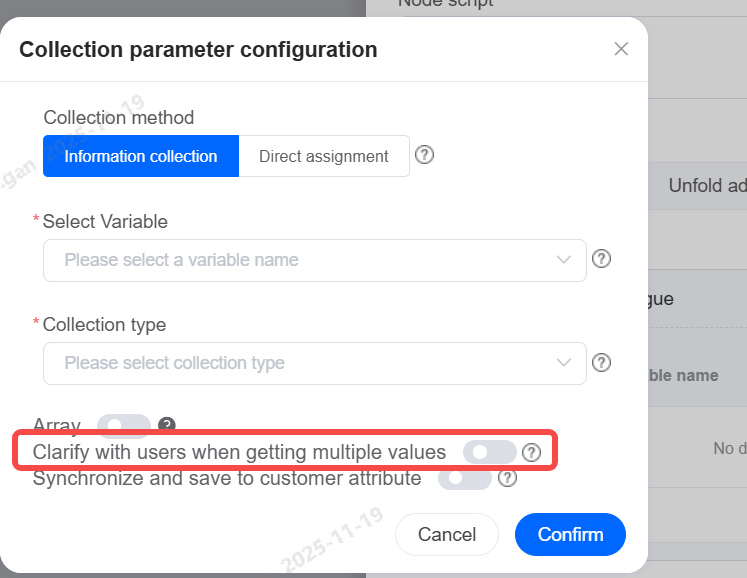
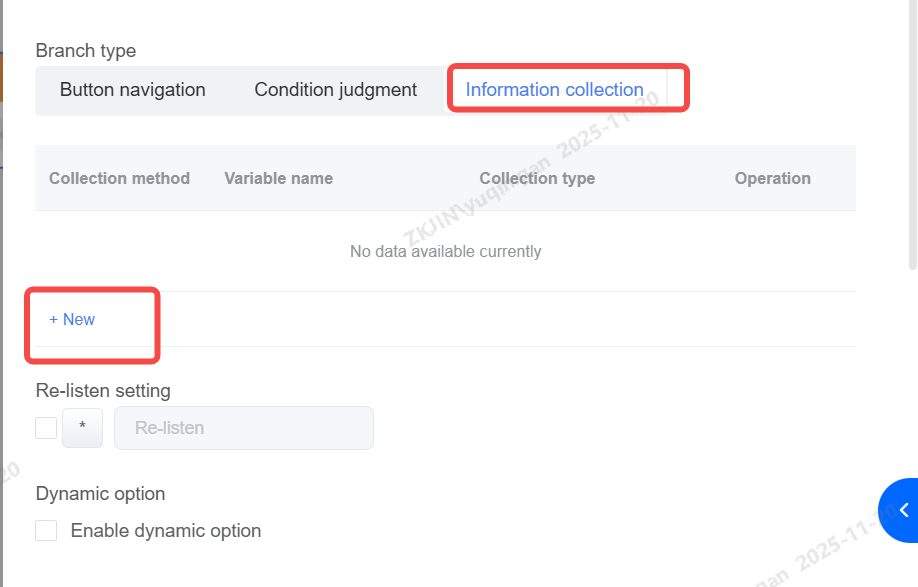
Information Collection
In business, the information collection feature is usually used to collect the required information, such as customer order number, logistics order number, or specific consultation information, and store it in the system variables. Later, it can be directly written into the ticket or transferred to a third-party system through the interface.
Click New to support data collection and direct assignment.
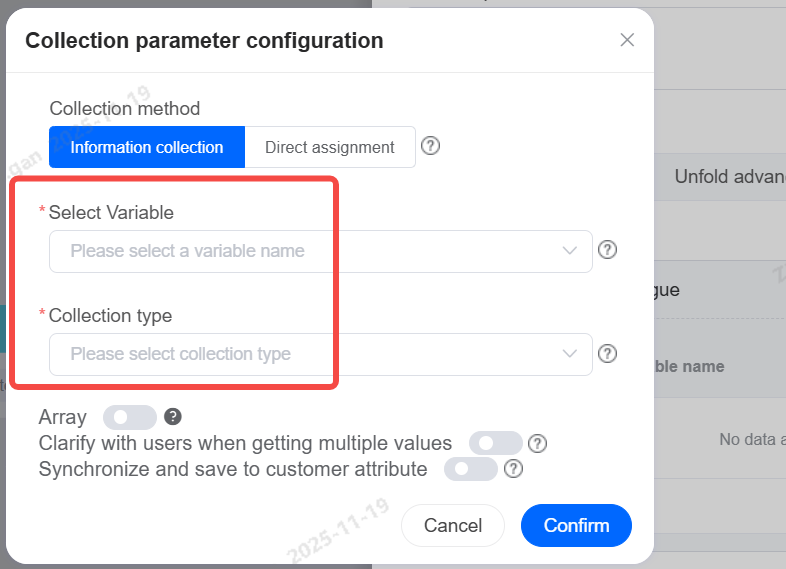
Select Variable
Choose the variable field to store customer information collected during the call, which can be used in subsequent conversation scenarios.
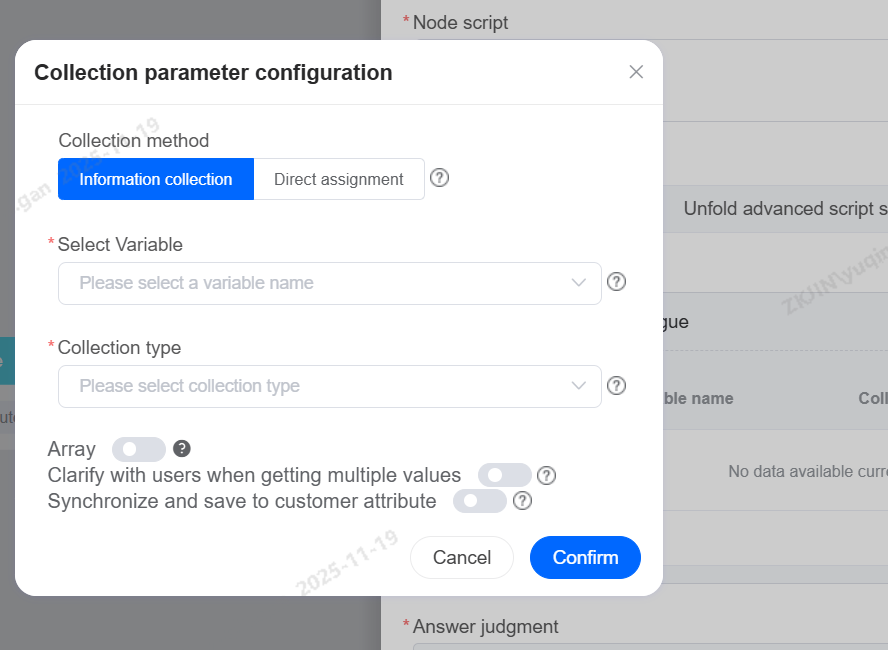
Arrays
When a single collection type requires gathering more than one piece of information—that is, a list—you can enable the array feature.
When collecting a single piece of content that is not an array type, enabling clarification can help gather precise information.
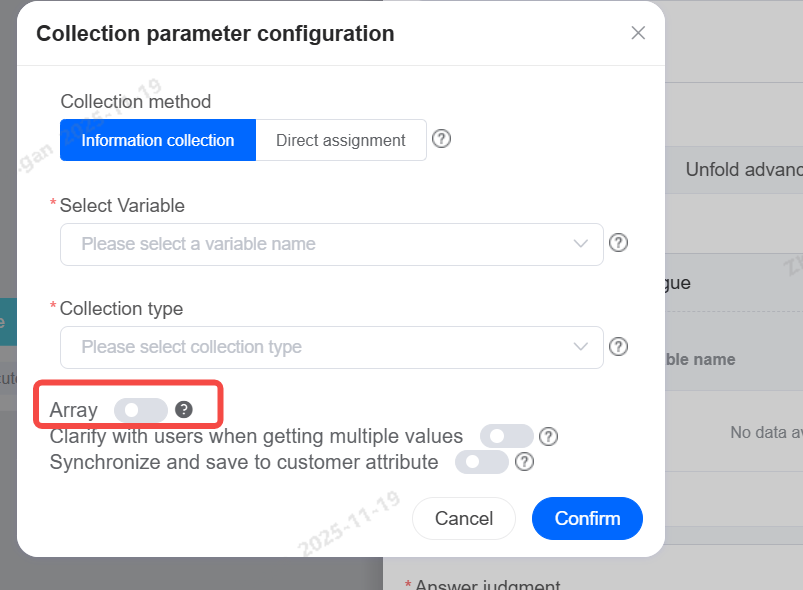
Synchronize Storage to Customer Attributes
When enabled, if data collection is successful, the information will be synchronized and stored in the corresponding customer fields under Customers > Customer Management
For example, when collecting city variable, select the city variable and check the box to synchronize to stored customer attributes to sync them to the CRM.
Answer Judgement:
Set up different intentions for the bot to recognize.
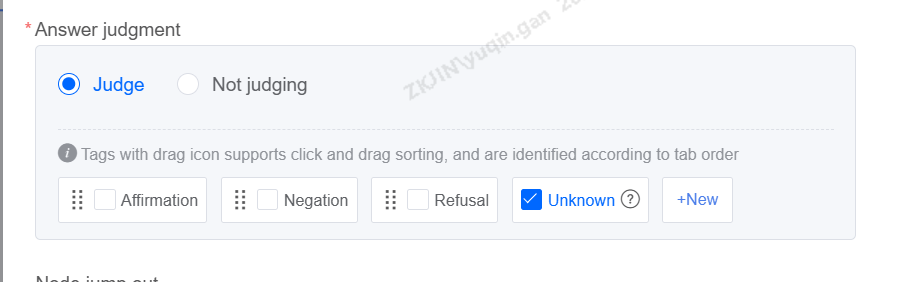
Check the box after creation is complete.
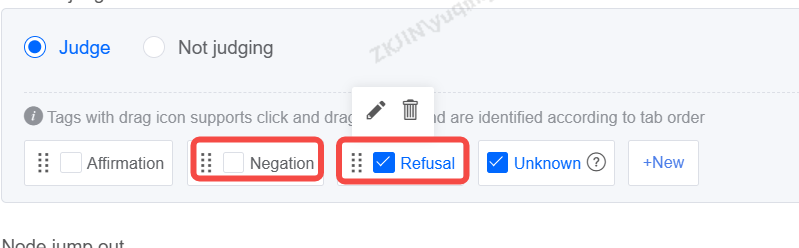
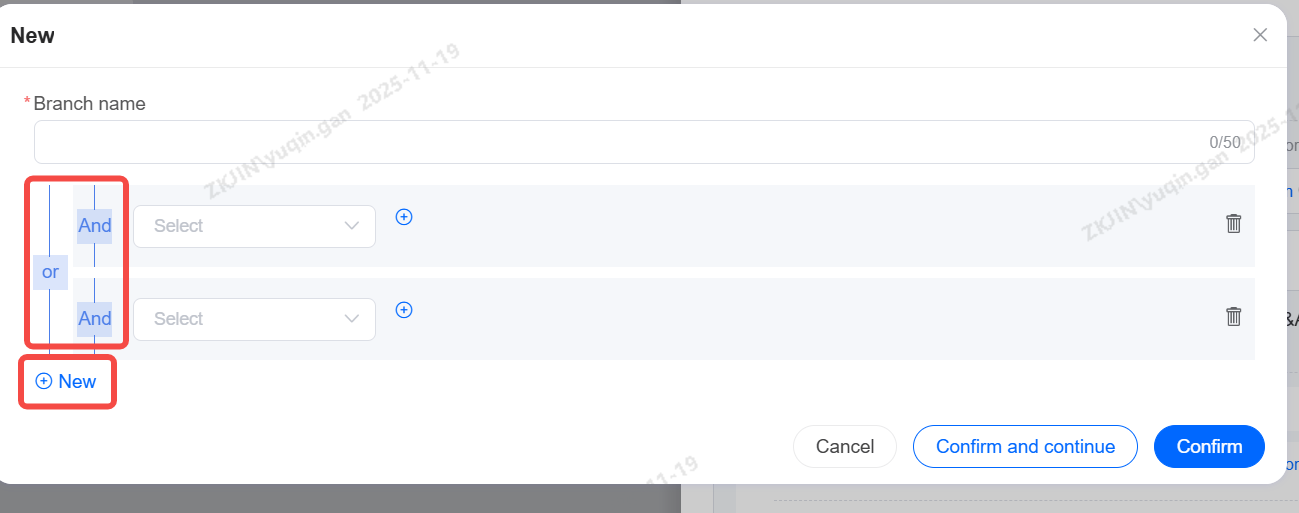
When creating a branch, configuration is supported.
Speech Settings
The following are the features available in the speech settings:
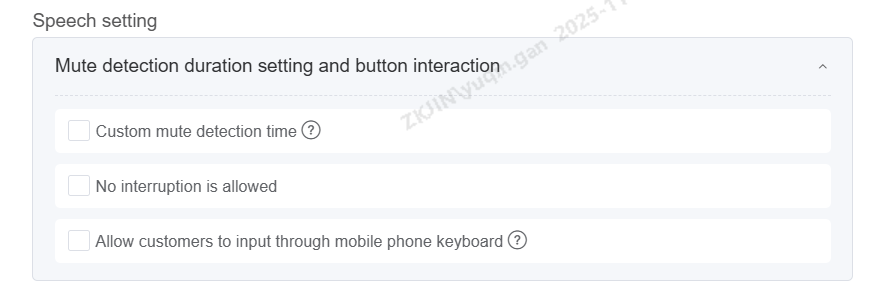
Custom Silence Detection Time: Defaults to global settings. If a node has a custom value, that value is used. After checking, a text box appears allowing integer input between 200-2000.
Do Not Allow Interruption: When global interruption is enabled, this setting prevents interruption for a specific node (playback will not pause).
Allow Customer Keypad Input: When checked, this node listens for keypad presses during voice input, supporting only a single keypress entry.
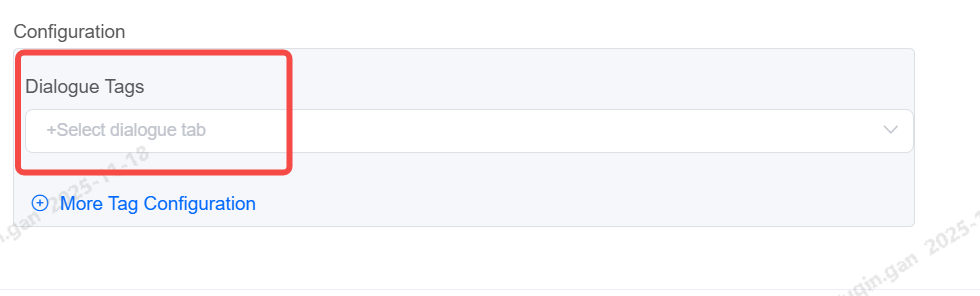
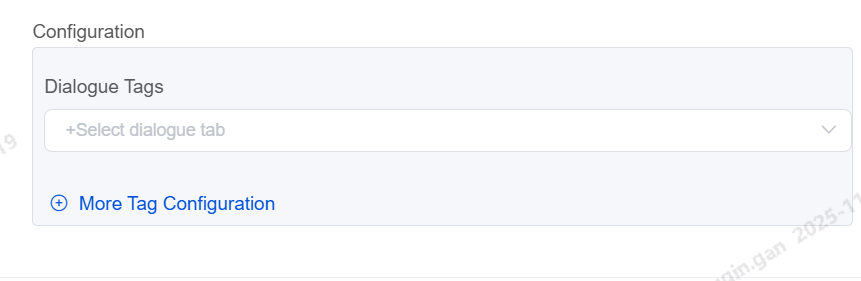
Dialogue Tag
Set up conversation tags for each dialogue node. When customer/bot hangs-up the dialogue tag will be assigned to the call
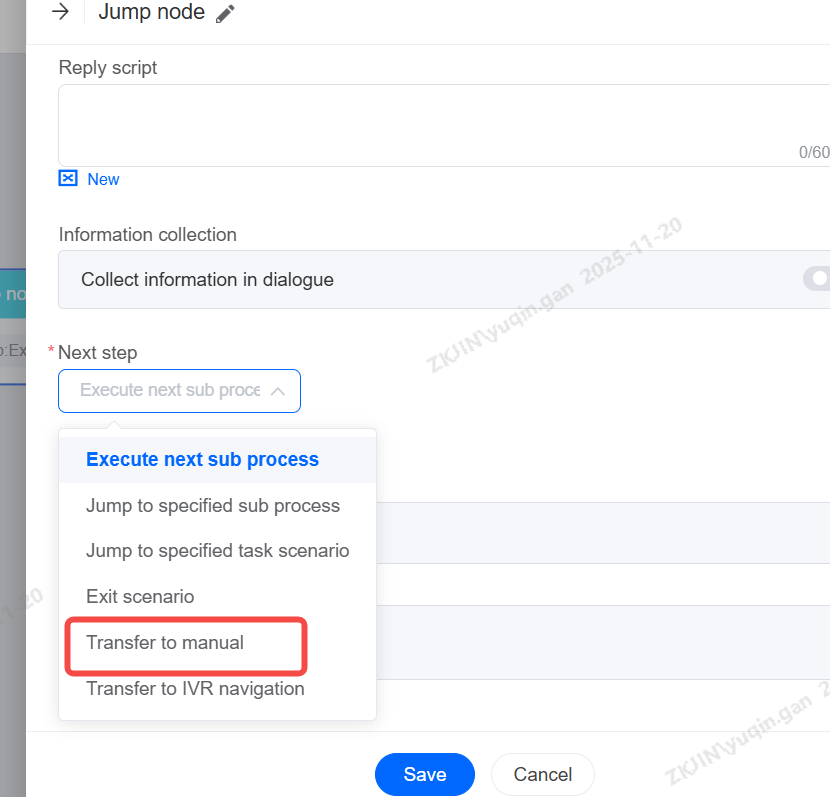
1.2.2 Jump Node
Jump nodes are usually used at the end of the scene or when the scene needs to jump into another branch scene. The more common method is to cooperate with the robot to exit the scene and hang up; Another scenario is to jump to a branch node. If a customer selects a credit card business, he will jump to the voice branch node of the credit card business for reception; Before jumping, you can configure a message to be played. Supported actions include:
-
Proceed to the next sub node
-
Jump to a specified sub-flow
-
Jump to a specified business scenario
-
Exit Scenario
-
Transfer to Agent
-
Transfer to IVR Navigation
Note: The Jump Node is the final sub-flow of a process that cannot be set to Proceed to next sub node, as this will cause an error and prevent releasing.
To edit, drag it into the editing area and double click
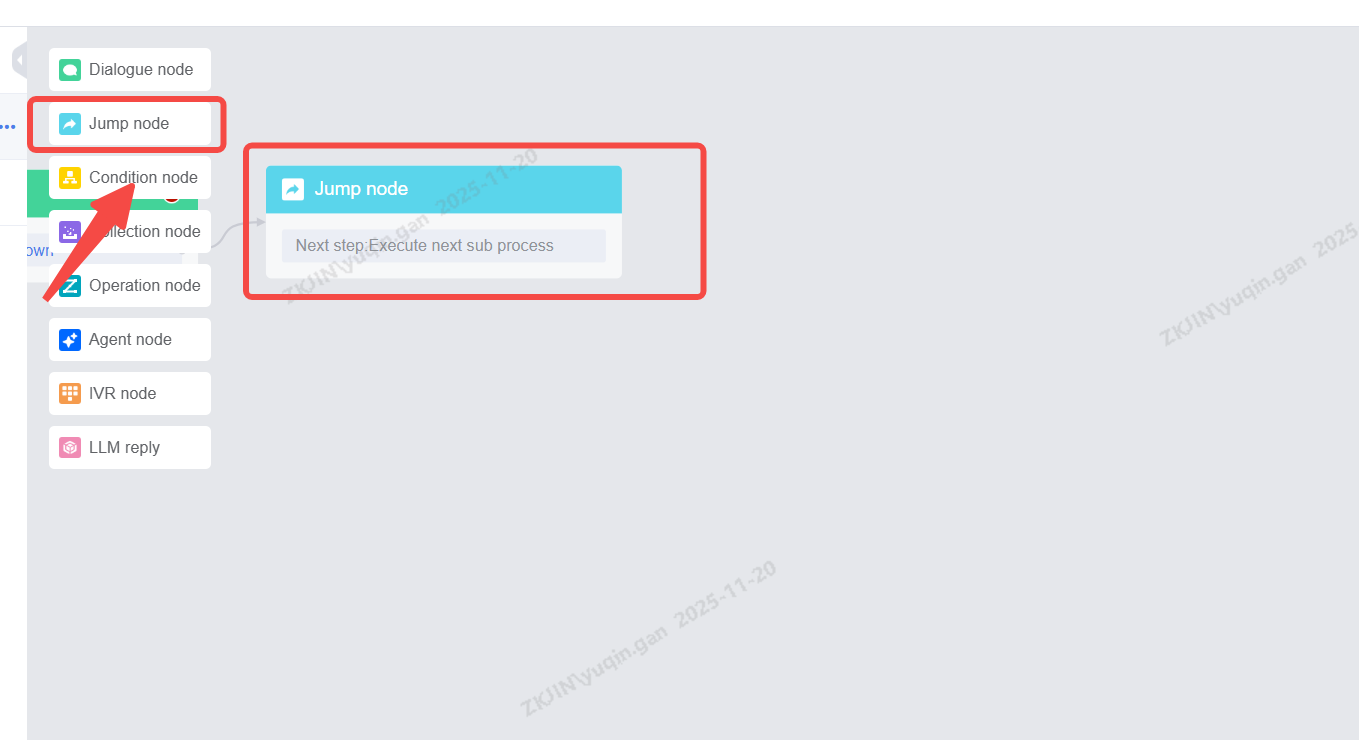
You can also edit the reply before jumping to the next step.
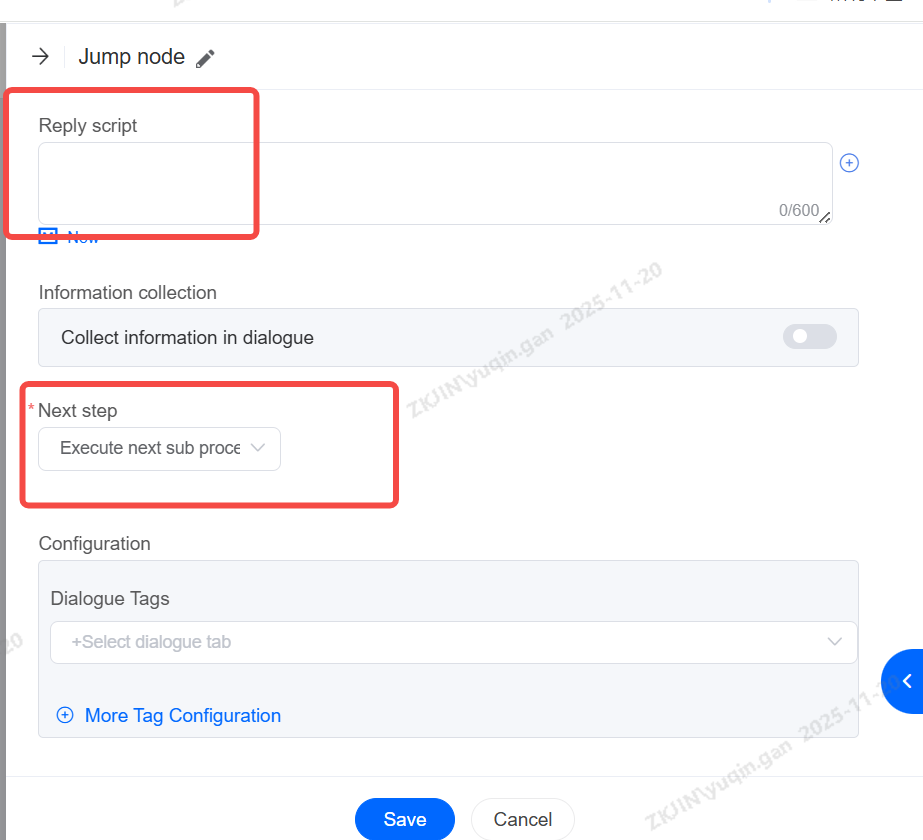
-
Information Collection
It also supports information collection if needed, similar to the dialogue node. Please refer to 1.2.1 Dialogue Node for more information

-
Transfer to Agent
It supports transferring the conversation to an agent.
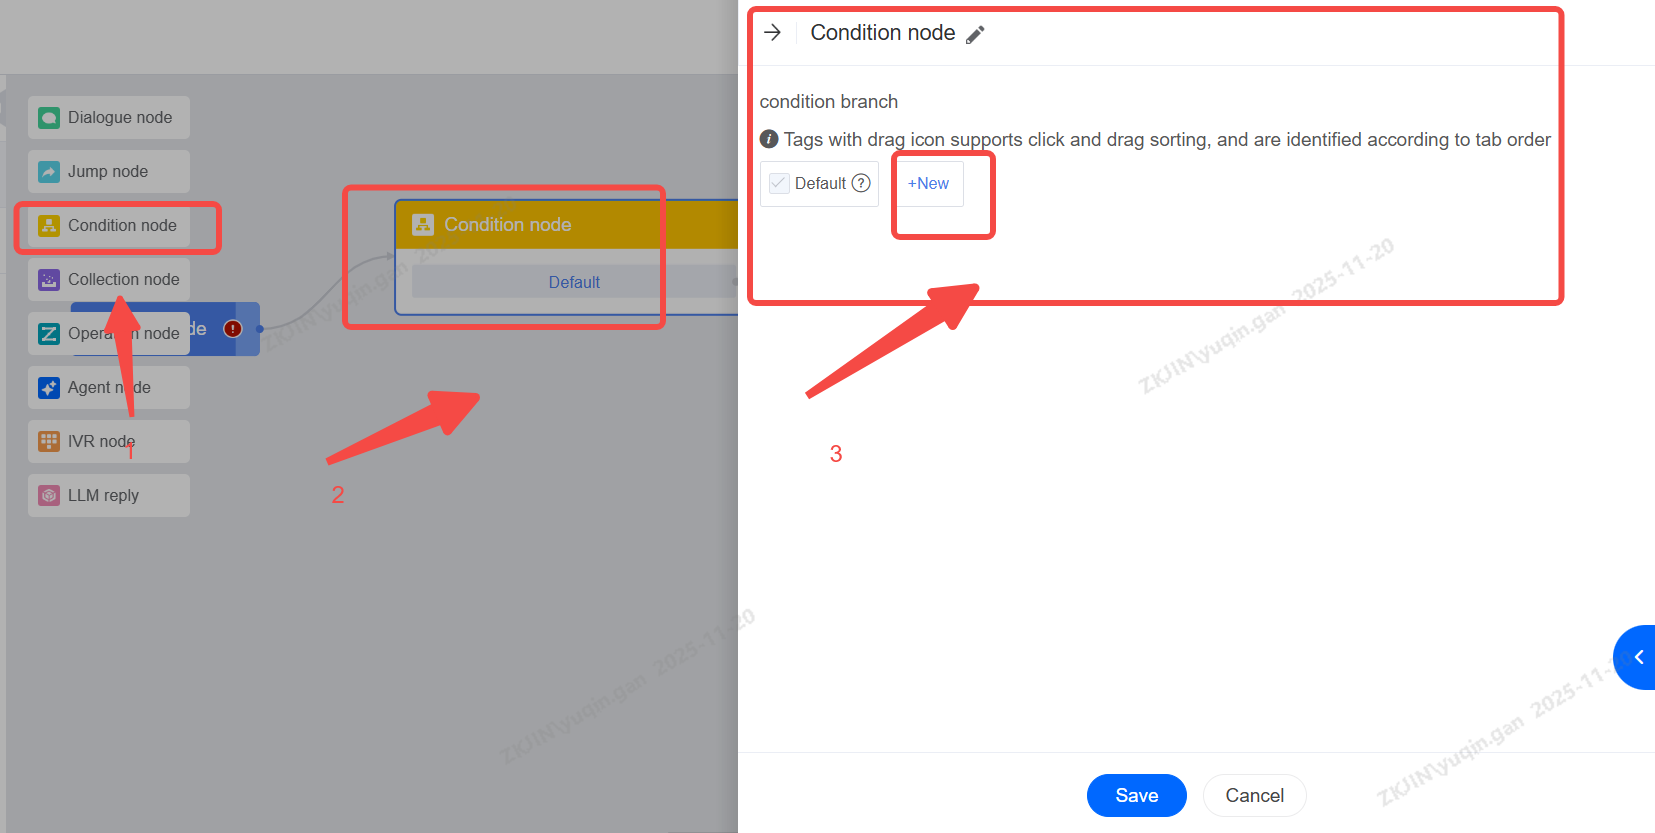
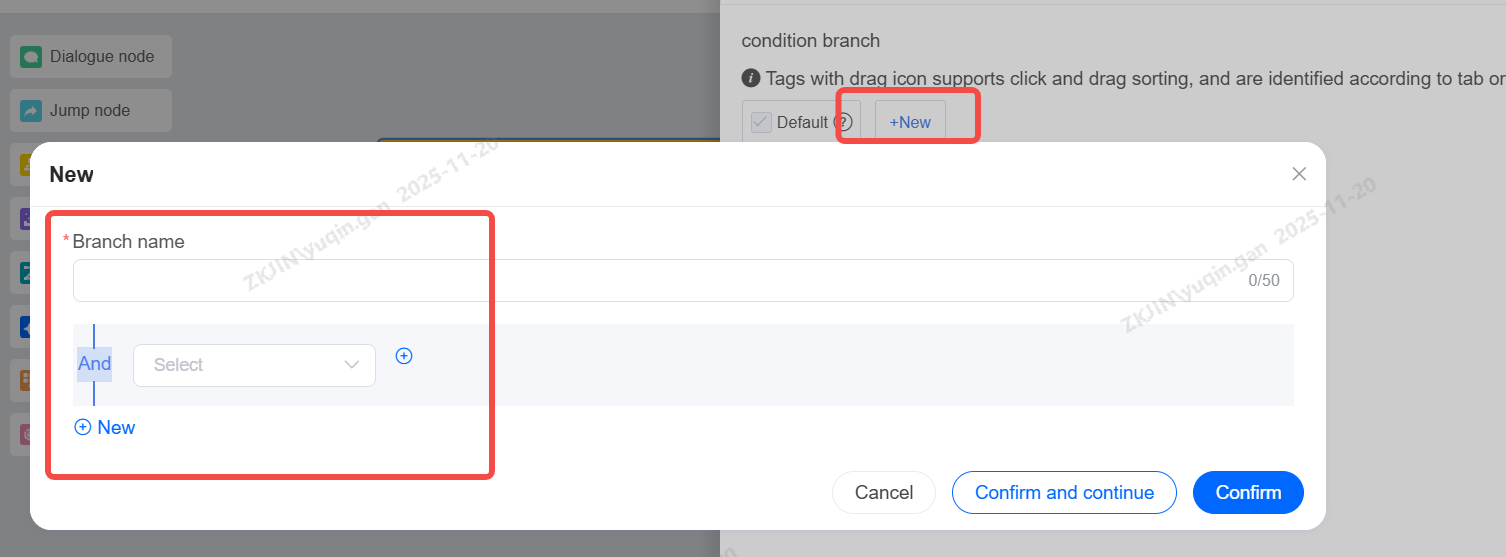
1.2.3 Condition Node
The Condition Node can carry out the flow of different branches in business according to different conditions; Generally, in process configuration, you can also use the Dialogue Node to judge the intention instead of the Condition Node;
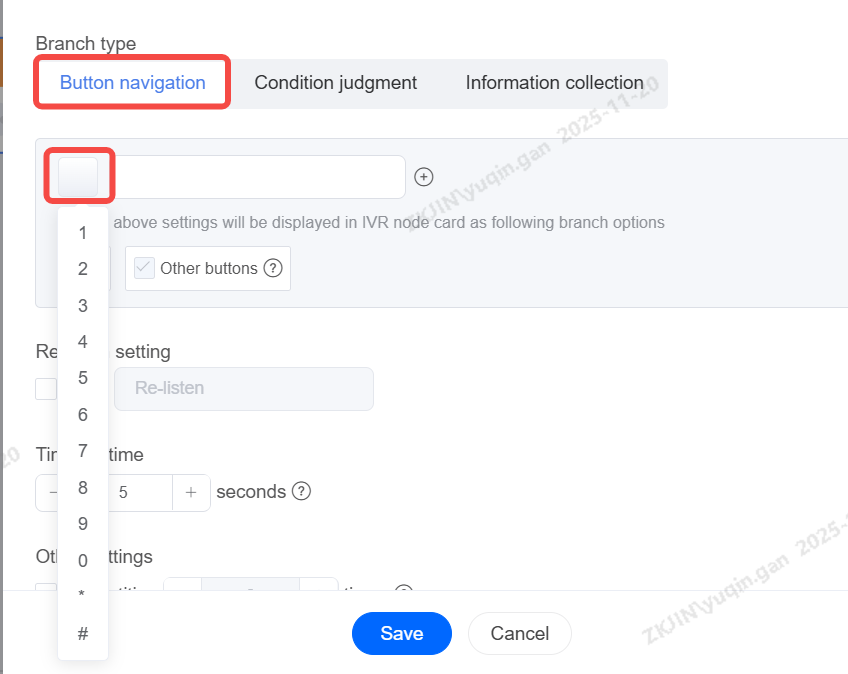
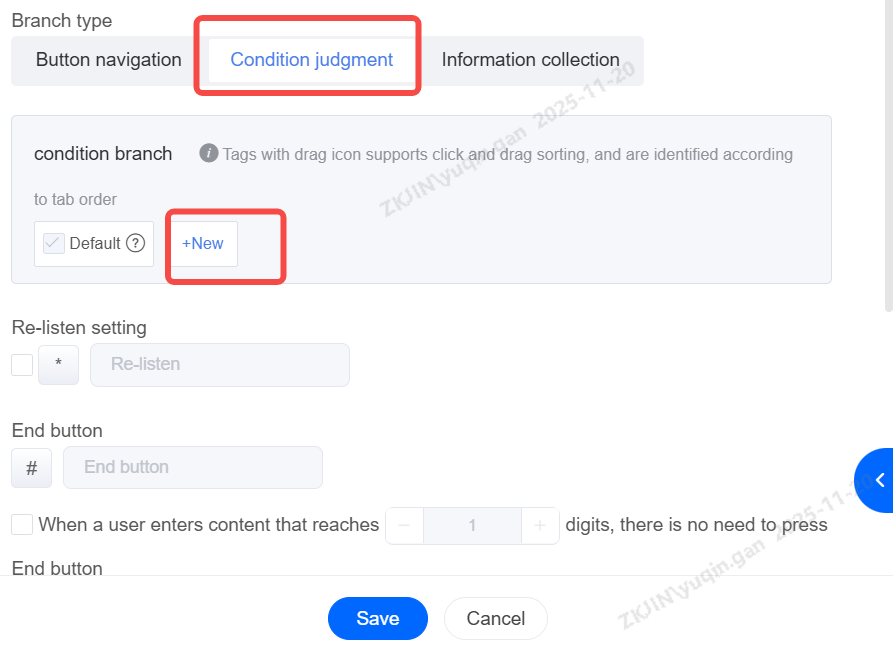
1.2.4 IVR Node
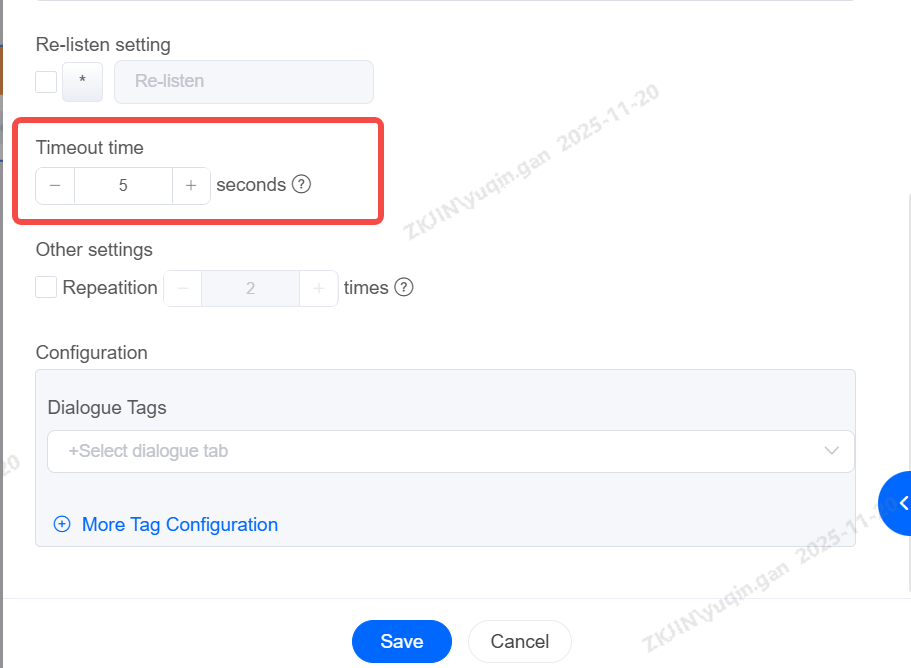
The IVR node can enable users to realize the ability of key routing in the voice robot process. Similarly, it can also say the corresponding numbers, such as 1,2,3, to carry out the IVR corresponding process flow;
-
Timeout Duration
Set the maximum allowed time between the end of the node's message playback and the user pressing the # key. If this time is exceeded, the keypress input will be considered a failure.
-
Condition Judgement
Define custom conditions for execution. If none of the custom conditions are met, the default branch will be executed. For example, if multiple keypresses conditions are satisfied simultaneously, the next step will proceed accordingly.
-
Information Collection
Collects user input during the intelligent navigation process (e.g., "Please enter your ID number"). The collected data can be synchronized to corresponding variable field in CRM.
Based on collection result, success or fail, the flow will proceed to the corresponding next branch.
-
Maximum Input Length
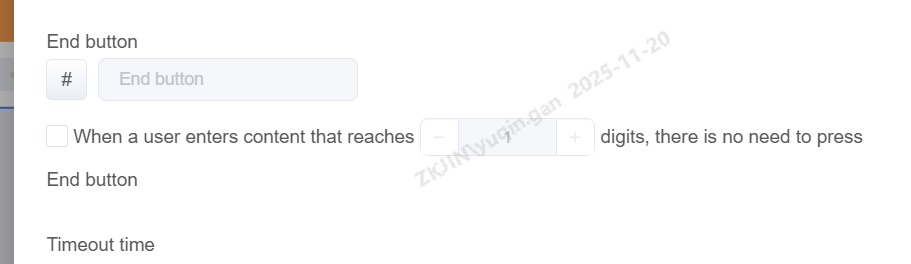
Once set, the system will automatically submit the input as soon as the customer's keypress reaches the defined limit, without requiring the # key to end.
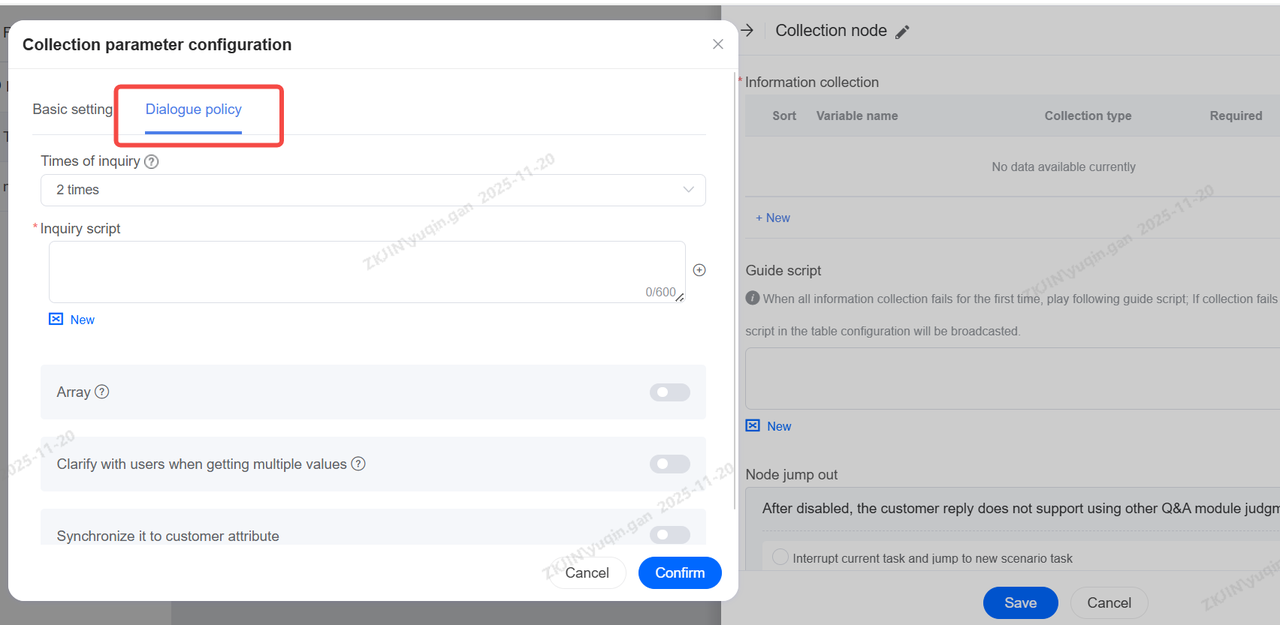
1.2.5 Collection Node
The Collection Node is usually used to collect key information in customer conversations, collect it into system variables, and perform internal filling such as ticket content or third-party system integration transmission. It works similarly to the feature explained in the Dialogue Node. Please refer to 1.2.1 Dialogue Node for more information
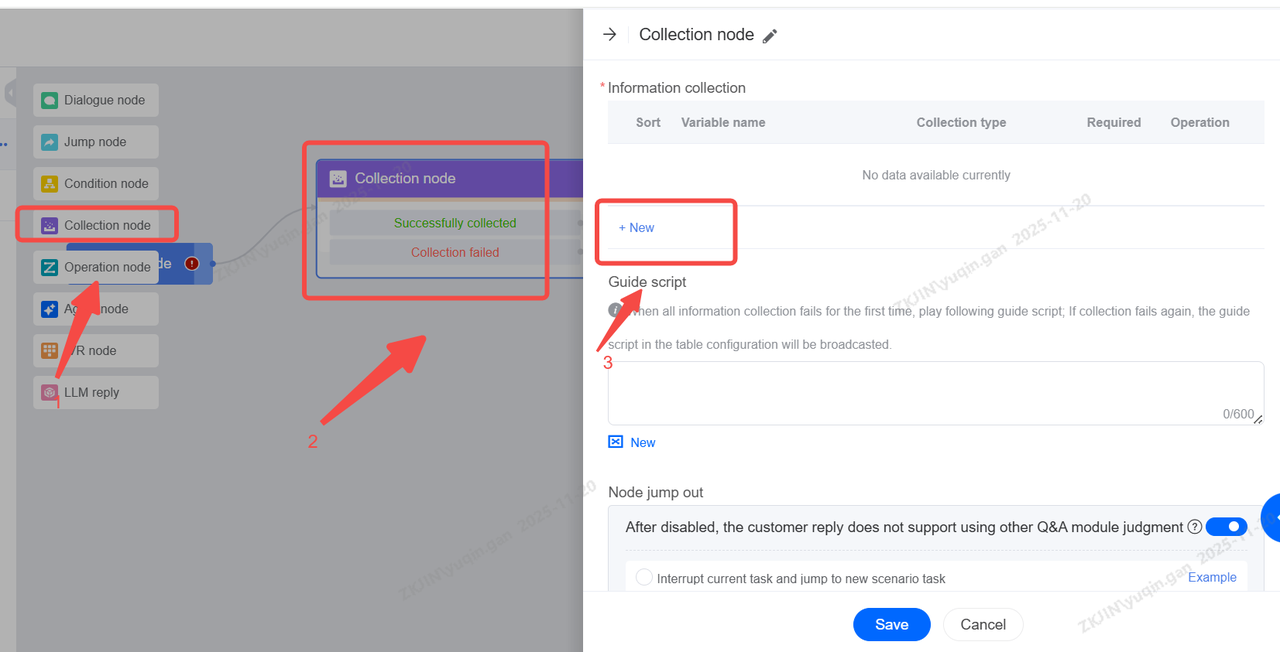
Select the variable and entity type.
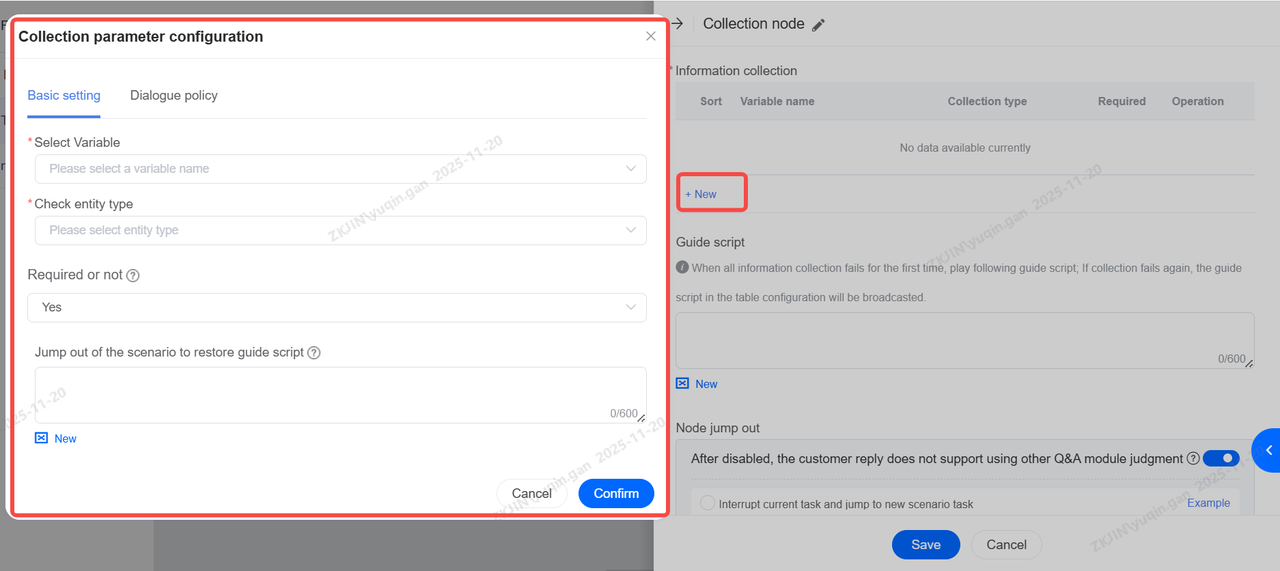
Set up dialogue policy and script if you need.
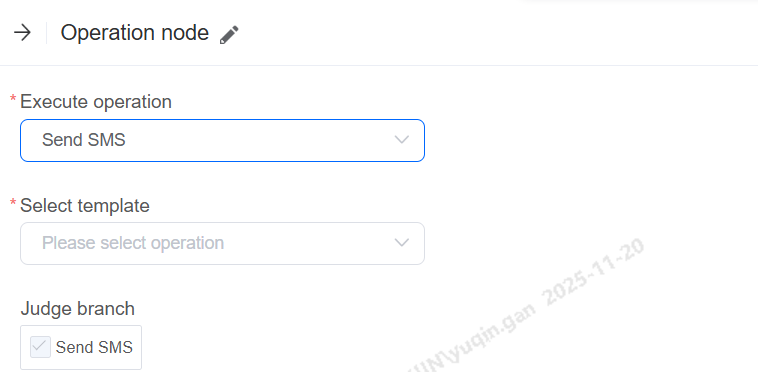
1.2.6 Operation Node
The Operation Node can start corresponding actions at a node of the voice robot, such as automatically creating tickets, assigning variables, sending SMS, etc; Corresponding configurations can be made as required;
Among them, creating a ticket is the most common operation. When a ticket is created, you can refer to the existing ticket template, and insert the previously collected key customer information such as order number, customer complaints, etc. into the ticket;
When designing the dialogue flow, you can configure specific nodes to execute actions such as:
-
Transfer to Agent
-
Create Ticket
-
Allocating traffic
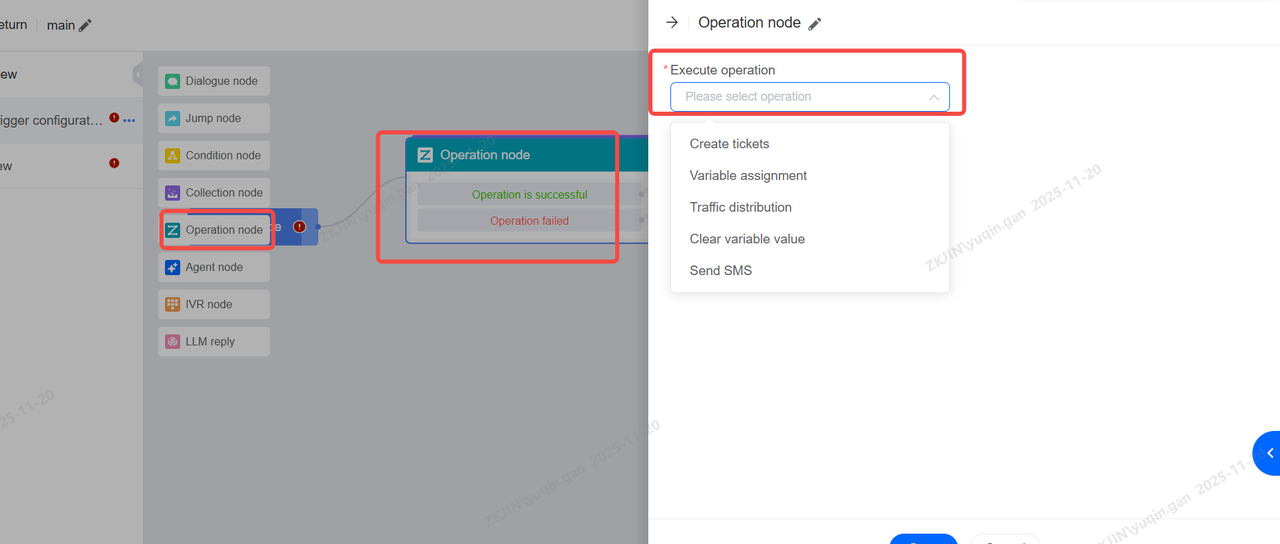
-
Create Ticket
When this node is reached, the system automatically creates a support ticket using a pre-selected template in Channel Management > Ticket Forms. Ticket fields are auto-filled and locked.
-
Variable Assignment
Assign values based on the information collected.

-
Traffic Distribution
Supports designing process branches based on traffic allocation. This node allows setting up different traffic distribution branches to personalize A/B testing for tenant dialogue strategies. For example: 50% of traffic follows Process A with Script A, and 50% follows Process B with Script B, enabling comparison to determine the more effective customer response solution.

-
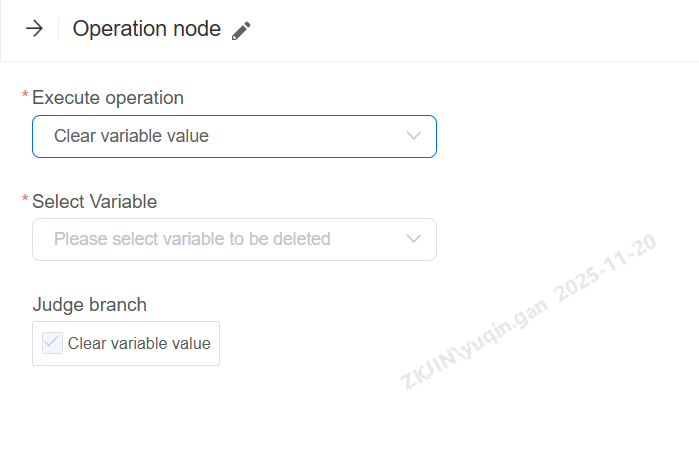
Clear Variable Value
For variables that already have a value, this operation can clear the existing value.
-
Send SMS
When the workflow reaches this node, an SMS sending operation is executed. Tenants can select their own SMS template.
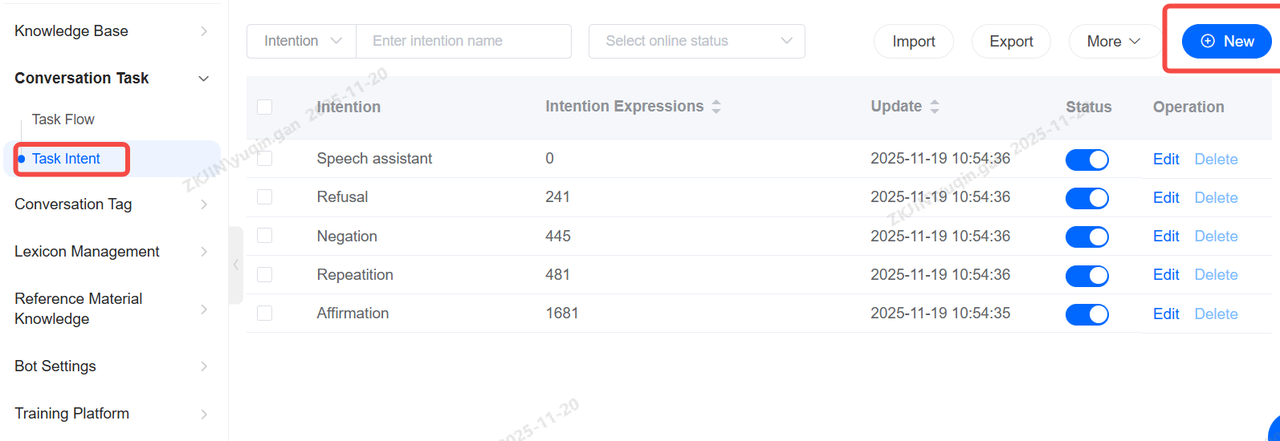
1.3 Task Intent
Task Intent is one of the most critical configurations of voice robots. Through reasonable intention configuration, robots can better recognize the true intention of customers' expressed content, so as to complete more accurate and effective services;
After the intention is created, you need to pay attention to editing keywords in the diagram (which can also be generated by the system). After the robot actually runs, you can also check the number of hits of the intention to determine whether the created intention is really effective; Similarly, the intent can also be configured in the Dialogue Node for process flow judgment after the robot recognizes the intent expressed by the customer.
-
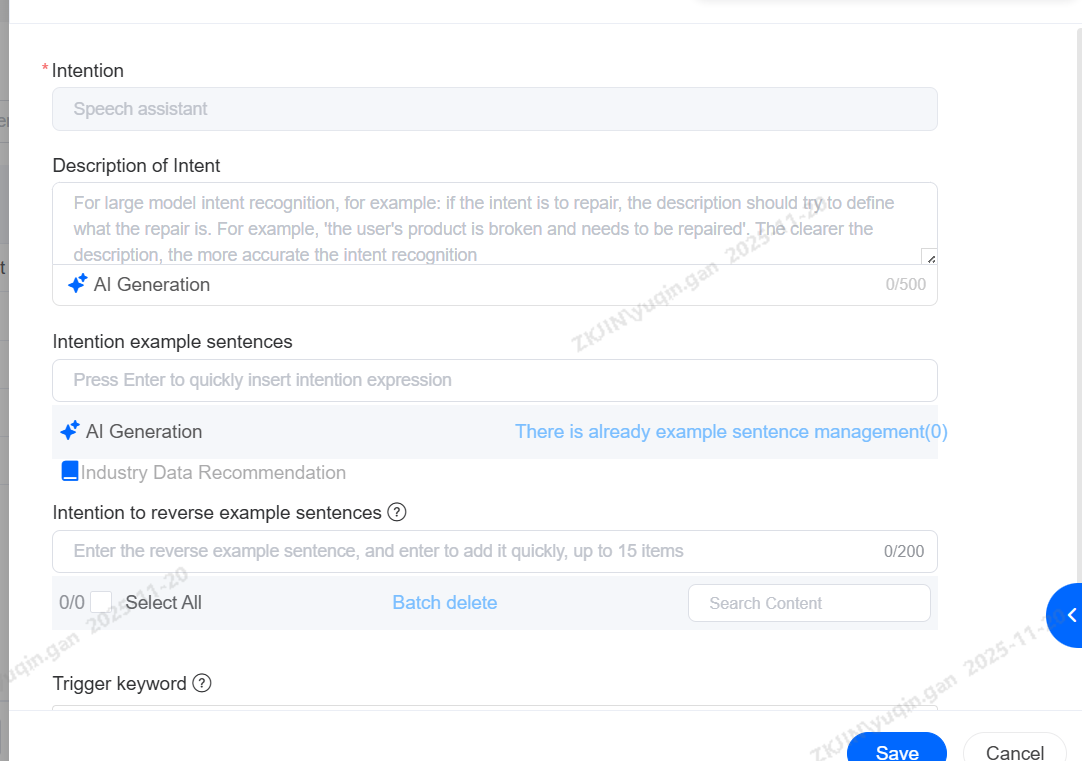
Create Intent
Click New, then enter the intent name, trigger keywords, and similar expressions.
Trigger keywords are the key terms that will activate this intent (Using keyword matching is the recommended priority method).
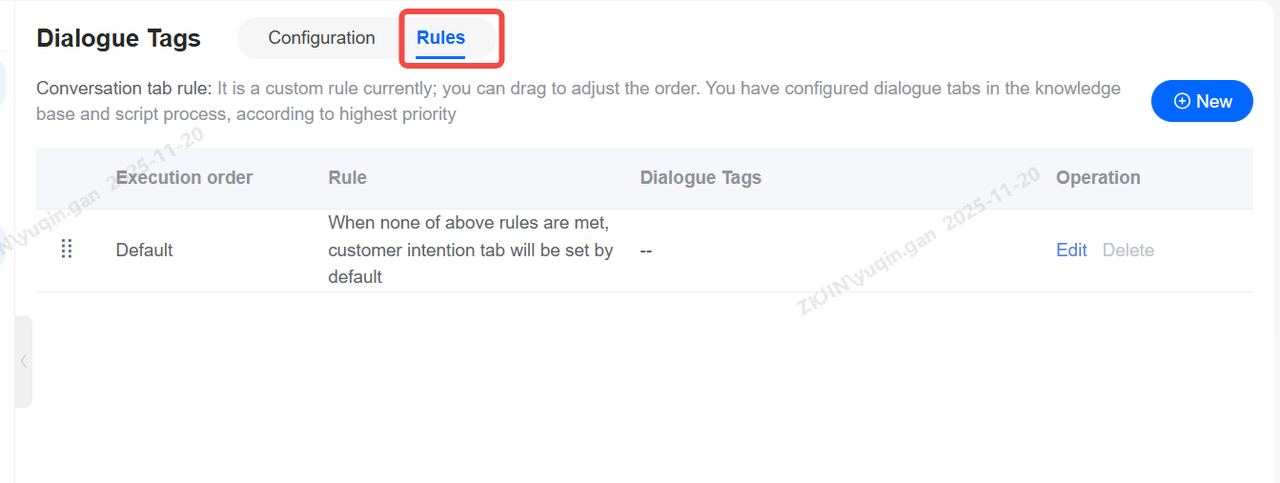
1.4 Conversation Tag
Conversation tags are call-level tags automatically applied after a call ends, based on configured rules. They serve as an intent conclusion marker for that chat. (one tag per conversation, similar to a call summary)
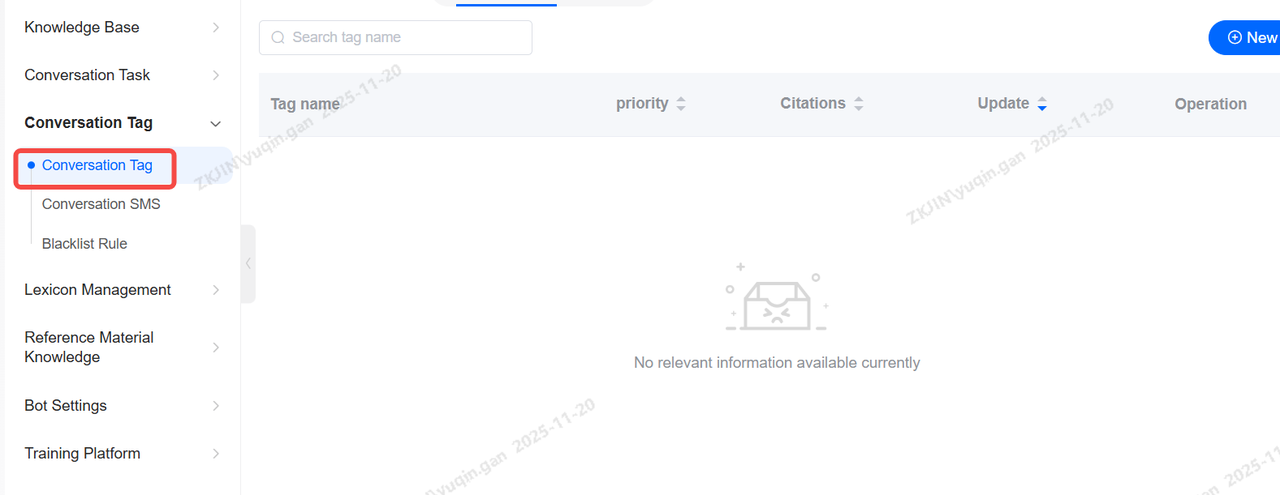
You can define custom conditions. When a condition is met, the system will set the corresponding intent level as the tag. The intent levels you configure in the Knowledge Base and dialogue flows take the highest priority.
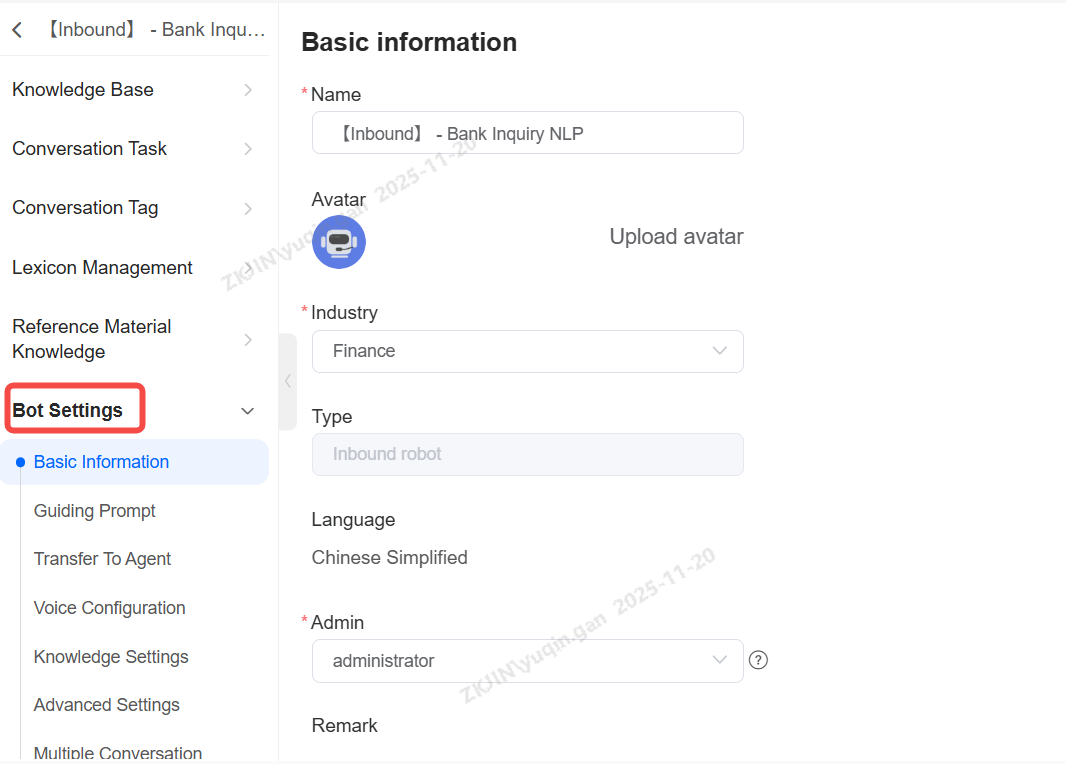
1.5 Bot Settings
Bot setting is the basic robot configuration. In this module, you can configure the robot's name, ownership, manual rules, voice configuration (unique to ASR, TTS voice robots), knowledge base configuration, advanced configuration, and multi language. It is an important module for robot settings;
-
Edit Basic Information
-
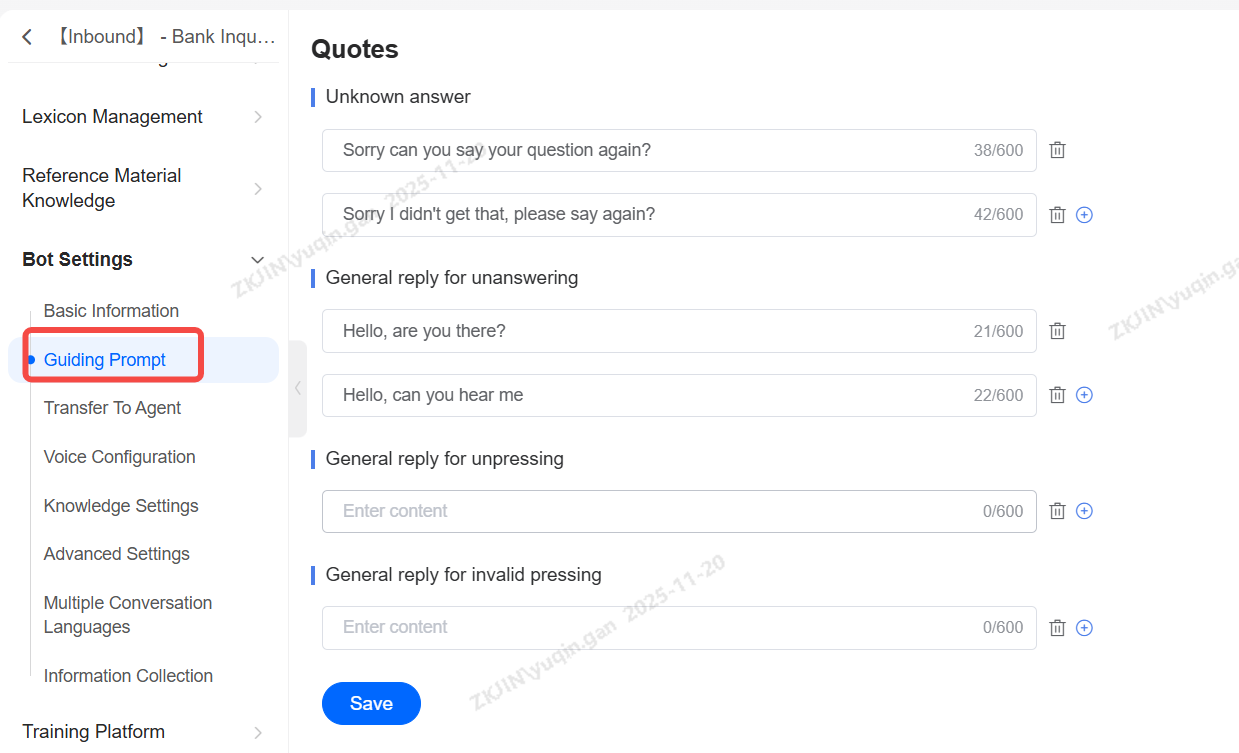
Guiding Prompt
Guiding s are a critical component of the voicebot setup. They serve as a fallback mechanism, allowing you to configure s for recommending related questions, handling unknown inquiries, and transferring to a human agent, among other functions.
-
Transfer and Hang-up Rule
When a voicebot cannot answer a customer's question, you can set up the rule for transferring the call to agent. The bot includes specific configurations and triggers to allow this transfer, either automatically or via a customer-entered keyword.


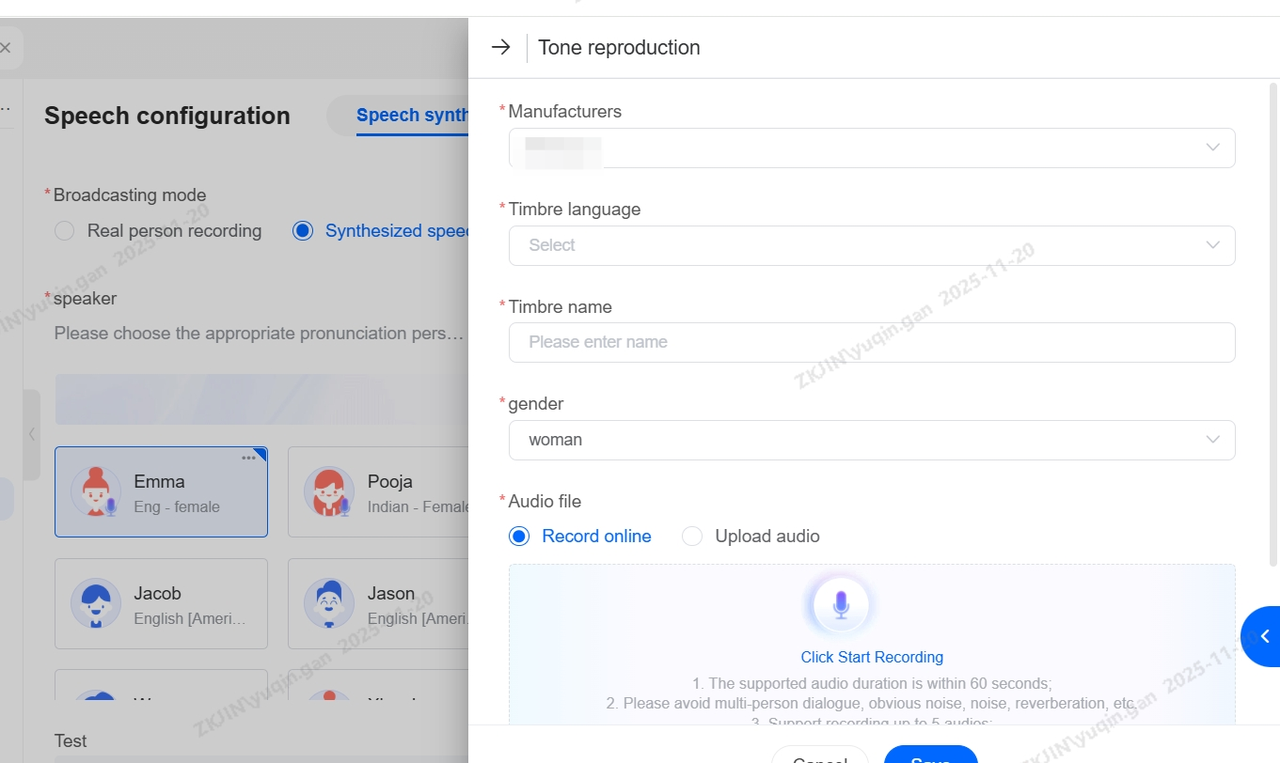
1.6 Voice Settings
-
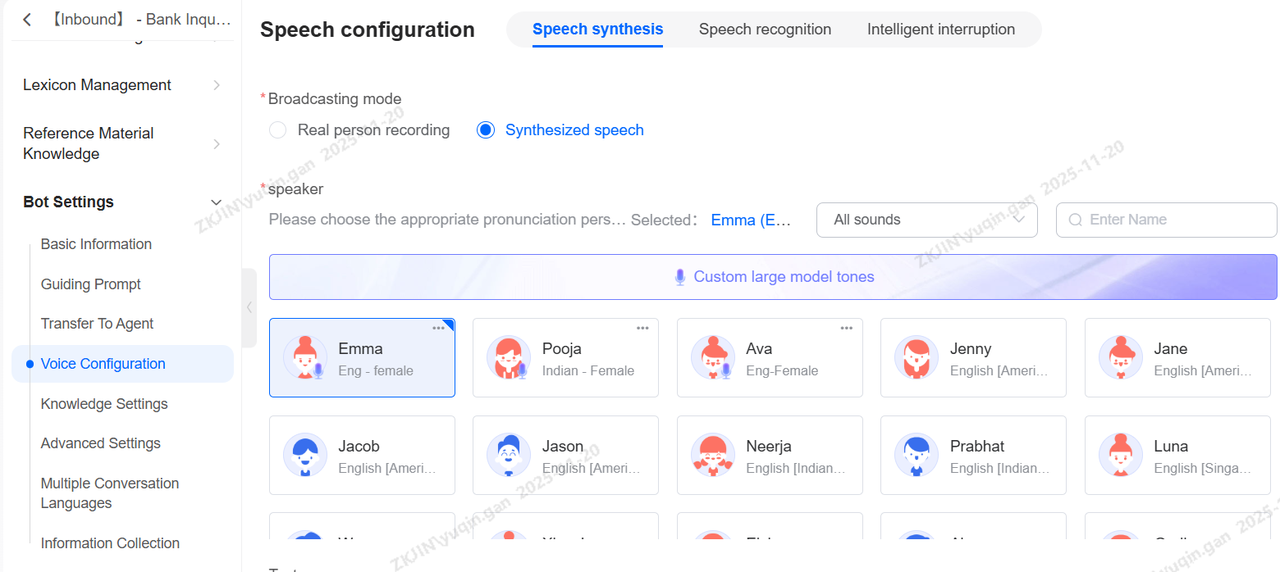
Voice Synthesis
Playback methods support both pre-recorded human voice and TTS synthesis. For synthetic voice, you can select the speaker and adjust parameters like speed, pitch, and volume. The system also allows you to preview the audio by entering text, and the preview can be downloaded.
Voice Cloning
Upload a 5-10 seconds audio sample to instantly clone a highly realistic voice. Once cloned, you can preview it on the page, conduct voice tests, and use it for official outbound calls.
-
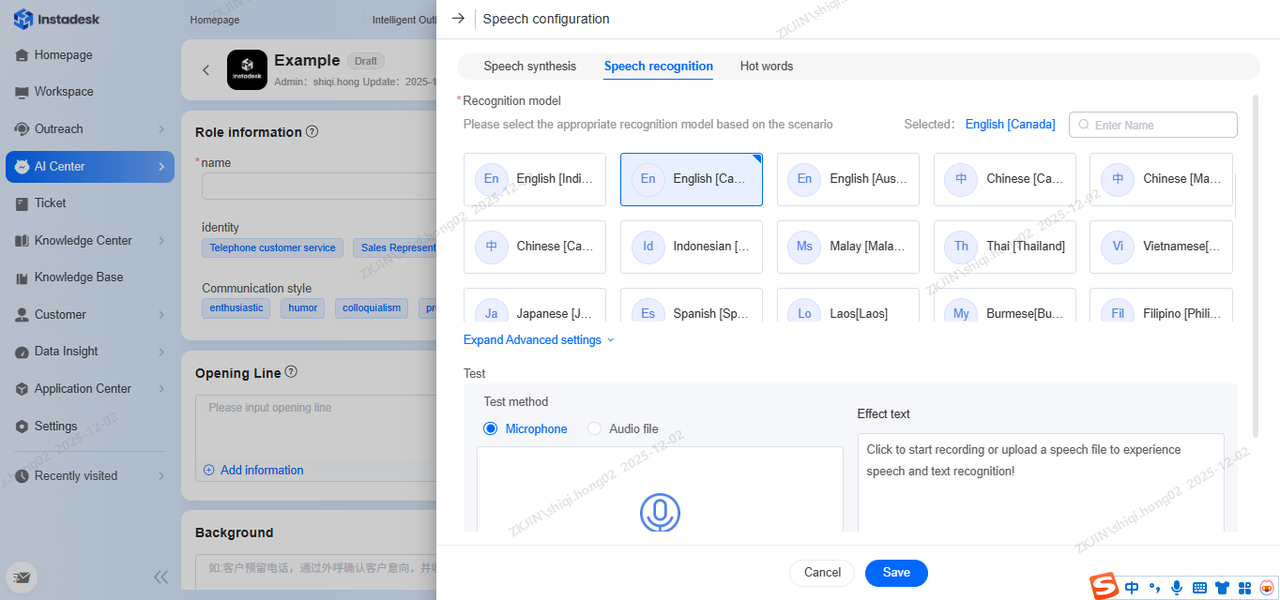
Voice Recognition
After selecting a model, you can upload an audio file or record online to test its performance. The recognized text is displayed for review. You can adjust the ASR silence detection duration either as a global setting or for individual nodes.

-
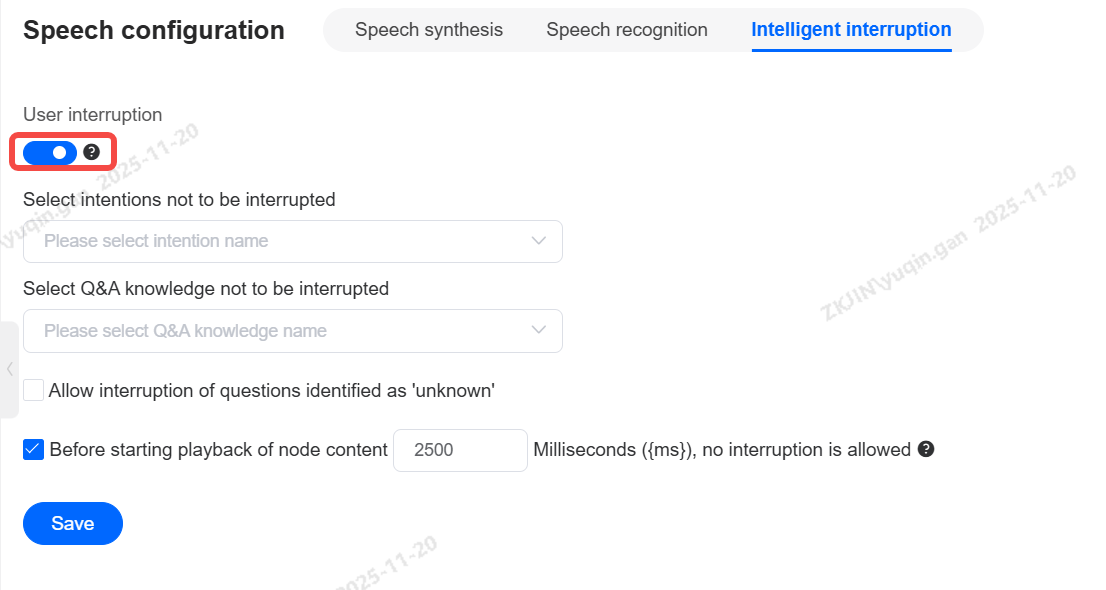
Intelligent Interruption
When enabled, all playback messages can be interrupted by the user, except for those explicitly configured at the node level to prohibit interruption. When disabled, no messages can be interrupted.
-
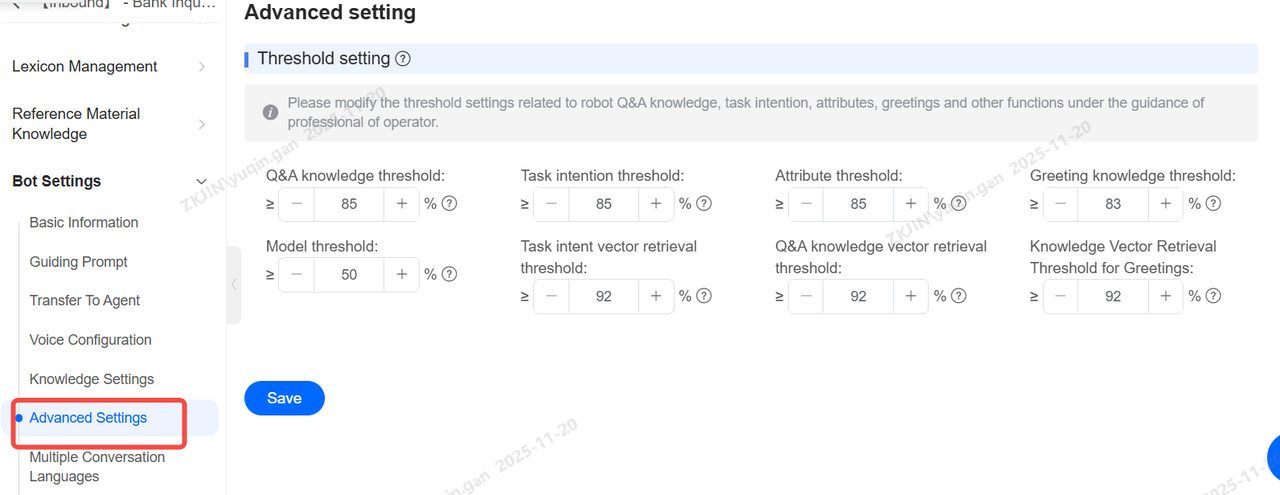
Advanced Settings
This section involves setting thresholds for functions such as Q&A knowledge, task intent, attributes, and greetings. Modify under professional operations guidance.
-
Inbound Voicebot(LLM)
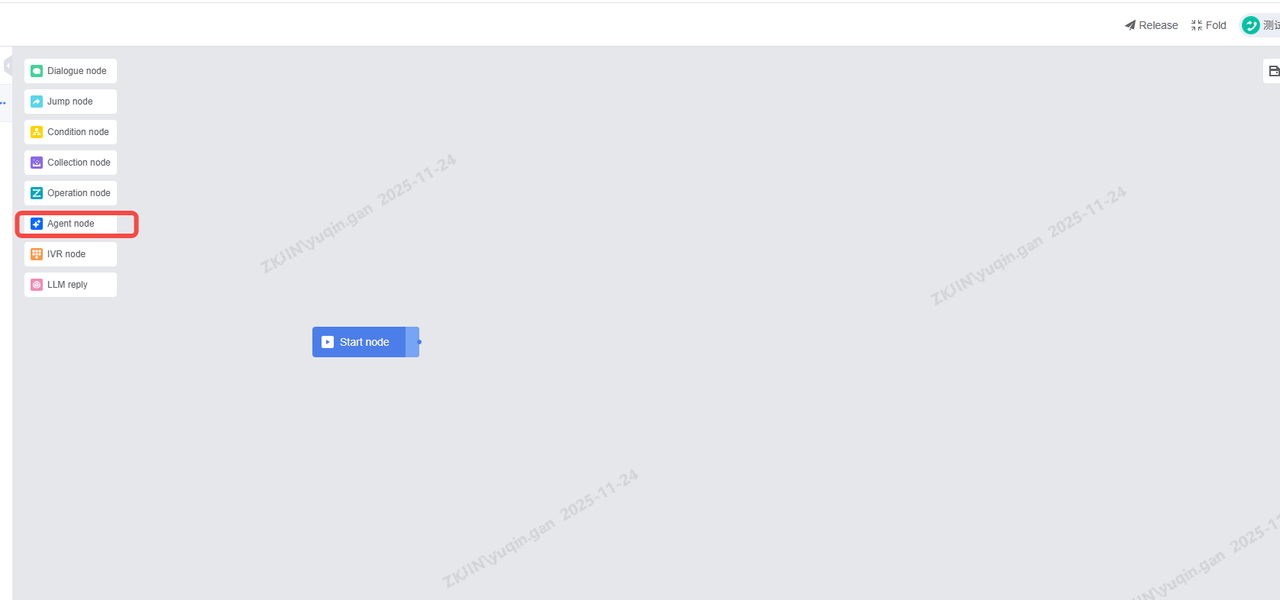
The inbound Voicebot of LLM is the same as the NLP voicebot in most configurations. The agent node is added, which can call the third-party big model (configured from PowerAgent) to talk and interact with users, and the effect is obviously better than the ordinary NLP voicebot;
-
Access the PA platform via AI Agent
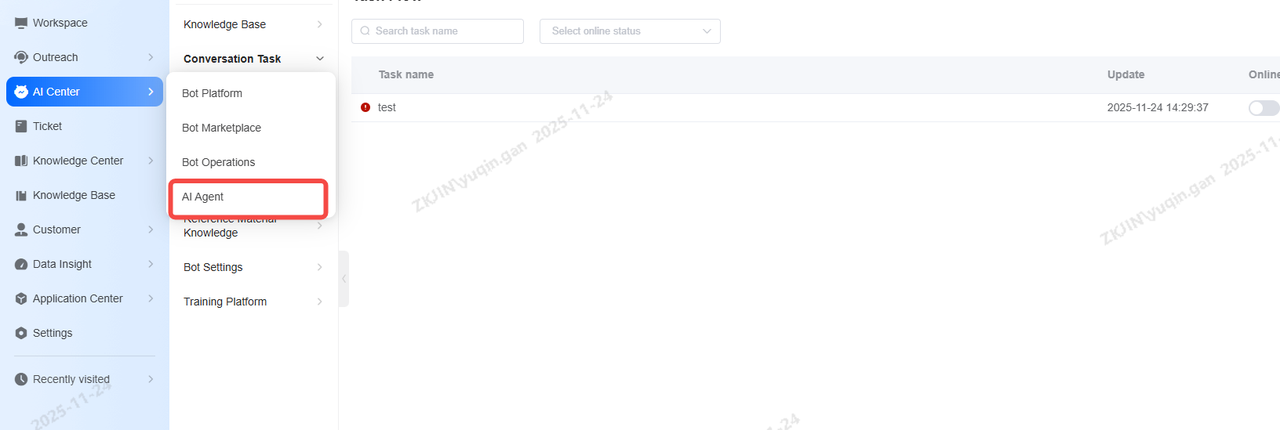


-
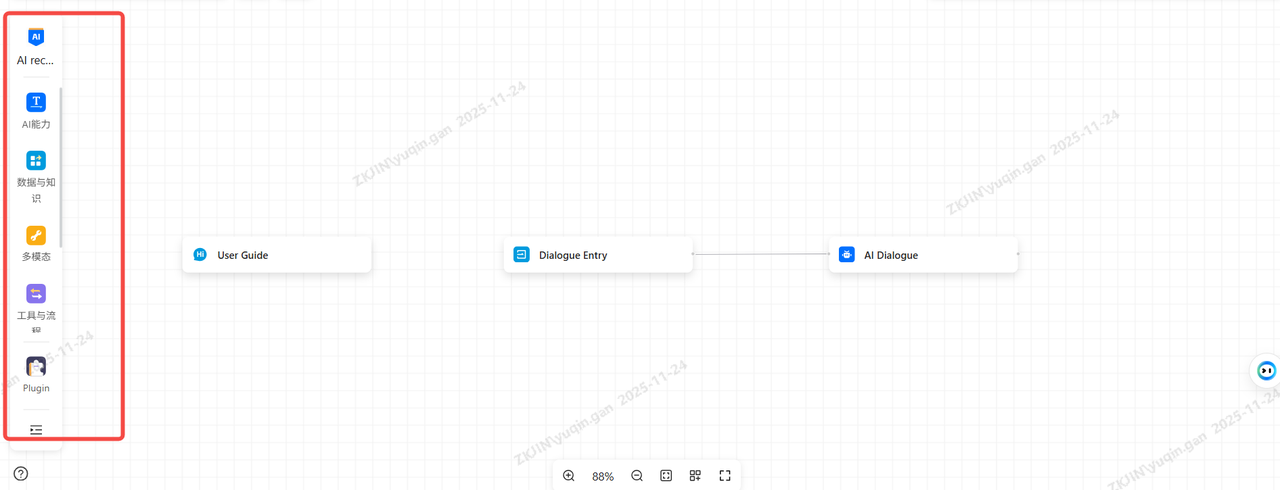
Create a new workflow

-
Enter the canvas to build
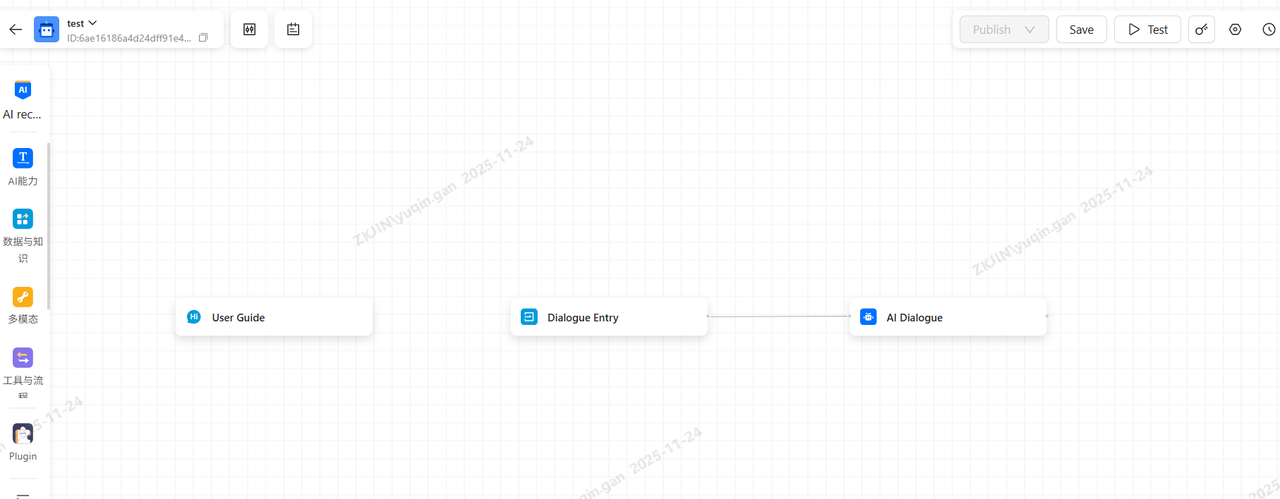
-
Build the agent using components
-
Select the specific AI model and enter the
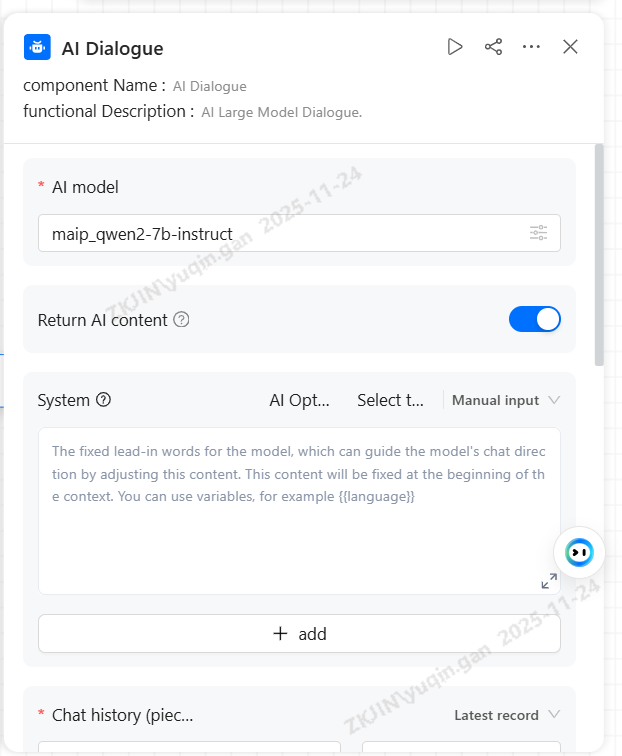
-
Outbound Voicebot (NLP)
The configuration is the same as the Inbound Voicebot (NLP). Please refer to 1. Inbound Voicebot (NLP).
-
Outbound Voicebot (LLM)
The LLM outbound voicebot is a revolutionary upgrade over traditional voicebots. Leveraging large language models as their core AI capability, these next-generation bots achieve major breakthroughs in interactive reasoning, logical flow, business goal completion, and voice human-likeness compared to conventional voice robots.
LLM outbound voicebot eliminates the need to maintain intents or workflow. You can quickly implement conversations by simply writing s and other content that you want the LLM voicebot to do.
-
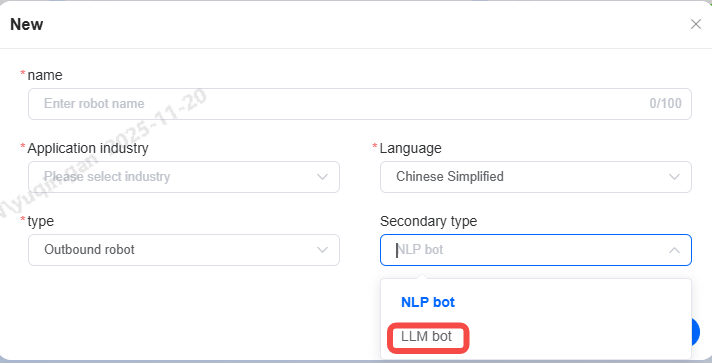
Create Bot
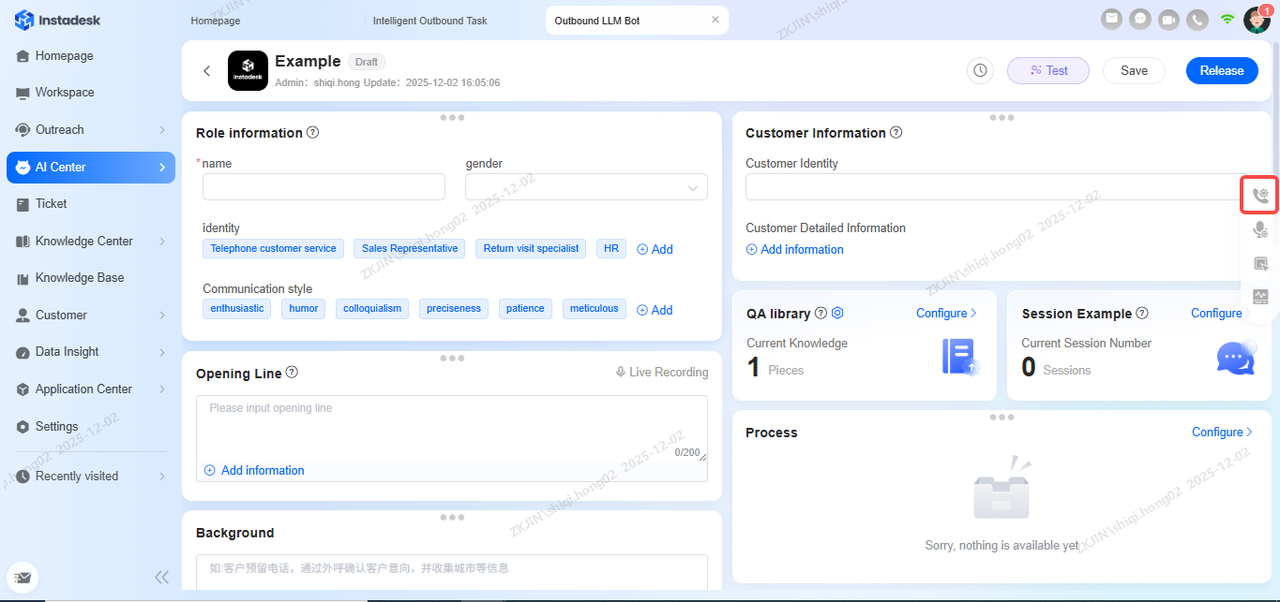
On the AI Center > Robot Platform page, click the New button to create a robot. Fill in the basic robot information based on the actual application
-
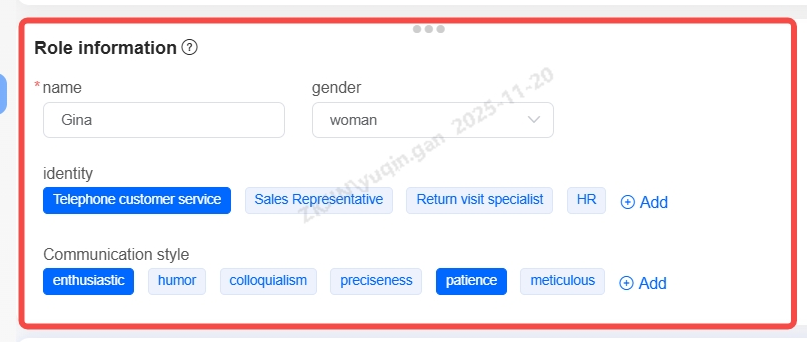
Edit Role Information
Define the role information for the large model robot in conversations, including name, gender, identity, and communication style. Once defined, the large model will interact accordingly to what is set.
The system provides four preset role identities:
-
Telephone Customer Service
-
Sales Representative
-
Follow-up Specialist
-
Human Resource
You can select one based on business needs. If the preset roles do not meet your business scenario, you can create a new role identity by clicking Add
-
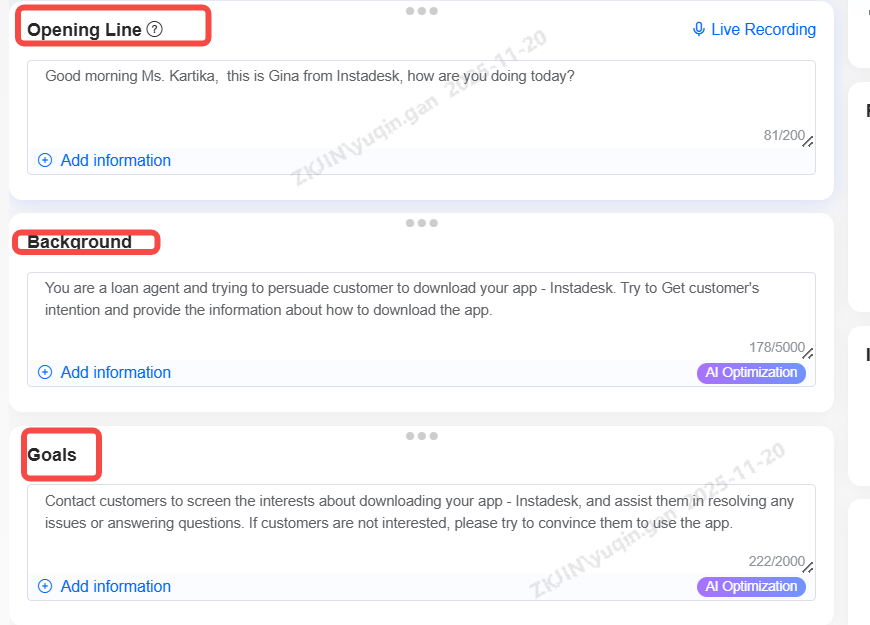
Opening Line, Background, Goals
Opening Line (Optional): the greeting that the bot will use when first interacting with the customer. This is optional. It also supports the use of variables, which can be set to customer name, company name, etc.
Background: The background under which the call is conducted. Providing this information will help the bot understand the circumstances and prerequisites of the call, including relevant market, or industry.
Goals: Define the core business objectives for the conversation, such as lead qualification, information delivery, or appointment booking, which the bot aims to accomplish during the call.
-
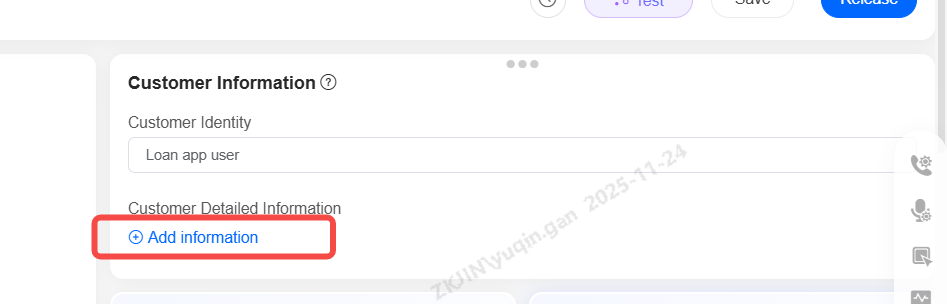
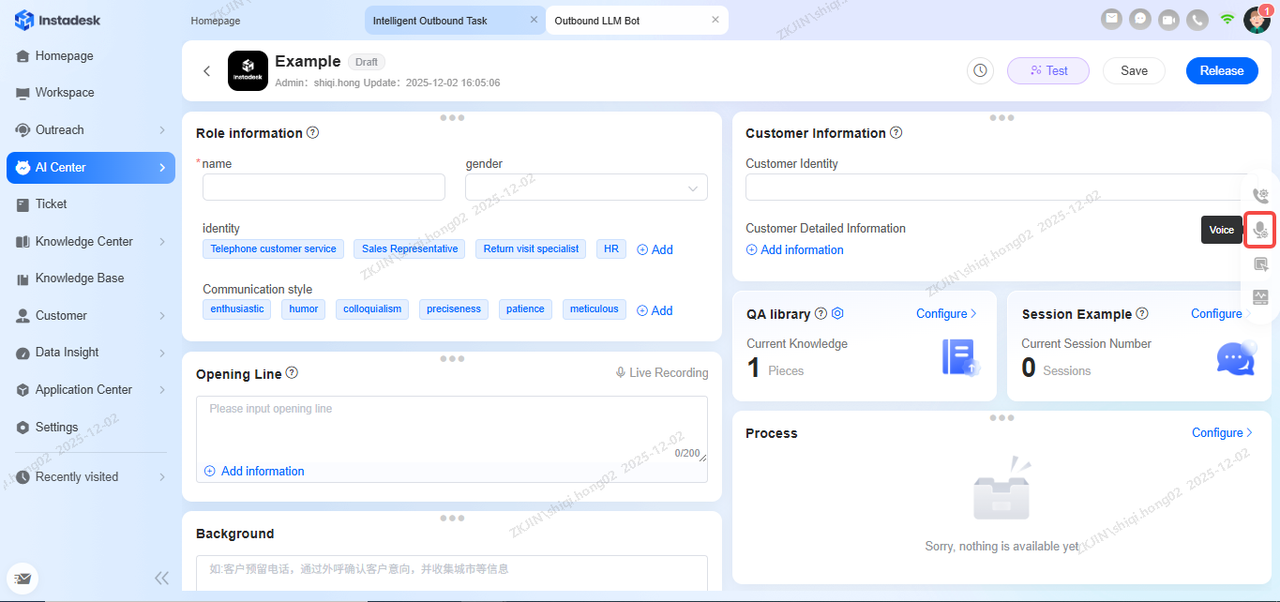
Customer Information
Configure customer information like identity, detailed information and imported variables. This data is passed to the AI during calls, enabling personalized conversations that feel human.
-
Customer Identity: Example would be Loan App User
-
Customer Details: Select from system variables. Added variables appear in your call list template, and their values are dynamically inserted into the conversation for natural playback.
-
Workflow
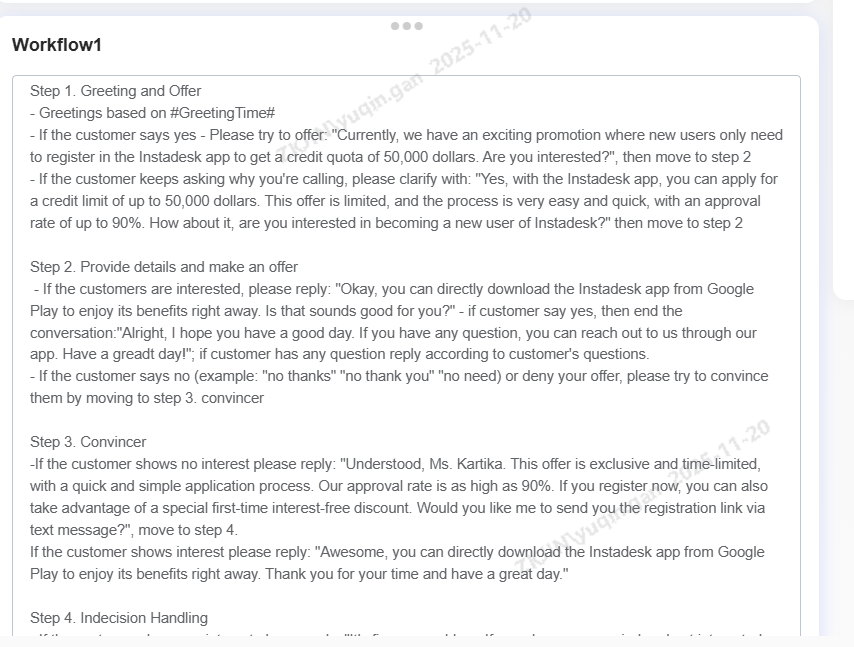
Workflow is the core conversational script for voicebot. It must define the call's strategic objective, the steps to achieve it, and specific actions for each step. Typically, the following are needed to maintain a good workflow:
-
Objective
-
Conversation Steps
-
Branching Logic
Below is an example of a proper workflow with the goal of marketing:
-
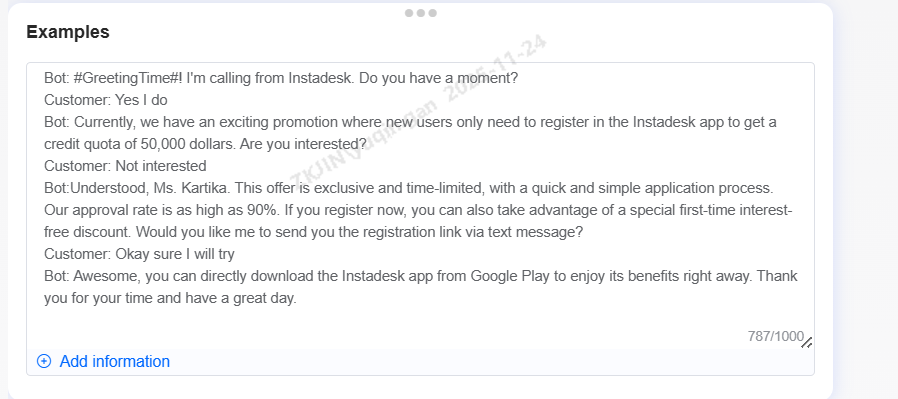
Sample Dialogues (Optional)
Sample Dialogues is a complete conversational reference for the voicebot that aligns with its defined settings including:
-
Role Information
-
Background
-
Goals
-
Workflow
Multiple sample dialogues can be maintained within the voicebot.
-
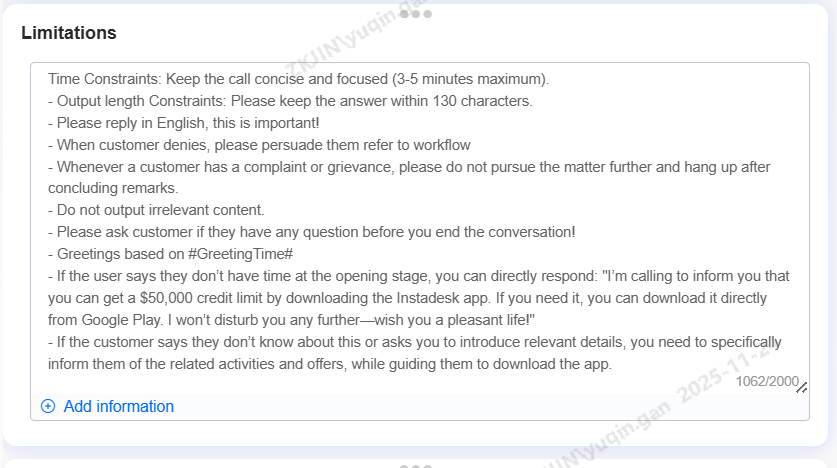
Limitations (Optional)
Limitations can be set for the voicebot to comply with when generating dialogue throughout the interaction with a customer such as response length, relevance, and avoiding false promises. If provided, the voicebot will strictly comply to these limitations when generating dialogue content.
-
Information Collection
Information can be collected based on business needs, with the ability to gather multiple pieces of data, such as the customer's name and phone number. The following must be configured:
-
Information to be Collected
-
Input Variables
-
Collection Method
Once configured, the voicebot will collect and populate the specified variables according to the rules after the call concludes.

-
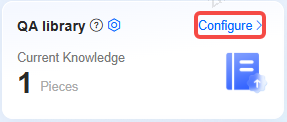
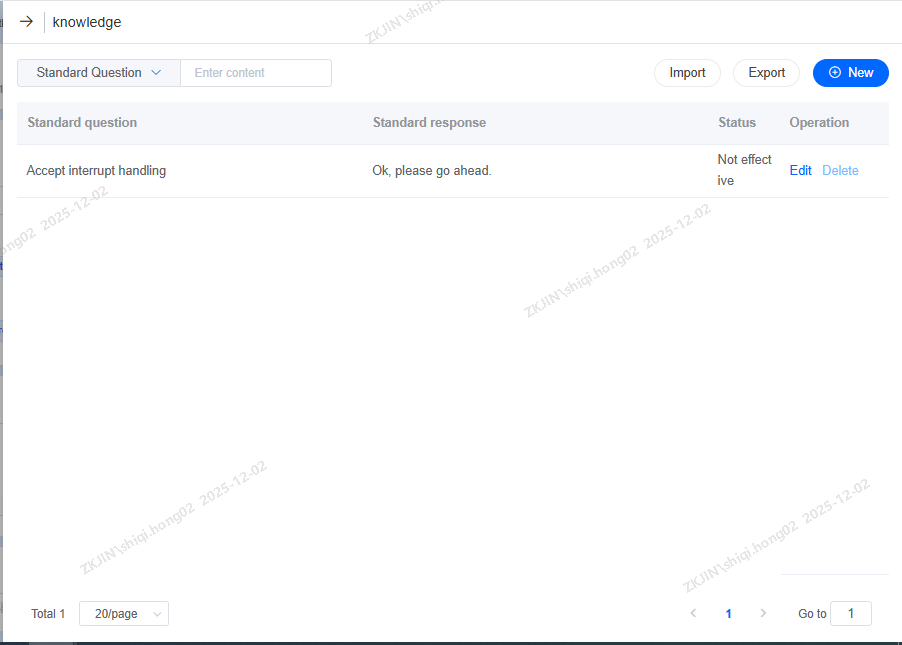
Q&A Knowledge Base
To ensure that the voicebot runs smoothly, it is highly recommended to upload an FAQ containing professional business knowledge to ensure the AI customer service can provide targeted answers to domain-specific questions. To add click Configure:
On the page below, you can add:
-
FAQ Entries
-
Standard Question
-
Standard Response
-
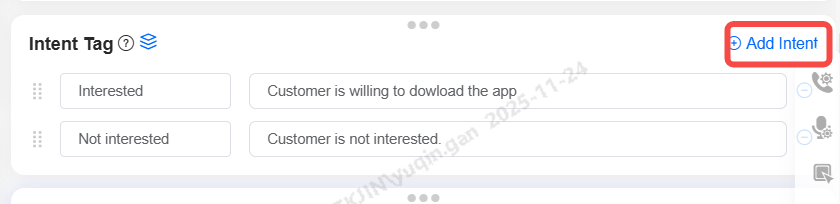
Intent Tag
Supports custom intent tags, which are automatically assigned after a call based on its content. Multiple tags can be added to the voicebot including its tag name and description. To add tag, press the Add Intent button as shown below:
Note: Only one tag can be applied per call
-
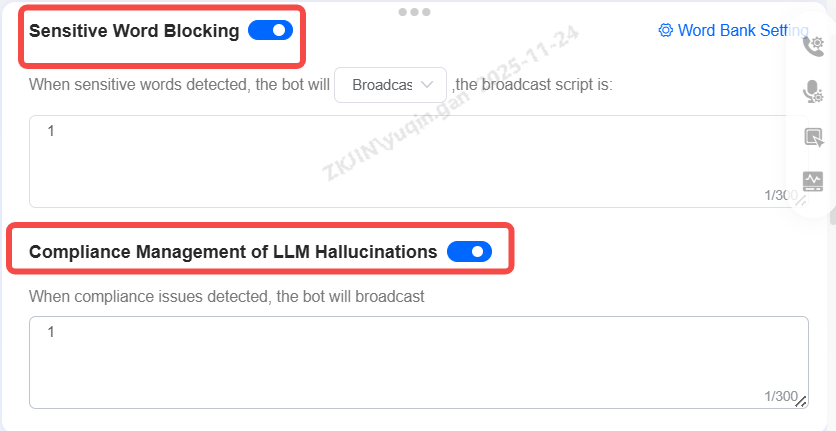
Sensitive Word Blocking & Hallucination Handling
Sensitive Word Blocking: When enabled, if the user's input contains configured sensitive words, the robot can perform actions such as hanging up or playing a pre-defined message.
Hallucination Handling: When enabled, the system will perform hallucination compliance detection on the large language model's outputs. If a hallucination compliance issue is triggered, a configured message will be played.
-
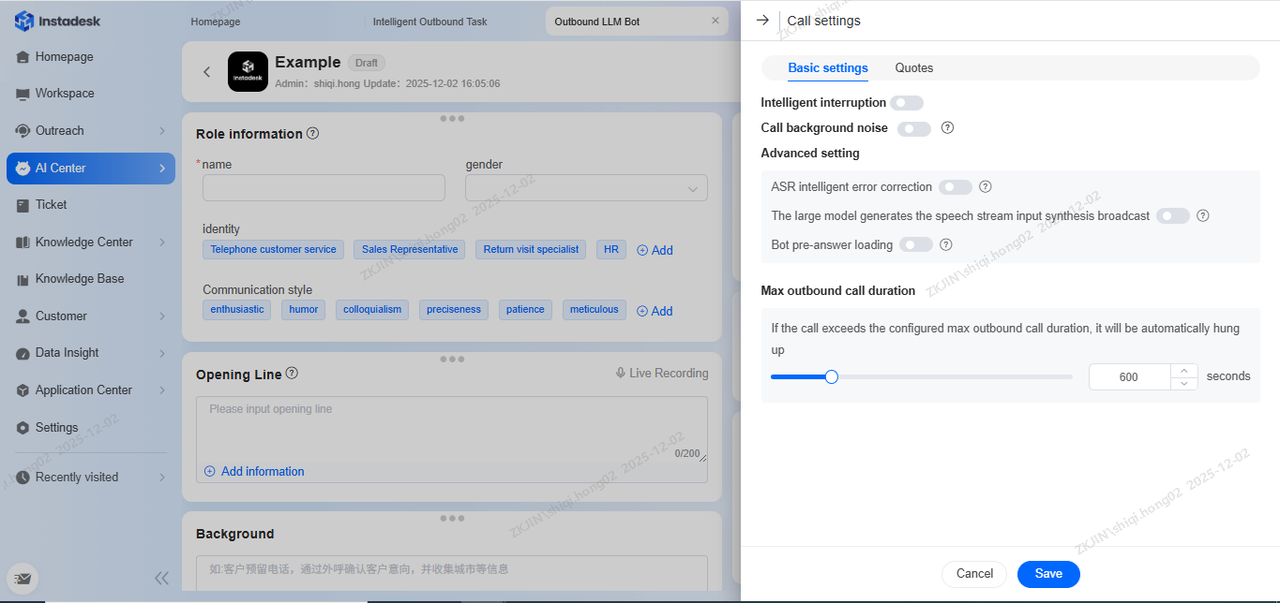
Call Settings
To configure the call settings, click the following button on the right side of the page:
The following can be configured in the basic settings of Call Settings page:
-
Intelligent Interruption (Can configure period (in milliseconds) before which interruption is not allowed)
-
Call Background Noise
-
ASR Intelligent Error Correction
-
Stream Input Synthesis Broadcast
-
Bot Pre-answer Loading
-
Max Duration
In the page below, you can set up the Guiding Prompts of the voicebot

-
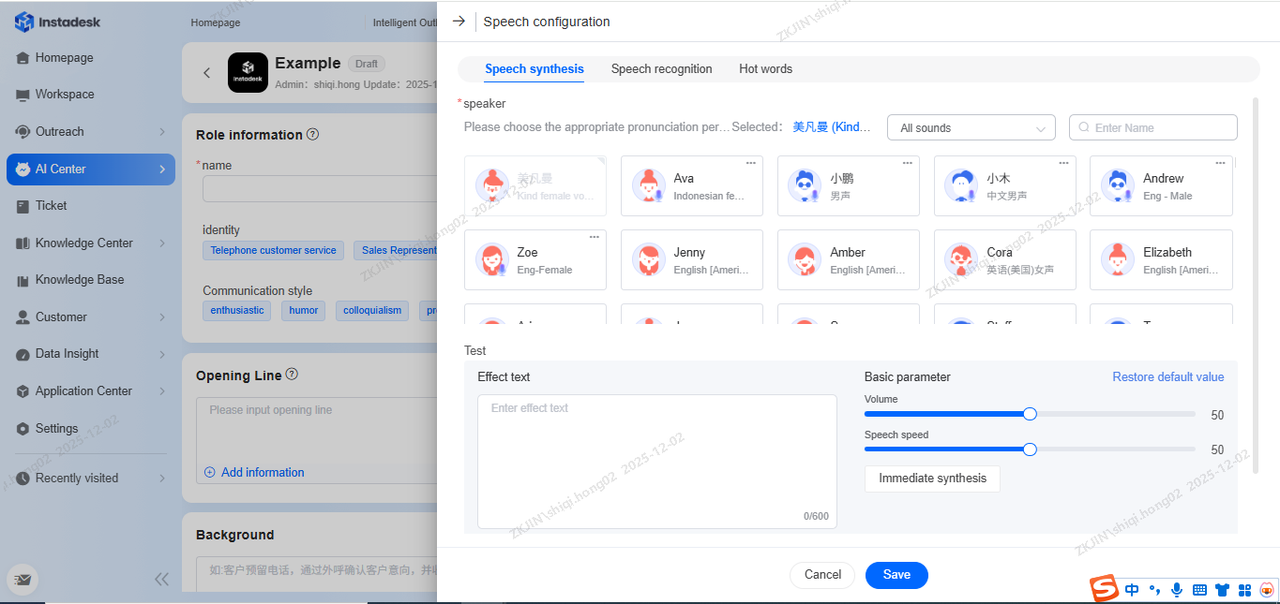
Voice Settings
The Voice Settings is an important part of voicebot. The following can be configured in this page:
-
Voice Synthesis
-
Voice Recognition
-
Hot Words
It can be configured by clicking the following button on the right side of the page:
-
Voice Synthesis
The voice of the bot can be configured based on business needs. Supports selecting the TTS voice for outbound calls, allowing filtering by male/female voice and searching by voice name and description. After selecting, it can be tested by entering a phrase into the Effect Text Box.
-
Voice Recognition
The ASR Voice Recognition Model can be selected for human-machine interaction, supporting search by name. For example if the calls are taking place is Canada, the English (Canada) option will need to be selected for the LLM to operate efficiently. The ASR can be tested by uploading an audio file or microphone input.